
Tent Wooden pole 2.5m with foot stopper and rubber ... - 2.5m to feet
1 Water Inlet and Ice2 Handle3 Left Honeycomb Panel4 Lever for Horizontal Louvers5 Water Tank6 Casters7 Horizontal Louvers8 Water Level Indicator9 Control Panel Loading Compartment10 Right Honeycomb Panel11 Continuous Water Supply Connection12 Drain Plug13 Backside Honeycomb Panel14 Power Cord & Plug15 Rear Grill Removal Screws16 Water Fill Door17 Honeycomb Cooling Media18 Water Inlet (Optional) for manual refill 1.6 OperationsControl Panel:NOTE:The speed control may be marked as High/Med/Low in certain units.Operation Instructions: Cooler Location:Place the cooler in front of an open door or window. Ensure that there is adequate cross–ventilation in the room by leaving a door or window open opposite the cooler. Following these guidelines will ensure your cooler will work as effectively as possible.Not an Air Conditioner:The evaporative air cooler is not an air conditioner as it does not use a compressor or refrigerant gas. It should not be expected to cool as efficiently as a refrigerated air conditioner. The recommended maximum relative humidity level is 60% or less, which allows a noticeable temperature decrease. The temperature decrease will be greater in drier climates because higher evaporation occurs when the humidity is low.The evaporative air cooler should not be used in enclosed spaces. It must be kept level and there must be water in the water tank. The room should have doors and windows opened to allow free airflow. The evaporative air cooler works best when placed near an open window so that outside air is drawn into the evaporative air cooler, the air circulates in the room, and then exits via the door. The maximum cooling effect is felt when a person is in the flow of air coming out of the evaporative air cooler.The evaporative air cooler can also be used to humidify dry air during cool weather. To be used for humidification the windows and doors should be closed to allow the humidified air to accumulate. The evaporative air cooler is not an air conditioner as it does not use a compressor or refrigerant gas. It should not be expected to cool as efficiently as a refrigerated air conditioner.NOTE: When the product is used for the first time the Honeycomb Cooling Media will have an odor that will dissipate in a week or so of initial use.FILL WATER:Water can be filled into the air cooler by:Water Inlet (Manually)Water / Ice can be put into the tank through the top opening. There is a hole for water to flow into the tank.Continuous water supply (Auto-Refill)Connect a garden hose to the continuous water supply inlet.Water Inlet (Manually)To refill the water tank, pull out the Water Fill Door located on the top of the unit and fill water to the Max, as indicated on the Water Level Indicator.Do not fill water above the Max water level mark.For maximum cooling performance, put ice cubes inside the Ice Loading Compartment located on the top of the Air Cooler.Filling With Water (Continuous Water Supply Connection)CAUTION Unplug from power source before fillingThis automated process eliminates the need to manually refill the water tank.Securely connect the continuous water supply connector (located on the lower left side panel) to the water supply.Turn on the water.The water tank will refill automatically.The water float valve will detect the water level and will automatically start or stop the water flow.Plug the unit into the power supply and turn the unit on.Installing Hose Adapter And Float ValveConnect the garden hose to the water supply connectorVerify that connections are secure and turn on the water.Control KnobsSpeed / On – OffConnect to the power supply and turn the Speed knob. The fan will start. Change the speed from 1 for Low to 2 for Medium to 3 for High. To switch OFF the unit turn the Speed knob to “0”.CoolTo begin cooling the desired area turn the “COOL” switch ON. The water pump will operate. You can feel the cooler air after the Honeycomb media is completely wet.SwingVertical LouversTurn the “SWING” switch ON. The louvers will begin to move from right to left automatically. Manually adjust the horizontal louvers to change vertical airflow.Horizontal LouversManually adjust the horizontal louvers to change vertical airflow.CLEANING & MAINTENANCEImportant – Please Read!The cooler is supplied with Honeycomb Cooling Media.The cleaning frequency for the Honeycomb media depends on local air and water conditions. In areas where the mineral content of water is high, mineral deposits may build up on the Honeycomb Cooling Media and restrict airflow. Draining the water reservoir and refilling it with fresh water at least once a week will help reduce mineral deposits. If mineral deposits remain on the Honeycomb media, the media should be removed and washed under fresh water. The media should be cleaned every two months or sooner, depending on your needs.Do not run the unit in COOL mode with stale water in the tank. Empty the tank and refill it with fresh water if the water has been standing in the tank for an extended period of time.For best results, allow the Honeycomb Cooling Media to dry after each use by turning off the cool function 15 minutes before turning the unit off.WARNINGBefore cleaning, turn the unit off and disconnect from the power source.Use a damp cloth to remove dirt and dust from the outside of the unit.Never use abrasive cleaners.When the unit is not in use, store it in a dry place, out of direct sunlight.Maximum water inlet pressure 0.5 MPa.Draining and Cleaning The Water TankTurn the power “off’ and disconnect the air cooler from the power supply.Move the unit to a location where it can be drained.Remove the drain plug and allow the tank to empty.Refill the water tank up to the maximum level with clean water and drain it completely.Fill the water tank and rinse at least 2-3 times before use.After cleaning ensure that the drain plug is back in place.Plug into the power supply and turn on the unit.Cleaning The Honeycomb Cooling MediaTurn off the unit, and unplug the power cord from the wall outlet.Rotate the unit facing the back panel, and locate the Grill Removal Screws. Remove the 4 screws with a screwdriver.Pull the rear grill panel, until it is completely removed.This cooler has Honeycomb cooling media on the right and left panels. The cleaning and removal procedure is the same as the rear panel.The Honeycomb cooling media can now be seen. Clean honeycomb with a clean cloth to remove all the dust & dirt particles.Once cleaning is finished, reassemble the unit.Plug into the power supply and turn on the unit.The air cooler is now ready to be used. This cleaning process should be repeated monthly to maintain the integrity of the unit and to remove particles filtered from the air.DISASSEMBLY INSTRUCTIONSWARNING – Before the following disassembly, POWER is set to OFF and disconnected the power cord.2.1 How To Change Honeycomb Cooling Media(3 sides)2.1.1 Back Panel.Use a screwdriver to remove 5 galvanized screws with plate head (ST4*12) on the back panel.Remove the back panel.2.1.2 Back Honeycomb Cooling Media.Use screwdriver to remove 4 galvanized screws with plate head(ST4*12) on the honeycomb holder.Remove the honeycomb holder.Remove the honeycomb cooling media from the back panel.2.1.3 Right Side Panel.Use a screwdriver to remove 4 galvanized screws with plate head (ST4*12) on the right-side panel.Remove the right side panel.2.1.4 Right Side Honeycomb Cooling Media.Use screwdriver to remove 4 galvanized screws with plate head(ST4*12) on the honeycomb holder.Remove the honeycomb holder.Remove the honeycomb cooling media from the right side panel.2.1.5 Left Side Panel.Use screwdriver to remove 4 galvanized screws with plate head (ST4*12) on the left side panel.Remove the left side panel.2.1.6 Left Side Honeycomb Cooling Media.Use a screwdriver to remove 4 galvanized screws with plate head(ST4*12) on the honeycomb holder.Remove the honeycomb holder.Remove the honeycomb cooling media from the left side panel.2.2 How To Change SwitchRemove the back panel and follow the procedure 2.1.1Remove the right-side panel and follow procedure 2.1.32.2.1. Switch BoxUse a screw driver to remove 4 galvanized screws with plate head(ST3*12) on the switch box.Remove switch box.2.2.2. Switch(cool/speed/swing)Use screw driver to remove 2 galvanized screws (ST3X10) on each switch of the control panel(cool/speed/swing).Cool switchSpeed switchSwing switch2.2.3. Wiring Color ConnectionWiring color connection refers to part 4.2 Wiring Color Description.2.3 How To Change Water PumpRemove the back panel and follow the procedure 2.1.1Remove the right-side panel and follow procedure 2.1.3Remove the switch box and follow the procedure 2.2.12.3.1 Water pump pipe and water pump clip.Remove the water pump pipe.Use a screw driver to remove 2 SS screws(ST4*12) on the water pump clip.2.3.2 Cool Switch And Wiring ConnectorUse a screwdriver to remove 2 galvanized screws (ST3X10) on the cool switch of the control panel.Remove the brown wire on the cool switch.Remove the wiring cap (below picture shown) to get the water pump.Note: connection is between the water pump and the N wire of the power cord.2.3.3 Water Pump Wiring ConnectionThe water pump wiring connection refers to part 4.2 Wiring Color Description.2.4 How To Change Fan MotorRemove the back panel and follow the procedure 2.1.1Remove the right-side panel and follow procedure 2.1.3Remove the switch box and follow the procedure 2.2.12.4.1 Speed Switch And Wiring Connector.Use a screwdriver to remove 2 galvanized screws (ST3X10) on the speed switch of the control panel.Remove the white/yellow/blue wire on the speed switch.Remove the wiring cap (below picture shown).Note: connection is between fan motor COM wire(black) and N wire of power cord.Remove the wiring cap (below picture shown).Note: connection is between motor and power cord earth wire.Remove the wiring cap (below picture shown).Note: connection is between the capacitor and the motor.Remove the wiring cap (below picture shown).Note: connection is between capacitor and the motor.2.4.2 Fan Blade And Fan MotorUse a screwdriver to remove 1galvanized screws (M6X14) on the fan blade.Remove the fan blade.Use a screw driver to remove 8 galvanized screws (M5X12) on fan motor to get the fanmotor.2.4.3 Main Motor Wiring ConnectionMain motor wiring connection refers to part 4.2 Wiring Color Description.2.5 How To Change Swing MotorRemove the back panel and follow the procedure 2.1.1Remove the right-side panel and follow procedure 2.1.3Remove the switch box and follow the procedure 2.2.12.5.1 Swing Switch And Wiring Connector.Use a screwdriver to remove 2 galvanized screws (ST3X10) on the swing switch of the control panel.Remove the pink wire on the swing switch.Remove the wiring cap (below picture shown).Note: connection is between swing motor and N wire of power cord.2.5.2 Swing Motor And Swing Motor Wheel.Use a screwdriver to remove 2 galvanized screws(ST4X12) on the swing motor.Remove the swing motor.Use screwdriver to remove 1 galvanized screw(ST3*8) on the swing motor wheel.Remove the swing motor wheel.Get the swing motor.2.5.3 Swing Motor Wiring ConnectionSwing motor wiring connection refers to part 4.2 Wiring Color Description.TROUBLESHOOTING GUIDE3.1 Outside DimensionsWidth: 700 mm (27.56’’)Depth: 466 mm (18.35’’)Height: 1017 mm (40.0’’)3.2 Cooling SystemHoneywell Evaporative Air Coolers are built to maximize energy efficiency and keep costs low. Warm air is drawn into the cooler through a dust and odor-reducing carbon filter and enters the Honeycomb Cooling Media. Water pumped from the tank pours over the honeycomb media. As the warm air passes through the media, the water absorbs the heat, naturally cooling and humidifying the air. A fan propels the cooled air out into the room. This no-compressor system cools naturally, efficiently and inexpensively.Troubleshooting GuideThe following troubleshooting guide is intended to address the most common symptoms and is by no means exhaustive. If symptoms persist, call a qualified service provider. Only a certified electrician should complete any electrical work. Unplug and disconnect the appliance from the power source before attempting to troubleshoot any of the following symptoms.ProblemPossible CauseSolutionNo discharge of airThe cord is not plugged in.Make sure the power cord is plugged in and the supply switch is on.The power is not on.Turn the unit ON.Humidity output minimal to noneWater is below the minimum water level in the tank.Turn off the unit.Follow the instructions to fill the water tank with clean water.The water pump is damaged.Replace the water pump according to procedure 2.3.Watercolor yellowish at initial useColor fasts from honeycomb filter.This is natural. After several uses, the watercolor will be clean.Abnormal noise inside the productThe noise of the water pump when water is not up-to-min water level. the product again.Turn off the product. Add water, and then turn onMotor or blade problem.Turn off and unplug the product or change the main motor according to procedure 2.4.Musty or unpleasant odorWhen the Cooler is new.When the unit is used for the first time, the Honeycomb Cooling Media will have an odor, which will dissipate within a few hours of initial use.Stale or stagnant water in the water tank.Drain, flush and clean the water tankMedia mildewed or clogged.Replace media according to the procedure 2.1.Not coolingPump is not turned on.Check the water level and turn on the pump.Low or no water.Damaged water pump.Replace the water pump according to procedure 2.3.SCHEMATIC DIAGRAM4.1 Wiring Diagram4.2 Wiring Color DescriptionPower Cord:(1) Brown(2) Blue(3) Green + YellowLiveNeutralEarth (Ground)to speed switch(4)motor COM(black)to motor earthMain Motor:(1) White(2) Yellow(3) Blue(4) Black(5) Red(6) Brown(7) Green + YellowHigh speedMedium speedLow speedNeutralEarth (Ground)to speed switch(1)to speed switch(2)to speed switch(3)to N wire of power cordto the capacitor by end-closed connectorto the capacitor by end-closed connectorto power cord earthWater Pump:(1) Brown(2) Blueto pump control switch(1)to N wire of power cordSwing Motor:(1) Pink(2) Pinkto swing control switch(1)to N wire of power cordEXPLODED VIEWREPLACEMENT PARTS LISTSrPART NAMEQUANTITY1Up/Down swing knob22Swing knob pressboard13Horizontal louver 124Horizontal louver 225Horizontal louver 326Horizontal louver 427Horizontal louver 528Horizontal louver middle link19Horizontal louver press board A210Horizontal louver link A211Horizontal louver press board B212Horizontal louver link B213Swing/Cool knob214Speed knob115Control plane116Swing/Cool switch217Speed switch118Air outlet panel119Front panel120Rubber washer2021Vertical louver base422Short vertical louver223Long vertical louver224Switch box125Side panel226Side honeycomb pad227Side water distributor cover228Side water distributor229Side honeycomb pad holder430Swing motor131Swing motor wheel132Vertical louver drive133Base of fan motor frame234Fan motor frame435Fan blade assembly136Fan motor137Top cover138Water fill door139Four directions pipe140Back water distributor tube141Left/Right water distributor tube242Water fill door link243Back water distributor144Back water distributor cover145Left stand pillar146Back honeycomb pad holder247Back honeycomb pad148Back panel149Right stand pillar150Motor capacitor151Suction pipe152Water fill pipe153Float cap154Float holder155Float tube156Water level board157Vertical louver link158Water tank159Water pump160Water pump clip161Continuous water supply connection162Castor263Castor with brake264Water drainage plug165Silica gel ring1CONFIDENTIALWebsite: http://www.honeywellaircoolers.comDownloaded from www.Manualslib.com manuals search engineDocuments / ResourcesHoneywell CO60PM Evaporative Air Cooler [pdf] Instruction ManualCO60PM, Evaporative Air Cooler, CO60PM Evaporative Air Cooler, Air Cooler, CoolerReferencesUser ManualRelated PostsEvaporative Air Cooler With Humidifier SF-615H User ManualEvaporative Air Cooler With Humidifier SF-615H User Manual - Optimized PDF Evaporative Air Cooler With Humidifier SF-615H User…Honeywell TC10PM Series Portable Evaporative Air Cooler User ManualHoneywell TC10PM Series Portable Evaporative Air Cooler Portable Evaporative Air Cooler User Manual Read and save these instructions…kogan KAPMNCL4BA Mini Evaporative Air Cooler User Guidekogan KAPMNCL4BA Mini Evaporative Air Cooler SAFETY & WARNINGS Ensure to read this user guide prior to first…COOLER MASTER Hyper T200 CPU Air Cooler User ManualCOOLER MASTER Hyper T200 CPU Air Cooler IN THE BOX INTEL & AMD AMD AM4/AM3+/AM3/AM2+/AM2/FM2+/FM2/FM1 Intel - LGA1151/1150/1155/1156/1366/775…
WARNING – This appliance is intended for use outdoors, in the home, or in office environments. Any other use is not recommended by the manufacturer and may cause fire, electrical shocks, or injury to a person or property.When using electrical appliances, basic safety precautions should always be followed:Your cooler should run on 120V Volt AC, 50 Hz current only.Check the household voltage to ensure it matches the appliance’s rate specification.Before operating the product remove it from its packaging and check it is in good condition.If the supply cord is damaged, it must be replaced by the manufacturer, its service agent or similarly qualified persons in order to avoid a hazard.DO NOT operate any product with a damaged cord or plug.DO NOT use an extension cord with this appliance.DO NOT run power cord under carpeting, or cover with rugs or runners. Arrange the cord away from areas where it may be tripped over.Unplug the appliance during filling and cleaning.Always unplug the appliance from the power source before servicing or removing the unit.Disconnect the power supply before servicing or cleaning operation.Remove the power cord from the electrical receptacle by grasping and pulling on the power cord plug-end only, never from the cord.DO NOT use the product in areas where gasoline, paint or other flammable goods and objects are stored.When using the ‘’COOL’’ setting, please check the water indicator level to ensure it is above the minimum water level. Operation of this unit on the ‘’COOL’’ setting on or below minimum water level could result in damage to the water pump.DO NOT attempt repair or adjustment to any electrical or mechanical functions of the cooler.Verify that the voltage power source matches the appliance’s electrical specifications. The improper voltage will burn out the blower/fan, oscillating, and/or pump motor windings and will void the warranty.DO NOT cover the air inlet or outlet on the appliance as this may cause motor damage.DO NOT insert or allow objects to enter any ventilation, exhaust opening, or water tank as this may damage the product and could cause an electrical shock or fire.DO NOT operate with media removed as this will overload and damage the motor.To reduce the risk of fire or electric shock, do not use this fan with any solid-state speed control device.DO NOT leave the appliance operating unattended for any extended period of time.This appliance is not intended for use by persons (including children or the elderly) with reduced physical, sensory or mental capabilities, or lack of experience and knowledge unless they have been given supervision or instruction concerning the use of the appliance by a person responsible for their safety.DO NOT let children play with any appliance packaging or plastic bags. Injury may resultfrom such practice.Children should be supervised to ensure that they do not play with the appliance.If the unit is damaged or it malfunctions, do not continue to operate it.Place the unit on the floor only.This product is not intended for use in wet or damp locations. Never locate the product where it may fall into a bathtub or other water container. DO NOT use in bathrooms. When it is not in use always store in a dry area.Don’t use indoor extension cords outside. Look for extension cords specifically marked for outdoor use. Look for extension cords that have a GFCI (Ground Fault Circuit Interrupter) built in.Make sure the amperage rating for the extension cord is higher than the amperage rating for the appliance. Check labels and owner’s manuals on the appliance and the extension cord for amperage ratings.Power cords have to be contained. If they must run along the ground, make sure every inch of them is secured so they will not be tripped over.The wiring and connections must be waterproof. Be sure the connections (to the air cooler) never get wet. Your unit is waterproof, but everything attached to it must be waterproof, too.Set up your unit so it cannot be tripped over or wobble loose. It must rest on solid support.NOTE: OPERATE THE UNIT WHEN THE WATER TANK IS FILLED WITH CLEAN WATER1.5 Parts Description1 Water Inlet and Ice2 Handle3 Left Honeycomb Panel4 Lever for Horizontal Louvers5 Water Tank6 Casters7 Horizontal Louvers8 Water Level Indicator9 Control Panel Loading Compartment10 Right Honeycomb Panel11 Continuous Water Supply Connection12 Drain Plug13 Backside Honeycomb Panel14 Power Cord & Plug15 Rear Grill Removal Screws16 Water Fill Door17 Honeycomb Cooling Media18 Water Inlet (Optional) for manual refill 1.6 OperationsControl Panel:NOTE:The speed control may be marked as High/Med/Low in certain units.Operation Instructions: Cooler Location:Place the cooler in front of an open door or window. Ensure that there is adequate cross–ventilation in the room by leaving a door or window open opposite the cooler. Following these guidelines will ensure your cooler will work as effectively as possible.Not an Air Conditioner:The evaporative air cooler is not an air conditioner as it does not use a compressor or refrigerant gas. It should not be expected to cool as efficiently as a refrigerated air conditioner. The recommended maximum relative humidity level is 60% or less, which allows a noticeable temperature decrease. The temperature decrease will be greater in drier climates because higher evaporation occurs when the humidity is low.The evaporative air cooler should not be used in enclosed spaces. It must be kept level and there must be water in the water tank. The room should have doors and windows opened to allow free airflow. The evaporative air cooler works best when placed near an open window so that outside air is drawn into the evaporative air cooler, the air circulates in the room, and then exits via the door. The maximum cooling effect is felt when a person is in the flow of air coming out of the evaporative air cooler.The evaporative air cooler can also be used to humidify dry air during cool weather. To be used for humidification the windows and doors should be closed to allow the humidified air to accumulate. The evaporative air cooler is not an air conditioner as it does not use a compressor or refrigerant gas. It should not be expected to cool as efficiently as a refrigerated air conditioner.NOTE: When the product is used for the first time the Honeycomb Cooling Media will have an odor that will dissipate in a week or so of initial use.FILL WATER:Water can be filled into the air cooler by:Water Inlet (Manually)Water / Ice can be put into the tank through the top opening. There is a hole for water to flow into the tank.Continuous water supply (Auto-Refill)Connect a garden hose to the continuous water supply inlet.Water Inlet (Manually)To refill the water tank, pull out the Water Fill Door located on the top of the unit and fill water to the Max, as indicated on the Water Level Indicator.Do not fill water above the Max water level mark.For maximum cooling performance, put ice cubes inside the Ice Loading Compartment located on the top of the Air Cooler.Filling With Water (Continuous Water Supply Connection)CAUTION Unplug from power source before fillingThis automated process eliminates the need to manually refill the water tank.Securely connect the continuous water supply connector (located on the lower left side panel) to the water supply.Turn on the water.The water tank will refill automatically.The water float valve will detect the water level and will automatically start or stop the water flow.Plug the unit into the power supply and turn the unit on.Installing Hose Adapter And Float ValveConnect the garden hose to the water supply connectorVerify that connections are secure and turn on the water.Control KnobsSpeed / On – OffConnect to the power supply and turn the Speed knob. The fan will start. Change the speed from 1 for Low to 2 for Medium to 3 for High. To switch OFF the unit turn the Speed knob to “0”.CoolTo begin cooling the desired area turn the “COOL” switch ON. The water pump will operate. You can feel the cooler air after the Honeycomb media is completely wet.SwingVertical LouversTurn the “SWING” switch ON. The louvers will begin to move from right to left automatically. Manually adjust the horizontal louvers to change vertical airflow.Horizontal LouversManually adjust the horizontal louvers to change vertical airflow.CLEANING & MAINTENANCEImportant – Please Read!The cooler is supplied with Honeycomb Cooling Media.The cleaning frequency for the Honeycomb media depends on local air and water conditions. In areas where the mineral content of water is high, mineral deposits may build up on the Honeycomb Cooling Media and restrict airflow. Draining the water reservoir and refilling it with fresh water at least once a week will help reduce mineral deposits. If mineral deposits remain on the Honeycomb media, the media should be removed and washed under fresh water. The media should be cleaned every two months or sooner, depending on your needs.Do not run the unit in COOL mode with stale water in the tank. Empty the tank and refill it with fresh water if the water has been standing in the tank for an extended period of time.For best results, allow the Honeycomb Cooling Media to dry after each use by turning off the cool function 15 minutes before turning the unit off.WARNINGBefore cleaning, turn the unit off and disconnect from the power source.Use a damp cloth to remove dirt and dust from the outside of the unit.Never use abrasive cleaners.When the unit is not in use, store it in a dry place, out of direct sunlight.Maximum water inlet pressure 0.5 MPa.Draining and Cleaning The Water TankTurn the power “off’ and disconnect the air cooler from the power supply.Move the unit to a location where it can be drained.Remove the drain plug and allow the tank to empty.Refill the water tank up to the maximum level with clean water and drain it completely.Fill the water tank and rinse at least 2-3 times before use.After cleaning ensure that the drain plug is back in place.Plug into the power supply and turn on the unit.Cleaning The Honeycomb Cooling MediaTurn off the unit, and unplug the power cord from the wall outlet.Rotate the unit facing the back panel, and locate the Grill Removal Screws. Remove the 4 screws with a screwdriver.Pull the rear grill panel, until it is completely removed.This cooler has Honeycomb cooling media on the right and left panels. The cleaning and removal procedure is the same as the rear panel.The Honeycomb cooling media can now be seen. Clean honeycomb with a clean cloth to remove all the dust & dirt particles.Once cleaning is finished, reassemble the unit.Plug into the power supply and turn on the unit.The air cooler is now ready to be used. This cleaning process should be repeated monthly to maintain the integrity of the unit and to remove particles filtered from the air.DISASSEMBLY INSTRUCTIONSWARNING – Before the following disassembly, POWER is set to OFF and disconnected the power cord.2.1 How To Change Honeycomb Cooling Media(3 sides)2.1.1 Back Panel.Use a screwdriver to remove 5 galvanized screws with plate head (ST4*12) on the back panel.Remove the back panel.2.1.2 Back Honeycomb Cooling Media.Use screwdriver to remove 4 galvanized screws with plate head(ST4*12) on the honeycomb holder.Remove the honeycomb holder.Remove the honeycomb cooling media from the back panel.2.1.3 Right Side Panel.Use a screwdriver to remove 4 galvanized screws with plate head (ST4*12) on the right-side panel.Remove the right side panel.2.1.4 Right Side Honeycomb Cooling Media.Use screwdriver to remove 4 galvanized screws with plate head(ST4*12) on the honeycomb holder.Remove the honeycomb holder.Remove the honeycomb cooling media from the right side panel.2.1.5 Left Side Panel.Use screwdriver to remove 4 galvanized screws with plate head (ST4*12) on the left side panel.Remove the left side panel.2.1.6 Left Side Honeycomb Cooling Media.Use a screwdriver to remove 4 galvanized screws with plate head(ST4*12) on the honeycomb holder.Remove the honeycomb holder.Remove the honeycomb cooling media from the left side panel.2.2 How To Change SwitchRemove the back panel and follow the procedure 2.1.1Remove the right-side panel and follow procedure 2.1.32.2.1. Switch BoxUse a screw driver to remove 4 galvanized screws with plate head(ST3*12) on the switch box.Remove switch box.2.2.2. Switch(cool/speed/swing)Use screw driver to remove 2 galvanized screws (ST3X10) on each switch of the control panel(cool/speed/swing).Cool switchSpeed switchSwing switch2.2.3. Wiring Color ConnectionWiring color connection refers to part 4.2 Wiring Color Description.2.3 How To Change Water PumpRemove the back panel and follow the procedure 2.1.1Remove the right-side panel and follow procedure 2.1.3Remove the switch box and follow the procedure 2.2.12.3.1 Water pump pipe and water pump clip.Remove the water pump pipe.Use a screw driver to remove 2 SS screws(ST4*12) on the water pump clip.2.3.2 Cool Switch And Wiring ConnectorUse a screwdriver to remove 2 galvanized screws (ST3X10) on the cool switch of the control panel.Remove the brown wire on the cool switch.Remove the wiring cap (below picture shown) to get the water pump.Note: connection is between the water pump and the N wire of the power cord.2.3.3 Water Pump Wiring ConnectionThe water pump wiring connection refers to part 4.2 Wiring Color Description.2.4 How To Change Fan MotorRemove the back panel and follow the procedure 2.1.1Remove the right-side panel and follow procedure 2.1.3Remove the switch box and follow the procedure 2.2.12.4.1 Speed Switch And Wiring Connector.Use a screwdriver to remove 2 galvanized screws (ST3X10) on the speed switch of the control panel.Remove the white/yellow/blue wire on the speed switch.Remove the wiring cap (below picture shown).Note: connection is between fan motor COM wire(black) and N wire of power cord.Remove the wiring cap (below picture shown).Note: connection is between motor and power cord earth wire.Remove the wiring cap (below picture shown).Note: connection is between the capacitor and the motor.Remove the wiring cap (below picture shown).Note: connection is between capacitor and the motor.2.4.2 Fan Blade And Fan MotorUse a screwdriver to remove 1galvanized screws (M6X14) on the fan blade.Remove the fan blade.Use a screw driver to remove 8 galvanized screws (M5X12) on fan motor to get the fanmotor.2.4.3 Main Motor Wiring ConnectionMain motor wiring connection refers to part 4.2 Wiring Color Description.2.5 How To Change Swing MotorRemove the back panel and follow the procedure 2.1.1Remove the right-side panel and follow procedure 2.1.3Remove the switch box and follow the procedure 2.2.12.5.1 Swing Switch And Wiring Connector.Use a screwdriver to remove 2 galvanized screws (ST3X10) on the swing switch of the control panel.Remove the pink wire on the swing switch.Remove the wiring cap (below picture shown).Note: connection is between swing motor and N wire of power cord.2.5.2 Swing Motor And Swing Motor Wheel.Use a screwdriver to remove 2 galvanized screws(ST4X12) on the swing motor.Remove the swing motor.Use screwdriver to remove 1 galvanized screw(ST3*8) on the swing motor wheel.Remove the swing motor wheel.Get the swing motor.2.5.3 Swing Motor Wiring ConnectionSwing motor wiring connection refers to part 4.2 Wiring Color Description.TROUBLESHOOTING GUIDE3.1 Outside DimensionsWidth: 700 mm (27.56’’)Depth: 466 mm (18.35’’)Height: 1017 mm (40.0’’)3.2 Cooling SystemHoneywell Evaporative Air Coolers are built to maximize energy efficiency and keep costs low. Warm air is drawn into the cooler through a dust and odor-reducing carbon filter and enters the Honeycomb Cooling Media. Water pumped from the tank pours over the honeycomb media. As the warm air passes through the media, the water absorbs the heat, naturally cooling and humidifying the air. A fan propels the cooled air out into the room. This no-compressor system cools naturally, efficiently and inexpensively.Troubleshooting GuideThe following troubleshooting guide is intended to address the most common symptoms and is by no means exhaustive. If symptoms persist, call a qualified service provider. Only a certified electrician should complete any electrical work. Unplug and disconnect the appliance from the power source before attempting to troubleshoot any of the following symptoms.ProblemPossible CauseSolutionNo discharge of airThe cord is not plugged in.Make sure the power cord is plugged in and the supply switch is on.The power is not on.Turn the unit ON.Humidity output minimal to noneWater is below the minimum water level in the tank.Turn off the unit.Follow the instructions to fill the water tank with clean water.The water pump is damaged.Replace the water pump according to procedure 2.3.Watercolor yellowish at initial useColor fasts from honeycomb filter.This is natural. After several uses, the watercolor will be clean.Abnormal noise inside the productThe noise of the water pump when water is not up-to-min water level. the product again.Turn off the product. Add water, and then turn onMotor or blade problem.Turn off and unplug the product or change the main motor according to procedure 2.4.Musty or unpleasant odorWhen the Cooler is new.When the unit is used for the first time, the Honeycomb Cooling Media will have an odor, which will dissipate within a few hours of initial use.Stale or stagnant water in the water tank.Drain, flush and clean the water tankMedia mildewed or clogged.Replace media according to the procedure 2.1.Not coolingPump is not turned on.Check the water level and turn on the pump.Low or no water.Damaged water pump.Replace the water pump according to procedure 2.3.SCHEMATIC DIAGRAM4.1 Wiring Diagram4.2 Wiring Color DescriptionPower Cord:(1) Brown(2) Blue(3) Green + YellowLiveNeutralEarth (Ground)to speed switch(4)motor COM(black)to motor earthMain Motor:(1) White(2) Yellow(3) Blue(4) Black(5) Red(6) Brown(7) Green + YellowHigh speedMedium speedLow speedNeutralEarth (Ground)to speed switch(1)to speed switch(2)to speed switch(3)to N wire of power cordto the capacitor by end-closed connectorto the capacitor by end-closed connectorto power cord earthWater Pump:(1) Brown(2) Blueto pump control switch(1)to N wire of power cordSwing Motor:(1) Pink(2) Pinkto swing control switch(1)to N wire of power cordEXPLODED VIEWREPLACEMENT PARTS LISTSrPART NAMEQUANTITY1Up/Down swing knob22Swing knob pressboard13Horizontal louver 124Horizontal louver 225Horizontal louver 326Horizontal louver 427Horizontal louver 528Horizontal louver middle link19Horizontal louver press board A210Horizontal louver link A211Horizontal louver press board B212Horizontal louver link B213Swing/Cool knob214Speed knob115Control plane116Swing/Cool switch217Speed switch118Air outlet panel119Front panel120Rubber washer2021Vertical louver base422Short vertical louver223Long vertical louver224Switch box125Side panel226Side honeycomb pad227Side water distributor cover228Side water distributor229Side honeycomb pad holder430Swing motor131Swing motor wheel132Vertical louver drive133Base of fan motor frame234Fan motor frame435Fan blade assembly136Fan motor137Top cover138Water fill door139Four directions pipe140Back water distributor tube141Left/Right water distributor tube242Water fill door link243Back water distributor144Back water distributor cover145Left stand pillar146Back honeycomb pad holder247Back honeycomb pad148Back panel149Right stand pillar150Motor capacitor151Suction pipe152Water fill pipe153Float cap154Float holder155Float tube156Water level board157Vertical louver link158Water tank159Water pump160Water pump clip161Continuous water supply connection162Castor263Castor with brake264Water drainage plug165Silica gel ring1CONFIDENTIALWebsite: http://www.honeywellaircoolers.comDownloaded from www.Manualslib.com manuals search engineDocuments / ResourcesHoneywell CO60PM Evaporative Air Cooler [pdf] Instruction ManualCO60PM, Evaporative Air Cooler, CO60PM Evaporative Air Cooler, Air Cooler, CoolerReferencesUser ManualRelated PostsEvaporative Air Cooler With Humidifier SF-615H User ManualEvaporative Air Cooler With Humidifier SF-615H User Manual - Optimized PDF Evaporative Air Cooler With Humidifier SF-615H User…Honeywell TC10PM Series Portable Evaporative Air Cooler User ManualHoneywell TC10PM Series Portable Evaporative Air Cooler Portable Evaporative Air Cooler User Manual Read and save these instructions…kogan KAPMNCL4BA Mini Evaporative Air Cooler User Guidekogan KAPMNCL4BA Mini Evaporative Air Cooler SAFETY & WARNINGS Ensure to read this user guide prior to first…COOLER MASTER Hyper T200 CPU Air Cooler User ManualCOOLER MASTER Hyper T200 CPU Air Cooler IN THE BOX INTEL & AMD AMD AM4/AM3+/AM3/AM2+/AM2/FM2+/FM2/FM1 Intel - LGA1151/1150/1155/1156/1366/775…
CoolTo begin cooling the desired area turn the “COOL” switch ON. The water pump will operate. You can feel the cooler air after the Honeycomb media is completely wet.
Evaporative Air Cooler With Humidifier SF-615H User Manual - Optimized PDF Evaporative Air Cooler With Humidifier SF-615H User…
Normally a software license is applied to the server via the n4ce License Manager app, which can apply the V2C file provided by Applications in CADD Ltd.
Honeywell TC10PM Series Portable Evaporative Air Cooler Portable Evaporative Air Cooler User Manual Read and save these instructions…
Not an Air Conditioner:The evaporative air cooler is not an air conditioner as it does not use a compressor or refrigerant gas. It should not be expected to cool as efficiently as a refrigerated air conditioner. The recommended maximum relative humidity level is 60% or less, which allows a noticeable temperature decrease. The temperature decrease will be greater in drier climates because higher evaporation occurs when the humidity is low.The evaporative air cooler should not be used in enclosed spaces. It must be kept level and there must be water in the water tank. The room should have doors and windows opened to allow free airflow. The evaporative air cooler works best when placed near an open window so that outside air is drawn into the evaporative air cooler, the air circulates in the room, and then exits via the door. The maximum cooling effect is felt when a person is in the flow of air coming out of the evaporative air cooler.The evaporative air cooler can also be used to humidify dry air during cool weather. To be used for humidification the windows and doors should be closed to allow the humidified air to accumulate. The evaporative air cooler is not an air conditioner as it does not use a compressor or refrigerant gas. It should not be expected to cool as efficiently as a refrigerated air conditioner.NOTE: When the product is used for the first time the Honeycomb Cooling Media will have an odor that will dissipate in a week or so of initial use.FILL WATER:Water can be filled into the air cooler by:Water Inlet (Manually)Water / Ice can be put into the tank through the top opening. There is a hole for water to flow into the tank.Continuous water supply (Auto-Refill)Connect a garden hose to the continuous water supply inlet.Water Inlet (Manually)To refill the water tank, pull out the Water Fill Door located on the top of the unit and fill water to the Max, as indicated on the Water Level Indicator.Do not fill water above the Max water level mark.For maximum cooling performance, put ice cubes inside the Ice Loading Compartment located on the top of the Air Cooler.Filling With Water (Continuous Water Supply Connection)CAUTION Unplug from power source before fillingThis automated process eliminates the need to manually refill the water tank.Securely connect the continuous water supply connector (located on the lower left side panel) to the water supply.Turn on the water.The water tank will refill automatically.The water float valve will detect the water level and will automatically start or stop the water flow.Plug the unit into the power supply and turn the unit on.Installing Hose Adapter And Float ValveConnect the garden hose to the water supply connectorVerify that connections are secure and turn on the water.Control KnobsSpeed / On – OffConnect to the power supply and turn the Speed knob. The fan will start. Change the speed from 1 for Low to 2 for Medium to 3 for High. To switch OFF the unit turn the Speed knob to “0”.CoolTo begin cooling the desired area turn the “COOL” switch ON. The water pump will operate. You can feel the cooler air after the Honeycomb media is completely wet.SwingVertical LouversTurn the “SWING” switch ON. The louvers will begin to move from right to left automatically. Manually adjust the horizontal louvers to change vertical airflow.Horizontal LouversManually adjust the horizontal louvers to change vertical airflow.CLEANING & MAINTENANCEImportant – Please Read!The cooler is supplied with Honeycomb Cooling Media.The cleaning frequency for the Honeycomb media depends on local air and water conditions. In areas where the mineral content of water is high, mineral deposits may build up on the Honeycomb Cooling Media and restrict airflow. Draining the water reservoir and refilling it with fresh water at least once a week will help reduce mineral deposits. If mineral deposits remain on the Honeycomb media, the media should be removed and washed under fresh water. The media should be cleaned every two months or sooner, depending on your needs.Do not run the unit in COOL mode with stale water in the tank. Empty the tank and refill it with fresh water if the water has been standing in the tank for an extended period of time.For best results, allow the Honeycomb Cooling Media to dry after each use by turning off the cool function 15 minutes before turning the unit off.WARNINGBefore cleaning, turn the unit off and disconnect from the power source.Use a damp cloth to remove dirt and dust from the outside of the unit.Never use abrasive cleaners.When the unit is not in use, store it in a dry place, out of direct sunlight.Maximum water inlet pressure 0.5 MPa.Draining and Cleaning The Water TankTurn the power “off’ and disconnect the air cooler from the power supply.Move the unit to a location where it can be drained.Remove the drain plug and allow the tank to empty.Refill the water tank up to the maximum level with clean water and drain it completely.Fill the water tank and rinse at least 2-3 times before use.After cleaning ensure that the drain plug is back in place.Plug into the power supply and turn on the unit.Cleaning The Honeycomb Cooling MediaTurn off the unit, and unplug the power cord from the wall outlet.Rotate the unit facing the back panel, and locate the Grill Removal Screws. Remove the 4 screws with a screwdriver.Pull the rear grill panel, until it is completely removed.This cooler has Honeycomb cooling media on the right and left panels. The cleaning and removal procedure is the same as the rear panel.The Honeycomb cooling media can now be seen. Clean honeycomb with a clean cloth to remove all the dust & dirt particles.Once cleaning is finished, reassemble the unit.Plug into the power supply and turn on the unit.The air cooler is now ready to be used. This cleaning process should be repeated monthly to maintain the integrity of the unit and to remove particles filtered from the air.DISASSEMBLY INSTRUCTIONSWARNING – Before the following disassembly, POWER is set to OFF and disconnected the power cord.2.1 How To Change Honeycomb Cooling Media(3 sides)2.1.1 Back Panel.Use a screwdriver to remove 5 galvanized screws with plate head (ST4*12) on the back panel.Remove the back panel.2.1.2 Back Honeycomb Cooling Media.Use screwdriver to remove 4 galvanized screws with plate head(ST4*12) on the honeycomb holder.Remove the honeycomb holder.Remove the honeycomb cooling media from the back panel.2.1.3 Right Side Panel.Use a screwdriver to remove 4 galvanized screws with plate head (ST4*12) on the right-side panel.Remove the right side panel.2.1.4 Right Side Honeycomb Cooling Media.Use screwdriver to remove 4 galvanized screws with plate head(ST4*12) on the honeycomb holder.Remove the honeycomb holder.Remove the honeycomb cooling media from the right side panel.2.1.5 Left Side Panel.Use screwdriver to remove 4 galvanized screws with plate head (ST4*12) on the left side panel.Remove the left side panel.2.1.6 Left Side Honeycomb Cooling Media.Use a screwdriver to remove 4 galvanized screws with plate head(ST4*12) on the honeycomb holder.Remove the honeycomb holder.Remove the honeycomb cooling media from the left side panel.2.2 How To Change SwitchRemove the back panel and follow the procedure 2.1.1Remove the right-side panel and follow procedure 2.1.32.2.1. Switch BoxUse a screw driver to remove 4 galvanized screws with plate head(ST3*12) on the switch box.Remove switch box.2.2.2. Switch(cool/speed/swing)Use screw driver to remove 2 galvanized screws (ST3X10) on each switch of the control panel(cool/speed/swing).Cool switchSpeed switchSwing switch2.2.3. Wiring Color ConnectionWiring color connection refers to part 4.2 Wiring Color Description.2.3 How To Change Water PumpRemove the back panel and follow the procedure 2.1.1Remove the right-side panel and follow procedure 2.1.3Remove the switch box and follow the procedure 2.2.12.3.1 Water pump pipe and water pump clip.Remove the water pump pipe.Use a screw driver to remove 2 SS screws(ST4*12) on the water pump clip.2.3.2 Cool Switch And Wiring ConnectorUse a screwdriver to remove 2 galvanized screws (ST3X10) on the cool switch of the control panel.Remove the brown wire on the cool switch.Remove the wiring cap (below picture shown) to get the water pump.Note: connection is between the water pump and the N wire of the power cord.2.3.3 Water Pump Wiring ConnectionThe water pump wiring connection refers to part 4.2 Wiring Color Description.2.4 How To Change Fan MotorRemove the back panel and follow the procedure 2.1.1Remove the right-side panel and follow procedure 2.1.3Remove the switch box and follow the procedure 2.2.12.4.1 Speed Switch And Wiring Connector.Use a screwdriver to remove 2 galvanized screws (ST3X10) on the speed switch of the control panel.Remove the white/yellow/blue wire on the speed switch.Remove the wiring cap (below picture shown).Note: connection is between fan motor COM wire(black) and N wire of power cord.Remove the wiring cap (below picture shown).Note: connection is between motor and power cord earth wire.Remove the wiring cap (below picture shown).Note: connection is between the capacitor and the motor.Remove the wiring cap (below picture shown).Note: connection is between capacitor and the motor.2.4.2 Fan Blade And Fan MotorUse a screwdriver to remove 1galvanized screws (M6X14) on the fan blade.Remove the fan blade.Use a screw driver to remove 8 galvanized screws (M5X12) on fan motor to get the fanmotor.2.4.3 Main Motor Wiring ConnectionMain motor wiring connection refers to part 4.2 Wiring Color Description.2.5 How To Change Swing MotorRemove the back panel and follow the procedure 2.1.1Remove the right-side panel and follow procedure 2.1.3Remove the switch box and follow the procedure 2.2.12.5.1 Swing Switch And Wiring Connector.Use a screwdriver to remove 2 galvanized screws (ST3X10) on the swing switch of the control panel.Remove the pink wire on the swing switch.Remove the wiring cap (below picture shown).Note: connection is between swing motor and N wire of power cord.2.5.2 Swing Motor And Swing Motor Wheel.Use a screwdriver to remove 2 galvanized screws(ST4X12) on the swing motor.Remove the swing motor.Use screwdriver to remove 1 galvanized screw(ST3*8) on the swing motor wheel.Remove the swing motor wheel.Get the swing motor.2.5.3 Swing Motor Wiring ConnectionSwing motor wiring connection refers to part 4.2 Wiring Color Description.TROUBLESHOOTING GUIDE3.1 Outside DimensionsWidth: 700 mm (27.56’’)Depth: 466 mm (18.35’’)Height: 1017 mm (40.0’’)3.2 Cooling SystemHoneywell Evaporative Air Coolers are built to maximize energy efficiency and keep costs low. Warm air is drawn into the cooler through a dust and odor-reducing carbon filter and enters the Honeycomb Cooling Media. Water pumped from the tank pours over the honeycomb media. As the warm air passes through the media, the water absorbs the heat, naturally cooling and humidifying the air. A fan propels the cooled air out into the room. This no-compressor system cools naturally, efficiently and inexpensively.Troubleshooting GuideThe following troubleshooting guide is intended to address the most common symptoms and is by no means exhaustive. If symptoms persist, call a qualified service provider. Only a certified electrician should complete any electrical work. Unplug and disconnect the appliance from the power source before attempting to troubleshoot any of the following symptoms.ProblemPossible CauseSolutionNo discharge of airThe cord is not plugged in.Make sure the power cord is plugged in and the supply switch is on.The power is not on.Turn the unit ON.Humidity output minimal to noneWater is below the minimum water level in the tank.Turn off the unit.Follow the instructions to fill the water tank with clean water.The water pump is damaged.Replace the water pump according to procedure 2.3.Watercolor yellowish at initial useColor fasts from honeycomb filter.This is natural. After several uses, the watercolor will be clean.Abnormal noise inside the productThe noise of the water pump when water is not up-to-min water level. the product again.Turn off the product. Add water, and then turn onMotor or blade problem.Turn off and unplug the product or change the main motor according to procedure 2.4.Musty or unpleasant odorWhen the Cooler is new.When the unit is used for the first time, the Honeycomb Cooling Media will have an odor, which will dissipate within a few hours of initial use.Stale or stagnant water in the water tank.Drain, flush and clean the water tankMedia mildewed or clogged.Replace media according to the procedure 2.1.Not coolingPump is not turned on.Check the water level and turn on the pump.Low or no water.Damaged water pump.Replace the water pump according to procedure 2.3.SCHEMATIC DIAGRAM4.1 Wiring Diagram4.2 Wiring Color DescriptionPower Cord:(1) Brown(2) Blue(3) Green + YellowLiveNeutralEarth (Ground)to speed switch(4)motor COM(black)to motor earthMain Motor:(1) White(2) Yellow(3) Blue(4) Black(5) Red(6) Brown(7) Green + YellowHigh speedMedium speedLow speedNeutralEarth (Ground)to speed switch(1)to speed switch(2)to speed switch(3)to N wire of power cordto the capacitor by end-closed connectorto the capacitor by end-closed connectorto power cord earthWater Pump:(1) Brown(2) Blueto pump control switch(1)to N wire of power cordSwing Motor:(1) Pink(2) Pinkto swing control switch(1)to N wire of power cordEXPLODED VIEWREPLACEMENT PARTS LISTSrPART NAMEQUANTITY1Up/Down swing knob22Swing knob pressboard13Horizontal louver 124Horizontal louver 225Horizontal louver 326Horizontal louver 427Horizontal louver 528Horizontal louver middle link19Horizontal louver press board A210Horizontal louver link A211Horizontal louver press board B212Horizontal louver link B213Swing/Cool knob214Speed knob115Control plane116Swing/Cool switch217Speed switch118Air outlet panel119Front panel120Rubber washer2021Vertical louver base422Short vertical louver223Long vertical louver224Switch box125Side panel226Side honeycomb pad227Side water distributor cover228Side water distributor229Side honeycomb pad holder430Swing motor131Swing motor wheel132Vertical louver drive133Base of fan motor frame234Fan motor frame435Fan blade assembly136Fan motor137Top cover138Water fill door139Four directions pipe140Back water distributor tube141Left/Right water distributor tube242Water fill door link243Back water distributor144Back water distributor cover145Left stand pillar146Back honeycomb pad holder247Back honeycomb pad148Back panel149Right stand pillar150Motor capacitor151Suction pipe152Water fill pipe153Float cap154Float holder155Float tube156Water level board157Vertical louver link158Water tank159Water pump160Water pump clip161Continuous water supply connection162Castor263Castor with brake264Water drainage plug165Silica gel ring1CONFIDENTIALWebsite: http://www.honeywellaircoolers.comDownloaded from www.Manualslib.com manuals search engineDocuments / ResourcesHoneywell CO60PM Evaporative Air Cooler [pdf] Instruction ManualCO60PM, Evaporative Air Cooler, CO60PM Evaporative Air Cooler, Air Cooler, CoolerReferencesUser ManualRelated PostsEvaporative Air Cooler With Humidifier SF-615H User ManualEvaporative Air Cooler With Humidifier SF-615H User Manual - Optimized PDF Evaporative Air Cooler With Humidifier SF-615H User…Honeywell TC10PM Series Portable Evaporative Air Cooler User ManualHoneywell TC10PM Series Portable Evaporative Air Cooler Portable Evaporative Air Cooler User Manual Read and save these instructions…kogan KAPMNCL4BA Mini Evaporative Air Cooler User Guidekogan KAPMNCL4BA Mini Evaporative Air Cooler SAFETY & WARNINGS Ensure to read this user guide prior to first…COOLER MASTER Hyper T200 CPU Air Cooler User ManualCOOLER MASTER Hyper T200 CPU Air Cooler IN THE BOX INTEL & AMD AMD AM4/AM3+/AM3/AM2+/AM2/FM2+/FM2/FM1 Intel - LGA1151/1150/1155/1156/1366/775…
Width: 700 mm (27.56’’)Depth: 466 mm (18.35’’)Height: 1017 mm (40.0’’)3.2 Cooling SystemHoneywell Evaporative Air Coolers are built to maximize energy efficiency and keep costs low. Warm air is drawn into the cooler through a dust and odor-reducing carbon filter and enters the Honeycomb Cooling Media. Water pumped from the tank pours over the honeycomb media. As the warm air passes through the media, the water absorbs the heat, naturally cooling and humidifying the air. A fan propels the cooled air out into the room. This no-compressor system cools naturally, efficiently and inexpensively.Troubleshooting GuideThe following troubleshooting guide is intended to address the most common symptoms and is by no means exhaustive. If symptoms persist, call a qualified service provider. Only a certified electrician should complete any electrical work. Unplug and disconnect the appliance from the power source before attempting to troubleshoot any of the following symptoms.ProblemPossible CauseSolutionNo discharge of airThe cord is not plugged in.Make sure the power cord is plugged in and the supply switch is on.The power is not on.Turn the unit ON.Humidity output minimal to noneWater is below the minimum water level in the tank.Turn off the unit.Follow the instructions to fill the water tank with clean water.The water pump is damaged.Replace the water pump according to procedure 2.3.Watercolor yellowish at initial useColor fasts from honeycomb filter.This is natural. After several uses, the watercolor will be clean.Abnormal noise inside the productThe noise of the water pump when water is not up-to-min water level. the product again.Turn off the product. Add water, and then turn onMotor or blade problem.Turn off and unplug the product or change the main motor according to procedure 2.4.Musty or unpleasant odorWhen the Cooler is new.When the unit is used for the first time, the Honeycomb Cooling Media will have an odor, which will dissipate within a few hours of initial use.Stale or stagnant water in the water tank.Drain, flush and clean the water tankMedia mildewed or clogged.Replace media according to the procedure 2.1.Not coolingPump is not turned on.Check the water level and turn on the pump.Low or no water.Damaged water pump.Replace the water pump according to procedure 2.3.SCHEMATIC DIAGRAM4.1 Wiring Diagram4.2 Wiring Color DescriptionPower Cord:(1) Brown(2) Blue(3) Green + YellowLiveNeutralEarth (Ground)to speed switch(4)motor COM(black)to motor earthMain Motor:(1) White(2) Yellow(3) Blue(4) Black(5) Red(6) Brown(7) Green + YellowHigh speedMedium speedLow speedNeutralEarth (Ground)to speed switch(1)to speed switch(2)to speed switch(3)to N wire of power cordto the capacitor by end-closed connectorto the capacitor by end-closed connectorto power cord earthWater Pump:(1) Brown(2) Blueto pump control switch(1)to N wire of power cordSwing Motor:(1) Pink(2) Pinkto swing control switch(1)to N wire of power cordEXPLODED VIEWREPLACEMENT PARTS LISTSrPART NAMEQUANTITY1Up/Down swing knob22Swing knob pressboard13Horizontal louver 124Horizontal louver 225Horizontal louver 326Horizontal louver 427Horizontal louver 528Horizontal louver middle link19Horizontal louver press board A210Horizontal louver link A211Horizontal louver press board B212Horizontal louver link B213Swing/Cool knob214Speed knob115Control plane116Swing/Cool switch217Speed switch118Air outlet panel119Front panel120Rubber washer2021Vertical louver base422Short vertical louver223Long vertical louver224Switch box125Side panel226Side honeycomb pad227Side water distributor cover228Side water distributor229Side honeycomb pad holder430Swing motor131Swing motor wheel132Vertical louver drive133Base of fan motor frame234Fan motor frame435Fan blade assembly136Fan motor137Top cover138Water fill door139Four directions pipe140Back water distributor tube141Left/Right water distributor tube242Water fill door link243Back water distributor144Back water distributor cover145Left stand pillar146Back honeycomb pad holder247Back honeycomb pad148Back panel149Right stand pillar150Motor capacitor151Suction pipe152Water fill pipe153Float cap154Float holder155Float tube156Water level board157Vertical louver link158Water tank159Water pump160Water pump clip161Continuous water supply connection162Castor263Castor with brake264Water drainage plug165Silica gel ring1CONFIDENTIALWebsite: http://www.honeywellaircoolers.comDownloaded from www.Manualslib.com manuals search engineDocuments / ResourcesHoneywell CO60PM Evaporative Air Cooler [pdf] Instruction ManualCO60PM, Evaporative Air Cooler, CO60PM Evaporative Air Cooler, Air Cooler, CoolerReferencesUser ManualRelated PostsEvaporative Air Cooler With Humidifier SF-615H User ManualEvaporative Air Cooler With Humidifier SF-615H User Manual - Optimized PDF Evaporative Air Cooler With Humidifier SF-615H User…Honeywell TC10PM Series Portable Evaporative Air Cooler User ManualHoneywell TC10PM Series Portable Evaporative Air Cooler Portable Evaporative Air Cooler User Manual Read and save these instructions…kogan KAPMNCL4BA Mini Evaporative Air Cooler User Guidekogan KAPMNCL4BA Mini Evaporative Air Cooler SAFETY & WARNINGS Ensure to read this user guide prior to first…COOLER MASTER Hyper T200 CPU Air Cooler User ManualCOOLER MASTER Hyper T200 CPU Air Cooler IN THE BOX INTEL & AMD AMD AM4/AM3+/AM3/AM2+/AM2/FM2+/FM2/FM1 Intel - LGA1151/1150/1155/1156/1366/775…
The air cooler is now ready to be used. This cleaning process should be repeated monthly to maintain the integrity of the unit and to remove particles filtered from the air.
The ENVION Therapure TPP640 Air Purifier Tower is a great option for those who suffer from allergies or those who just want to breathe cleaner air. With the ...
No information is available for this page.
The evaporative air cooler can also be used to humidify dry air during cool weather. To be used for humidification the windows and doors should be closed to allow the humidified air to accumulate. The evaporative air cooler is not an air conditioner as it does not use a compressor or refrigerant gas. It should not be expected to cool as efficiently as a refrigerated air conditioner.NOTE: When the product is used for the first time the Honeycomb Cooling Media will have an odor that will dissipate in a week or so of initial use.
REPLACEMENT PARTS LISTSrPART NAMEQUANTITY1Up/Down swing knob22Swing knob pressboard13Horizontal louver 124Horizontal louver 225Horizontal louver 326Horizontal louver 427Horizontal louver 528Horizontal louver middle link19Horizontal louver press board A210Horizontal louver link A211Horizontal louver press board B212Horizontal louver link B213Swing/Cool knob214Speed knob115Control plane116Swing/Cool switch217Speed switch118Air outlet panel119Front panel120Rubber washer2021Vertical louver base422Short vertical louver223Long vertical louver224Switch box125Side panel226Side honeycomb pad227Side water distributor cover228Side water distributor229Side honeycomb pad holder430Swing motor131Swing motor wheel132Vertical louver drive133Base of fan motor frame234Fan motor frame435Fan blade assembly136Fan motor137Top cover138Water fill door139Four directions pipe140Back water distributor tube141Left/Right water distributor tube242Water fill door link243Back water distributor144Back water distributor cover145Left stand pillar146Back honeycomb pad holder247Back honeycomb pad148Back panel149Right stand pillar150Motor capacitor151Suction pipe152Water fill pipe153Float cap154Float holder155Float tube156Water level board157Vertical louver link158Water tank159Water pump160Water pump clip161Continuous water supply connection162Castor263Castor with brake264Water drainage plug165Silica gel ring1CONFIDENTIALWebsite: http://www.honeywellaircoolers.comDownloaded from www.Manualslib.com manuals search engineDocuments / ResourcesHoneywell CO60PM Evaporative Air Cooler [pdf] Instruction ManualCO60PM, Evaporative Air Cooler, CO60PM Evaporative Air Cooler, Air Cooler, CoolerReferencesUser ManualRelated PostsEvaporative Air Cooler With Humidifier SF-615H User ManualEvaporative Air Cooler With Humidifier SF-615H User Manual - Optimized PDF Evaporative Air Cooler With Humidifier SF-615H User…Honeywell TC10PM Series Portable Evaporative Air Cooler User ManualHoneywell TC10PM Series Portable Evaporative Air Cooler Portable Evaporative Air Cooler User Manual Read and save these instructions…kogan KAPMNCL4BA Mini Evaporative Air Cooler User Guidekogan KAPMNCL4BA Mini Evaporative Air Cooler SAFETY & WARNINGS Ensure to read this user guide prior to first…COOLER MASTER Hyper T200 CPU Air Cooler User ManualCOOLER MASTER Hyper T200 CPU Air Cooler IN THE BOX INTEL & AMD AMD AM4/AM3+/AM3/AM2+/AM2/FM2+/FM2/FM1 Intel - LGA1151/1150/1155/1156/1366/775…
Main Motor:(1) White(2) Yellow(3) Blue(4) Black(5) Red(6) Brown(7) Green + YellowHigh speedMedium speedLow speedNeutralEarth (Ground)to speed switch(1)to speed switch(2)to speed switch(3)to N wire of power cordto the capacitor by end-closed connectorto the capacitor by end-closed connectorto power cord earthWater Pump:(1) Brown(2) Blueto pump control switch(1)to N wire of power cordSwing Motor:(1) Pink(2) Pinkto swing control switch(1)to N wire of power cordEXPLODED VIEWREPLACEMENT PARTS LISTSrPART NAMEQUANTITY1Up/Down swing knob22Swing knob pressboard13Horizontal louver 124Horizontal louver 225Horizontal louver 326Horizontal louver 427Horizontal louver 528Horizontal louver middle link19Horizontal louver press board A210Horizontal louver link A211Horizontal louver press board B212Horizontal louver link B213Swing/Cool knob214Speed knob115Control plane116Swing/Cool switch217Speed switch118Air outlet panel119Front panel120Rubber washer2021Vertical louver base422Short vertical louver223Long vertical louver224Switch box125Side panel226Side honeycomb pad227Side water distributor cover228Side water distributor229Side honeycomb pad holder430Swing motor131Swing motor wheel132Vertical louver drive133Base of fan motor frame234Fan motor frame435Fan blade assembly136Fan motor137Top cover138Water fill door139Four directions pipe140Back water distributor tube141Left/Right water distributor tube242Water fill door link243Back water distributor144Back water distributor cover145Left stand pillar146Back honeycomb pad holder247Back honeycomb pad148Back panel149Right stand pillar150Motor capacitor151Suction pipe152Water fill pipe153Float cap154Float holder155Float tube156Water level board157Vertical louver link158Water tank159Water pump160Water pump clip161Continuous water supply connection162Castor263Castor with brake264Water drainage plug165Silica gel ring1CONFIDENTIALWebsite: http://www.honeywellaircoolers.comDownloaded from www.Manualslib.com manuals search engineDocuments / ResourcesHoneywell CO60PM Evaporative Air Cooler [pdf] Instruction ManualCO60PM, Evaporative Air Cooler, CO60PM Evaporative Air Cooler, Air Cooler, CoolerReferencesUser ManualRelated PostsEvaporative Air Cooler With Humidifier SF-615H User ManualEvaporative Air Cooler With Humidifier SF-615H User Manual - Optimized PDF Evaporative Air Cooler With Humidifier SF-615H User…Honeywell TC10PM Series Portable Evaporative Air Cooler User ManualHoneywell TC10PM Series Portable Evaporative Air Cooler Portable Evaporative Air Cooler User Manual Read and save these instructions…kogan KAPMNCL4BA Mini Evaporative Air Cooler User Guidekogan KAPMNCL4BA Mini Evaporative Air Cooler SAFETY & WARNINGS Ensure to read this user guide prior to first…COOLER MASTER Hyper T200 CPU Air Cooler User ManualCOOLER MASTER Hyper T200 CPU Air Cooler IN THE BOX INTEL & AMD AMD AM4/AM3+/AM3/AM2+/AM2/FM2+/FM2/FM1 Intel - LGA1151/1150/1155/1156/1366/775…
2.1.3 Right Side Panel.Use a screwdriver to remove 4 galvanized screws with plate head (ST4*12) on the right-side panel.Remove the right side panel.2.1.4 Right Side Honeycomb Cooling Media.Use screwdriver to remove 4 galvanized screws with plate head(ST4*12) on the honeycomb holder.Remove the honeycomb holder.Remove the honeycomb cooling media from the right side panel.2.1.5 Left Side Panel.Use screwdriver to remove 4 galvanized screws with plate head (ST4*12) on the left side panel.Remove the left side panel.2.1.6 Left Side Honeycomb Cooling Media.Use a screwdriver to remove 4 galvanized screws with plate head(ST4*12) on the honeycomb holder.Remove the honeycomb holder.Remove the honeycomb cooling media from the left side panel.2.2 How To Change SwitchRemove the back panel and follow the procedure 2.1.1Remove the right-side panel and follow procedure 2.1.32.2.1. Switch BoxUse a screw driver to remove 4 galvanized screws with plate head(ST3*12) on the switch box.Remove switch box.2.2.2. Switch(cool/speed/swing)Use screw driver to remove 2 galvanized screws (ST3X10) on each switch of the control panel(cool/speed/swing).Cool switchSpeed switchSwing switch2.2.3. Wiring Color ConnectionWiring color connection refers to part 4.2 Wiring Color Description.2.3 How To Change Water PumpRemove the back panel and follow the procedure 2.1.1Remove the right-side panel and follow procedure 2.1.3Remove the switch box and follow the procedure 2.2.12.3.1 Water pump pipe and water pump clip.Remove the water pump pipe.Use a screw driver to remove 2 SS screws(ST4*12) on the water pump clip.2.3.2 Cool Switch And Wiring ConnectorUse a screwdriver to remove 2 galvanized screws (ST3X10) on the cool switch of the control panel.Remove the brown wire on the cool switch.Remove the wiring cap (below picture shown) to get the water pump.Note: connection is between the water pump and the N wire of the power cord.2.3.3 Water Pump Wiring ConnectionThe water pump wiring connection refers to part 4.2 Wiring Color Description.2.4 How To Change Fan MotorRemove the back panel and follow the procedure 2.1.1Remove the right-side panel and follow procedure 2.1.3Remove the switch box and follow the procedure 2.2.12.4.1 Speed Switch And Wiring Connector.Use a screwdriver to remove 2 galvanized screws (ST3X10) on the speed switch of the control panel.Remove the white/yellow/blue wire on the speed switch.Remove the wiring cap (below picture shown).Note: connection is between fan motor COM wire(black) and N wire of power cord.Remove the wiring cap (below picture shown).Note: connection is between motor and power cord earth wire.Remove the wiring cap (below picture shown).Note: connection is between the capacitor and the motor.Remove the wiring cap (below picture shown).Note: connection is between capacitor and the motor.2.4.2 Fan Blade And Fan MotorUse a screwdriver to remove 1galvanized screws (M6X14) on the fan blade.Remove the fan blade.Use a screw driver to remove 8 galvanized screws (M5X12) on fan motor to get the fanmotor.2.4.3 Main Motor Wiring ConnectionMain motor wiring connection refers to part 4.2 Wiring Color Description.2.5 How To Change Swing MotorRemove the back panel and follow the procedure 2.1.1Remove the right-side panel and follow procedure 2.1.3Remove the switch box and follow the procedure 2.2.12.5.1 Swing Switch And Wiring Connector.Use a screwdriver to remove 2 galvanized screws (ST3X10) on the swing switch of the control panel.Remove the pink wire on the swing switch.Remove the wiring cap (below picture shown).Note: connection is between swing motor and N wire of power cord.2.5.2 Swing Motor And Swing Motor Wheel.Use a screwdriver to remove 2 galvanized screws(ST4X12) on the swing motor.Remove the swing motor.Use screwdriver to remove 1 galvanized screw(ST3*8) on the swing motor wheel.Remove the swing motor wheel.Get the swing motor.2.5.3 Swing Motor Wiring ConnectionSwing motor wiring connection refers to part 4.2 Wiring Color Description.TROUBLESHOOTING GUIDE3.1 Outside DimensionsWidth: 700 mm (27.56’’)Depth: 466 mm (18.35’’)Height: 1017 mm (40.0’’)3.2 Cooling SystemHoneywell Evaporative Air Coolers are built to maximize energy efficiency and keep costs low. Warm air is drawn into the cooler through a dust and odor-reducing carbon filter and enters the Honeycomb Cooling Media. Water pumped from the tank pours over the honeycomb media. As the warm air passes through the media, the water absorbs the heat, naturally cooling and humidifying the air. A fan propels the cooled air out into the room. This no-compressor system cools naturally, efficiently and inexpensively.Troubleshooting GuideThe following troubleshooting guide is intended to address the most common symptoms and is by no means exhaustive. If symptoms persist, call a qualified service provider. Only a certified electrician should complete any electrical work. Unplug and disconnect the appliance from the power source before attempting to troubleshoot any of the following symptoms.ProblemPossible CauseSolutionNo discharge of airThe cord is not plugged in.Make sure the power cord is plugged in and the supply switch is on.The power is not on.Turn the unit ON.Humidity output minimal to noneWater is below the minimum water level in the tank.Turn off the unit.Follow the instructions to fill the water tank with clean water.The water pump is damaged.Replace the water pump according to procedure 2.3.Watercolor yellowish at initial useColor fasts from honeycomb filter.This is natural. After several uses, the watercolor will be clean.Abnormal noise inside the productThe noise of the water pump when water is not up-to-min water level. the product again.Turn off the product. Add water, and then turn onMotor or blade problem.Turn off and unplug the product or change the main motor according to procedure 2.4.Musty or unpleasant odorWhen the Cooler is new.When the unit is used for the first time, the Honeycomb Cooling Media will have an odor, which will dissipate within a few hours of initial use.Stale or stagnant water in the water tank.Drain, flush and clean the water tankMedia mildewed or clogged.Replace media according to the procedure 2.1.Not coolingPump is not turned on.Check the water level and turn on the pump.Low or no water.Damaged water pump.Replace the water pump according to procedure 2.3.SCHEMATIC DIAGRAM4.1 Wiring Diagram4.2 Wiring Color DescriptionPower Cord:(1) Brown(2) Blue(3) Green + YellowLiveNeutralEarth (Ground)to speed switch(4)motor COM(black)to motor earthMain Motor:(1) White(2) Yellow(3) Blue(4) Black(5) Red(6) Brown(7) Green + YellowHigh speedMedium speedLow speedNeutralEarth (Ground)to speed switch(1)to speed switch(2)to speed switch(3)to N wire of power cordto the capacitor by end-closed connectorto the capacitor by end-closed connectorto power cord earthWater Pump:(1) Brown(2) Blueto pump control switch(1)to N wire of power cordSwing Motor:(1) Pink(2) Pinkto swing control switch(1)to N wire of power cordEXPLODED VIEWREPLACEMENT PARTS LISTSrPART NAMEQUANTITY1Up/Down swing knob22Swing knob pressboard13Horizontal louver 124Horizontal louver 225Horizontal louver 326Horizontal louver 427Horizontal louver 528Horizontal louver middle link19Horizontal louver press board A210Horizontal louver link A211Horizontal louver press board B212Horizontal louver link B213Swing/Cool knob214Speed knob115Control plane116Swing/Cool switch217Speed switch118Air outlet panel119Front panel120Rubber washer2021Vertical louver base422Short vertical louver223Long vertical louver224Switch box125Side panel226Side honeycomb pad227Side water distributor cover228Side water distributor229Side honeycomb pad holder430Swing motor131Swing motor wheel132Vertical louver drive133Base of fan motor frame234Fan motor frame435Fan blade assembly136Fan motor137Top cover138Water fill door139Four directions pipe140Back water distributor tube141Left/Right water distributor tube242Water fill door link243Back water distributor144Back water distributor cover145Left stand pillar146Back honeycomb pad holder247Back honeycomb pad148Back panel149Right stand pillar150Motor capacitor151Suction pipe152Water fill pipe153Float cap154Float holder155Float tube156Water level board157Vertical louver link158Water tank159Water pump160Water pump clip161Continuous water supply connection162Castor263Castor with brake264Water drainage plug165Silica gel ring1CONFIDENTIALWebsite: http://www.honeywellaircoolers.comDownloaded from www.Manualslib.com manuals search engineDocuments / ResourcesHoneywell CO60PM Evaporative Air Cooler [pdf] Instruction ManualCO60PM, Evaporative Air Cooler, CO60PM Evaporative Air Cooler, Air Cooler, CoolerReferencesUser ManualRelated PostsEvaporative Air Cooler With Humidifier SF-615H User ManualEvaporative Air Cooler With Humidifier SF-615H User Manual - Optimized PDF Evaporative Air Cooler With Humidifier SF-615H User…Honeywell TC10PM Series Portable Evaporative Air Cooler User ManualHoneywell TC10PM Series Portable Evaporative Air Cooler Portable Evaporative Air Cooler User Manual Read and save these instructions…kogan KAPMNCL4BA Mini Evaporative Air Cooler User Guidekogan KAPMNCL4BA Mini Evaporative Air Cooler SAFETY & WARNINGS Ensure to read this user guide prior to first…COOLER MASTER Hyper T200 CPU Air Cooler User ManualCOOLER MASTER Hyper T200 CPU Air Cooler IN THE BOX INTEL & AMD AMD AM4/AM3+/AM3/AM2+/AM2/FM2+/FM2/FM1 Intel - LGA1151/1150/1155/1156/1366/775…
CADD keyeBay
Baxter 0.9% Sodium Chloride Injection, USP, 1000mL (2B1324). Sodium Chloride Injection (Normal Saline). VIAFLEX Plastic Container Bags. NDC: 0338-0049-04.
2.2.2. Switch(cool/speed/swing)Use screw driver to remove 2 galvanized screws (ST3X10) on each switch of the control panel(cool/speed/swing).Cool switchSpeed switchSwing switch2.2.3. Wiring Color ConnectionWiring color connection refers to part 4.2 Wiring Color Description.2.3 How To Change Water PumpRemove the back panel and follow the procedure 2.1.1Remove the right-side panel and follow procedure 2.1.3Remove the switch box and follow the procedure 2.2.12.3.1 Water pump pipe and water pump clip.Remove the water pump pipe.Use a screw driver to remove 2 SS screws(ST4*12) on the water pump clip.2.3.2 Cool Switch And Wiring ConnectorUse a screwdriver to remove 2 galvanized screws (ST3X10) on the cool switch of the control panel.Remove the brown wire on the cool switch.Remove the wiring cap (below picture shown) to get the water pump.Note: connection is between the water pump and the N wire of the power cord.2.3.3 Water Pump Wiring ConnectionThe water pump wiring connection refers to part 4.2 Wiring Color Description.2.4 How To Change Fan MotorRemove the back panel and follow the procedure 2.1.1Remove the right-side panel and follow procedure 2.1.3Remove the switch box and follow the procedure 2.2.12.4.1 Speed Switch And Wiring Connector.Use a screwdriver to remove 2 galvanized screws (ST3X10) on the speed switch of the control panel.Remove the white/yellow/blue wire on the speed switch.Remove the wiring cap (below picture shown).Note: connection is between fan motor COM wire(black) and N wire of power cord.Remove the wiring cap (below picture shown).Note: connection is between motor and power cord earth wire.Remove the wiring cap (below picture shown).Note: connection is between the capacitor and the motor.Remove the wiring cap (below picture shown).Note: connection is between capacitor and the motor.2.4.2 Fan Blade And Fan MotorUse a screwdriver to remove 1galvanized screws (M6X14) on the fan blade.Remove the fan blade.Use a screw driver to remove 8 galvanized screws (M5X12) on fan motor to get the fanmotor.2.4.3 Main Motor Wiring ConnectionMain motor wiring connection refers to part 4.2 Wiring Color Description.2.5 How To Change Swing MotorRemove the back panel and follow the procedure 2.1.1Remove the right-side panel and follow procedure 2.1.3Remove the switch box and follow the procedure 2.2.12.5.1 Swing Switch And Wiring Connector.Use a screwdriver to remove 2 galvanized screws (ST3X10) on the swing switch of the control panel.Remove the pink wire on the swing switch.Remove the wiring cap (below picture shown).Note: connection is between swing motor and N wire of power cord.2.5.2 Swing Motor And Swing Motor Wheel.Use a screwdriver to remove 2 galvanized screws(ST4X12) on the swing motor.Remove the swing motor.Use screwdriver to remove 1 galvanized screw(ST3*8) on the swing motor wheel.Remove the swing motor wheel.Get the swing motor.2.5.3 Swing Motor Wiring ConnectionSwing motor wiring connection refers to part 4.2 Wiring Color Description.TROUBLESHOOTING GUIDE3.1 Outside DimensionsWidth: 700 mm (27.56’’)Depth: 466 mm (18.35’’)Height: 1017 mm (40.0’’)3.2 Cooling SystemHoneywell Evaporative Air Coolers are built to maximize energy efficiency and keep costs low. Warm air is drawn into the cooler through a dust and odor-reducing carbon filter and enters the Honeycomb Cooling Media. Water pumped from the tank pours over the honeycomb media. As the warm air passes through the media, the water absorbs the heat, naturally cooling and humidifying the air. A fan propels the cooled air out into the room. This no-compressor system cools naturally, efficiently and inexpensively.Troubleshooting GuideThe following troubleshooting guide is intended to address the most common symptoms and is by no means exhaustive. If symptoms persist, call a qualified service provider. Only a certified electrician should complete any electrical work. Unplug and disconnect the appliance from the power source before attempting to troubleshoot any of the following symptoms.ProblemPossible CauseSolutionNo discharge of airThe cord is not plugged in.Make sure the power cord is plugged in and the supply switch is on.The power is not on.Turn the unit ON.Humidity output minimal to noneWater is below the minimum water level in the tank.Turn off the unit.Follow the instructions to fill the water tank with clean water.The water pump is damaged.Replace the water pump according to procedure 2.3.Watercolor yellowish at initial useColor fasts from honeycomb filter.This is natural. After several uses, the watercolor will be clean.Abnormal noise inside the productThe noise of the water pump when water is not up-to-min water level. the product again.Turn off the product. Add water, and then turn onMotor or blade problem.Turn off and unplug the product or change the main motor according to procedure 2.4.Musty or unpleasant odorWhen the Cooler is new.When the unit is used for the first time, the Honeycomb Cooling Media will have an odor, which will dissipate within a few hours of initial use.Stale or stagnant water in the water tank.Drain, flush and clean the water tankMedia mildewed or clogged.Replace media according to the procedure 2.1.Not coolingPump is not turned on.Check the water level and turn on the pump.Low or no water.Damaged water pump.Replace the water pump according to procedure 2.3.SCHEMATIC DIAGRAM4.1 Wiring Diagram4.2 Wiring Color DescriptionPower Cord:(1) Brown(2) Blue(3) Green + YellowLiveNeutralEarth (Ground)to speed switch(4)motor COM(black)to motor earthMain Motor:(1) White(2) Yellow(3) Blue(4) Black(5) Red(6) Brown(7) Green + YellowHigh speedMedium speedLow speedNeutralEarth (Ground)to speed switch(1)to speed switch(2)to speed switch(3)to N wire of power cordto the capacitor by end-closed connectorto the capacitor by end-closed connectorto power cord earthWater Pump:(1) Brown(2) Blueto pump control switch(1)to N wire of power cordSwing Motor:(1) Pink(2) Pinkto swing control switch(1)to N wire of power cordEXPLODED VIEWREPLACEMENT PARTS LISTSrPART NAMEQUANTITY1Up/Down swing knob22Swing knob pressboard13Horizontal louver 124Horizontal louver 225Horizontal louver 326Horizontal louver 427Horizontal louver 528Horizontal louver middle link19Horizontal louver press board A210Horizontal louver link A211Horizontal louver press board B212Horizontal louver link B213Swing/Cool knob214Speed knob115Control plane116Swing/Cool switch217Speed switch118Air outlet panel119Front panel120Rubber washer2021Vertical louver base422Short vertical louver223Long vertical louver224Switch box125Side panel226Side honeycomb pad227Side water distributor cover228Side water distributor229Side honeycomb pad holder430Swing motor131Swing motor wheel132Vertical louver drive133Base of fan motor frame234Fan motor frame435Fan blade assembly136Fan motor137Top cover138Water fill door139Four directions pipe140Back water distributor tube141Left/Right water distributor tube242Water fill door link243Back water distributor144Back water distributor cover145Left stand pillar146Back honeycomb pad holder247Back honeycomb pad148Back panel149Right stand pillar150Motor capacitor151Suction pipe152Water fill pipe153Float cap154Float holder155Float tube156Water level board157Vertical louver link158Water tank159Water pump160Water pump clip161Continuous water supply connection162Castor263Castor with brake264Water drainage plug165Silica gel ring1CONFIDENTIALWebsite: http://www.honeywellaircoolers.comDownloaded from www.Manualslib.com manuals search engineDocuments / ResourcesHoneywell CO60PM Evaporative Air Cooler [pdf] Instruction ManualCO60PM, Evaporative Air Cooler, CO60PM Evaporative Air Cooler, Air Cooler, CoolerReferencesUser ManualRelated PostsEvaporative Air Cooler With Humidifier SF-615H User ManualEvaporative Air Cooler With Humidifier SF-615H User Manual - Optimized PDF Evaporative Air Cooler With Humidifier SF-615H User…Honeywell TC10PM Series Portable Evaporative Air Cooler User ManualHoneywell TC10PM Series Portable Evaporative Air Cooler Portable Evaporative Air Cooler User Manual Read and save these instructions…kogan KAPMNCL4BA Mini Evaporative Air Cooler User Guidekogan KAPMNCL4BA Mini Evaporative Air Cooler SAFETY & WARNINGS Ensure to read this user guide prior to first…COOLER MASTER Hyper T200 CPU Air Cooler User ManualCOOLER MASTER Hyper T200 CPU Air Cooler IN THE BOX INTEL & AMD AMD AM4/AM3+/AM3/AM2+/AM2/FM2+/FM2/FM1 Intel - LGA1151/1150/1155/1156/1366/775…
Filling With Water (Continuous Water Supply Connection)CAUTION Unplug from power source before fillingThis automated process eliminates the need to manually refill the water tank.
cadd-solis ambulatory infusion pumpkey
Control Panel:NOTE:The speed control may be marked as High/Med/Low in certain units.Operation Instructions: Cooler Location:Place the cooler in front of an open door or window. Ensure that there is adequate cross–ventilation in the room by leaving a door or window open opposite the cooler. Following these guidelines will ensure your cooler will work as effectively as possible.Not an Air Conditioner:The evaporative air cooler is not an air conditioner as it does not use a compressor or refrigerant gas. It should not be expected to cool as efficiently as a refrigerated air conditioner. The recommended maximum relative humidity level is 60% or less, which allows a noticeable temperature decrease. The temperature decrease will be greater in drier climates because higher evaporation occurs when the humidity is low.The evaporative air cooler should not be used in enclosed spaces. It must be kept level and there must be water in the water tank. The room should have doors and windows opened to allow free airflow. The evaporative air cooler works best when placed near an open window so that outside air is drawn into the evaporative air cooler, the air circulates in the room, and then exits via the door. The maximum cooling effect is felt when a person is in the flow of air coming out of the evaporative air cooler.The evaporative air cooler can also be used to humidify dry air during cool weather. To be used for humidification the windows and doors should be closed to allow the humidified air to accumulate. The evaporative air cooler is not an air conditioner as it does not use a compressor or refrigerant gas. It should not be expected to cool as efficiently as a refrigerated air conditioner.NOTE: When the product is used for the first time the Honeycomb Cooling Media will have an odor that will dissipate in a week or so of initial use.FILL WATER:Water can be filled into the air cooler by:Water Inlet (Manually)Water / Ice can be put into the tank through the top opening. There is a hole for water to flow into the tank.Continuous water supply (Auto-Refill)Connect a garden hose to the continuous water supply inlet.Water Inlet (Manually)To refill the water tank, pull out the Water Fill Door located on the top of the unit and fill water to the Max, as indicated on the Water Level Indicator.Do not fill water above the Max water level mark.For maximum cooling performance, put ice cubes inside the Ice Loading Compartment located on the top of the Air Cooler.Filling With Water (Continuous Water Supply Connection)CAUTION Unplug from power source before fillingThis automated process eliminates the need to manually refill the water tank.Securely connect the continuous water supply connector (located on the lower left side panel) to the water supply.Turn on the water.The water tank will refill automatically.The water float valve will detect the water level and will automatically start or stop the water flow.Plug the unit into the power supply and turn the unit on.Installing Hose Adapter And Float ValveConnect the garden hose to the water supply connectorVerify that connections are secure and turn on the water.Control KnobsSpeed / On – OffConnect to the power supply and turn the Speed knob. The fan will start. Change the speed from 1 for Low to 2 for Medium to 3 for High. To switch OFF the unit turn the Speed knob to “0”.CoolTo begin cooling the desired area turn the “COOL” switch ON. The water pump will operate. You can feel the cooler air after the Honeycomb media is completely wet.SwingVertical LouversTurn the “SWING” switch ON. The louvers will begin to move from right to left automatically. Manually adjust the horizontal louvers to change vertical airflow.Horizontal LouversManually adjust the horizontal louvers to change vertical airflow.CLEANING & MAINTENANCEImportant – Please Read!The cooler is supplied with Honeycomb Cooling Media.The cleaning frequency for the Honeycomb media depends on local air and water conditions. In areas where the mineral content of water is high, mineral deposits may build up on the Honeycomb Cooling Media and restrict airflow. Draining the water reservoir and refilling it with fresh water at least once a week will help reduce mineral deposits. If mineral deposits remain on the Honeycomb media, the media should be removed and washed under fresh water. The media should be cleaned every two months or sooner, depending on your needs.Do not run the unit in COOL mode with stale water in the tank. Empty the tank and refill it with fresh water if the water has been standing in the tank for an extended period of time.For best results, allow the Honeycomb Cooling Media to dry after each use by turning off the cool function 15 minutes before turning the unit off.WARNINGBefore cleaning, turn the unit off and disconnect from the power source.Use a damp cloth to remove dirt and dust from the outside of the unit.Never use abrasive cleaners.When the unit is not in use, store it in a dry place, out of direct sunlight.Maximum water inlet pressure 0.5 MPa.Draining and Cleaning The Water TankTurn the power “off’ and disconnect the air cooler from the power supply.Move the unit to a location where it can be drained.Remove the drain plug and allow the tank to empty.Refill the water tank up to the maximum level with clean water and drain it completely.Fill the water tank and rinse at least 2-3 times before use.After cleaning ensure that the drain plug is back in place.Plug into the power supply and turn on the unit.Cleaning The Honeycomb Cooling MediaTurn off the unit, and unplug the power cord from the wall outlet.Rotate the unit facing the back panel, and locate the Grill Removal Screws. Remove the 4 screws with a screwdriver.Pull the rear grill panel, until it is completely removed.This cooler has Honeycomb cooling media on the right and left panels. The cleaning and removal procedure is the same as the rear panel.The Honeycomb cooling media can now be seen. Clean honeycomb with a clean cloth to remove all the dust & dirt particles.Once cleaning is finished, reassemble the unit.Plug into the power supply and turn on the unit.The air cooler is now ready to be used. This cleaning process should be repeated monthly to maintain the integrity of the unit and to remove particles filtered from the air.DISASSEMBLY INSTRUCTIONSWARNING – Before the following disassembly, POWER is set to OFF and disconnected the power cord.2.1 How To Change Honeycomb Cooling Media(3 sides)2.1.1 Back Panel.Use a screwdriver to remove 5 galvanized screws with plate head (ST4*12) on the back panel.Remove the back panel.2.1.2 Back Honeycomb Cooling Media.Use screwdriver to remove 4 galvanized screws with plate head(ST4*12) on the honeycomb holder.Remove the honeycomb holder.Remove the honeycomb cooling media from the back panel.2.1.3 Right Side Panel.Use a screwdriver to remove 4 galvanized screws with plate head (ST4*12) on the right-side panel.Remove the right side panel.2.1.4 Right Side Honeycomb Cooling Media.Use screwdriver to remove 4 galvanized screws with plate head(ST4*12) on the honeycomb holder.Remove the honeycomb holder.Remove the honeycomb cooling media from the right side panel.2.1.5 Left Side Panel.Use screwdriver to remove 4 galvanized screws with plate head (ST4*12) on the left side panel.Remove the left side panel.2.1.6 Left Side Honeycomb Cooling Media.Use a screwdriver to remove 4 galvanized screws with plate head(ST4*12) on the honeycomb holder.Remove the honeycomb holder.Remove the honeycomb cooling media from the left side panel.2.2 How To Change SwitchRemove the back panel and follow the procedure 2.1.1Remove the right-side panel and follow procedure 2.1.32.2.1. Switch BoxUse a screw driver to remove 4 galvanized screws with plate head(ST3*12) on the switch box.Remove switch box.2.2.2. Switch(cool/speed/swing)Use screw driver to remove 2 galvanized screws (ST3X10) on each switch of the control panel(cool/speed/swing).Cool switchSpeed switchSwing switch2.2.3. Wiring Color ConnectionWiring color connection refers to part 4.2 Wiring Color Description.2.3 How To Change Water PumpRemove the back panel and follow the procedure 2.1.1Remove the right-side panel and follow procedure 2.1.3Remove the switch box and follow the procedure 2.2.12.3.1 Water pump pipe and water pump clip.Remove the water pump pipe.Use a screw driver to remove 2 SS screws(ST4*12) on the water pump clip.2.3.2 Cool Switch And Wiring ConnectorUse a screwdriver to remove 2 galvanized screws (ST3X10) on the cool switch of the control panel.Remove the brown wire on the cool switch.Remove the wiring cap (below picture shown) to get the water pump.Note: connection is between the water pump and the N wire of the power cord.2.3.3 Water Pump Wiring ConnectionThe water pump wiring connection refers to part 4.2 Wiring Color Description.2.4 How To Change Fan MotorRemove the back panel and follow the procedure 2.1.1Remove the right-side panel and follow procedure 2.1.3Remove the switch box and follow the procedure 2.2.12.4.1 Speed Switch And Wiring Connector.Use a screwdriver to remove 2 galvanized screws (ST3X10) on the speed switch of the control panel.Remove the white/yellow/blue wire on the speed switch.Remove the wiring cap (below picture shown).Note: connection is between fan motor COM wire(black) and N wire of power cord.Remove the wiring cap (below picture shown).Note: connection is between motor and power cord earth wire.Remove the wiring cap (below picture shown).Note: connection is between the capacitor and the motor.Remove the wiring cap (below picture shown).Note: connection is between capacitor and the motor.2.4.2 Fan Blade And Fan MotorUse a screwdriver to remove 1galvanized screws (M6X14) on the fan blade.Remove the fan blade.Use a screw driver to remove 8 galvanized screws (M5X12) on fan motor to get the fanmotor.2.4.3 Main Motor Wiring ConnectionMain motor wiring connection refers to part 4.2 Wiring Color Description.2.5 How To Change Swing MotorRemove the back panel and follow the procedure 2.1.1Remove the right-side panel and follow procedure 2.1.3Remove the switch box and follow the procedure 2.2.12.5.1 Swing Switch And Wiring Connector.Use a screwdriver to remove 2 galvanized screws (ST3X10) on the swing switch of the control panel.Remove the pink wire on the swing switch.Remove the wiring cap (below picture shown).Note: connection is between swing motor and N wire of power cord.2.5.2 Swing Motor And Swing Motor Wheel.Use a screwdriver to remove 2 galvanized screws(ST4X12) on the swing motor.Remove the swing motor.Use screwdriver to remove 1 galvanized screw(ST3*8) on the swing motor wheel.Remove the swing motor wheel.Get the swing motor.2.5.3 Swing Motor Wiring ConnectionSwing motor wiring connection refers to part 4.2 Wiring Color Description.TROUBLESHOOTING GUIDE3.1 Outside DimensionsWidth: 700 mm (27.56’’)Depth: 466 mm (18.35’’)Height: 1017 mm (40.0’’)3.2 Cooling SystemHoneywell Evaporative Air Coolers are built to maximize energy efficiency and keep costs low. Warm air is drawn into the cooler through a dust and odor-reducing carbon filter and enters the Honeycomb Cooling Media. Water pumped from the tank pours over the honeycomb media. As the warm air passes through the media, the water absorbs the heat, naturally cooling and humidifying the air. A fan propels the cooled air out into the room. This no-compressor system cools naturally, efficiently and inexpensively.Troubleshooting GuideThe following troubleshooting guide is intended to address the most common symptoms and is by no means exhaustive. If symptoms persist, call a qualified service provider. Only a certified electrician should complete any electrical work. Unplug and disconnect the appliance from the power source before attempting to troubleshoot any of the following symptoms.ProblemPossible CauseSolutionNo discharge of airThe cord is not plugged in.Make sure the power cord is plugged in and the supply switch is on.The power is not on.Turn the unit ON.Humidity output minimal to noneWater is below the minimum water level in the tank.Turn off the unit.Follow the instructions to fill the water tank with clean water.The water pump is damaged.Replace the water pump according to procedure 2.3.Watercolor yellowish at initial useColor fasts from honeycomb filter.This is natural. After several uses, the watercolor will be clean.Abnormal noise inside the productThe noise of the water pump when water is not up-to-min water level. the product again.Turn off the product. Add water, and then turn onMotor or blade problem.Turn off and unplug the product or change the main motor according to procedure 2.4.Musty or unpleasant odorWhen the Cooler is new.When the unit is used for the first time, the Honeycomb Cooling Media will have an odor, which will dissipate within a few hours of initial use.Stale or stagnant water in the water tank.Drain, flush and clean the water tankMedia mildewed or clogged.Replace media according to the procedure 2.1.Not coolingPump is not turned on.Check the water level and turn on the pump.Low or no water.Damaged water pump.Replace the water pump according to procedure 2.3.SCHEMATIC DIAGRAM4.1 Wiring Diagram4.2 Wiring Color DescriptionPower Cord:(1) Brown(2) Blue(3) Green + YellowLiveNeutralEarth (Ground)to speed switch(4)motor COM(black)to motor earthMain Motor:(1) White(2) Yellow(3) Blue(4) Black(5) Red(6) Brown(7) Green + YellowHigh speedMedium speedLow speedNeutralEarth (Ground)to speed switch(1)to speed switch(2)to speed switch(3)to N wire of power cordto the capacitor by end-closed connectorto the capacitor by end-closed connectorto power cord earthWater Pump:(1) Brown(2) Blueto pump control switch(1)to N wire of power cordSwing Motor:(1) Pink(2) Pinkto swing control switch(1)to N wire of power cordEXPLODED VIEWREPLACEMENT PARTS LISTSrPART NAMEQUANTITY1Up/Down swing knob22Swing knob pressboard13Horizontal louver 124Horizontal louver 225Horizontal louver 326Horizontal louver 427Horizontal louver 528Horizontal louver middle link19Horizontal louver press board A210Horizontal louver link A211Horizontal louver press board B212Horizontal louver link B213Swing/Cool knob214Speed knob115Control plane116Swing/Cool switch217Speed switch118Air outlet panel119Front panel120Rubber washer2021Vertical louver base422Short vertical louver223Long vertical louver224Switch box125Side panel226Side honeycomb pad227Side water distributor cover228Side water distributor229Side honeycomb pad holder430Swing motor131Swing motor wheel132Vertical louver drive133Base of fan motor frame234Fan motor frame435Fan blade assembly136Fan motor137Top cover138Water fill door139Four directions pipe140Back water distributor tube141Left/Right water distributor tube242Water fill door link243Back water distributor144Back water distributor cover145Left stand pillar146Back honeycomb pad holder247Back honeycomb pad148Back panel149Right stand pillar150Motor capacitor151Suction pipe152Water fill pipe153Float cap154Float holder155Float tube156Water level board157Vertical louver link158Water tank159Water pump160Water pump clip161Continuous water supply connection162Castor263Castor with brake264Water drainage plug165Silica gel ring1CONFIDENTIALWebsite: http://www.honeywellaircoolers.comDownloaded from www.Manualslib.com manuals search engineDocuments / ResourcesHoneywell CO60PM Evaporative Air Cooler [pdf] Instruction ManualCO60PM, Evaporative Air Cooler, CO60PM Evaporative Air Cooler, Air Cooler, CoolerReferencesUser ManualRelated PostsEvaporative Air Cooler With Humidifier SF-615H User ManualEvaporative Air Cooler With Humidifier SF-615H User Manual - Optimized PDF Evaporative Air Cooler With Humidifier SF-615H User…Honeywell TC10PM Series Portable Evaporative Air Cooler User ManualHoneywell TC10PM Series Portable Evaporative Air Cooler Portable Evaporative Air Cooler User Manual Read and save these instructions…kogan KAPMNCL4BA Mini Evaporative Air Cooler User Guidekogan KAPMNCL4BA Mini Evaporative Air Cooler SAFETY & WARNINGS Ensure to read this user guide prior to first…COOLER MASTER Hyper T200 CPU Air Cooler User ManualCOOLER MASTER Hyper T200 CPU Air Cooler IN THE BOX INTEL & AMD AMD AM4/AM3+/AM3/AM2+/AM2/FM2+/FM2/FM1 Intel - LGA1151/1150/1155/1156/1366/775…
Via the back end Web interface, two settings need to be made on each client PC running n4ce. These are required so that the license engine knows where to go looking for the Key identified in the registry settings above.
Remove the back panel and follow the procedure 2.1.1Remove the right-side panel and follow procedure 2.1.3Remove the switch box and follow the procedure 2.2.1
WARNINGBefore cleaning, turn the unit off and disconnect from the power source.Use a damp cloth to remove dirt and dust from the outside of the unit.Never use abrasive cleaners.When the unit is not in use, store it in a dry place, out of direct sunlight.Maximum water inlet pressure 0.5 MPa.Draining and Cleaning The Water TankTurn the power “off’ and disconnect the air cooler from the power supply.Move the unit to a location where it can be drained.Remove the drain plug and allow the tank to empty.Refill the water tank up to the maximum level with clean water and drain it completely.Fill the water tank and rinse at least 2-3 times before use.After cleaning ensure that the drain plug is back in place.Plug into the power supply and turn on the unit.Cleaning The Honeycomb Cooling MediaTurn off the unit, and unplug the power cord from the wall outlet.Rotate the unit facing the back panel, and locate the Grill Removal Screws. Remove the 4 screws with a screwdriver.Pull the rear grill panel, until it is completely removed.This cooler has Honeycomb cooling media on the right and left panels. The cleaning and removal procedure is the same as the rear panel.The Honeycomb cooling media can now be seen. Clean honeycomb with a clean cloth to remove all the dust & dirt particles.Once cleaning is finished, reassemble the unit.Plug into the power supply and turn on the unit.The air cooler is now ready to be used. This cleaning process should be repeated monthly to maintain the integrity of the unit and to remove particles filtered from the air.DISASSEMBLY INSTRUCTIONSWARNING – Before the following disassembly, POWER is set to OFF and disconnected the power cord.2.1 How To Change Honeycomb Cooling Media(3 sides)2.1.1 Back Panel.Use a screwdriver to remove 5 galvanized screws with plate head (ST4*12) on the back panel.Remove the back panel.2.1.2 Back Honeycomb Cooling Media.Use screwdriver to remove 4 galvanized screws with plate head(ST4*12) on the honeycomb holder.Remove the honeycomb holder.Remove the honeycomb cooling media from the back panel.2.1.3 Right Side Panel.Use a screwdriver to remove 4 galvanized screws with plate head (ST4*12) on the right-side panel.Remove the right side panel.2.1.4 Right Side Honeycomb Cooling Media.Use screwdriver to remove 4 galvanized screws with plate head(ST4*12) on the honeycomb holder.Remove the honeycomb holder.Remove the honeycomb cooling media from the right side panel.2.1.5 Left Side Panel.Use screwdriver to remove 4 galvanized screws with plate head (ST4*12) on the left side panel.Remove the left side panel.2.1.6 Left Side Honeycomb Cooling Media.Use a screwdriver to remove 4 galvanized screws with plate head(ST4*12) on the honeycomb holder.Remove the honeycomb holder.Remove the honeycomb cooling media from the left side panel.2.2 How To Change SwitchRemove the back panel and follow the procedure 2.1.1Remove the right-side panel and follow procedure 2.1.32.2.1. Switch BoxUse a screw driver to remove 4 galvanized screws with plate head(ST3*12) on the switch box.Remove switch box.2.2.2. Switch(cool/speed/swing)Use screw driver to remove 2 galvanized screws (ST3X10) on each switch of the control panel(cool/speed/swing).Cool switchSpeed switchSwing switch2.2.3. Wiring Color ConnectionWiring color connection refers to part 4.2 Wiring Color Description.2.3 How To Change Water PumpRemove the back panel and follow the procedure 2.1.1Remove the right-side panel and follow procedure 2.1.3Remove the switch box and follow the procedure 2.2.12.3.1 Water pump pipe and water pump clip.Remove the water pump pipe.Use a screw driver to remove 2 SS screws(ST4*12) on the water pump clip.2.3.2 Cool Switch And Wiring ConnectorUse a screwdriver to remove 2 galvanized screws (ST3X10) on the cool switch of the control panel.Remove the brown wire on the cool switch.Remove the wiring cap (below picture shown) to get the water pump.Note: connection is between the water pump and the N wire of the power cord.2.3.3 Water Pump Wiring ConnectionThe water pump wiring connection refers to part 4.2 Wiring Color Description.2.4 How To Change Fan MotorRemove the back panel and follow the procedure 2.1.1Remove the right-side panel and follow procedure 2.1.3Remove the switch box and follow the procedure 2.2.12.4.1 Speed Switch And Wiring Connector.Use a screwdriver to remove 2 galvanized screws (ST3X10) on the speed switch of the control panel.Remove the white/yellow/blue wire on the speed switch.Remove the wiring cap (below picture shown).Note: connection is between fan motor COM wire(black) and N wire of power cord.Remove the wiring cap (below picture shown).Note: connection is between motor and power cord earth wire.Remove the wiring cap (below picture shown).Note: connection is between the capacitor and the motor.Remove the wiring cap (below picture shown).Note: connection is between capacitor and the motor.2.4.2 Fan Blade And Fan MotorUse a screwdriver to remove 1galvanized screws (M6X14) on the fan blade.Remove the fan blade.Use a screw driver to remove 8 galvanized screws (M5X12) on fan motor to get the fanmotor.2.4.3 Main Motor Wiring ConnectionMain motor wiring connection refers to part 4.2 Wiring Color Description.2.5 How To Change Swing MotorRemove the back panel and follow the procedure 2.1.1Remove the right-side panel and follow procedure 2.1.3Remove the switch box and follow the procedure 2.2.12.5.1 Swing Switch And Wiring Connector.Use a screwdriver to remove 2 galvanized screws (ST3X10) on the swing switch of the control panel.Remove the pink wire on the swing switch.Remove the wiring cap (below picture shown).Note: connection is between swing motor and N wire of power cord.2.5.2 Swing Motor And Swing Motor Wheel.Use a screwdriver to remove 2 galvanized screws(ST4X12) on the swing motor.Remove the swing motor.Use screwdriver to remove 1 galvanized screw(ST3*8) on the swing motor wheel.Remove the swing motor wheel.Get the swing motor.2.5.3 Swing Motor Wiring ConnectionSwing motor wiring connection refers to part 4.2 Wiring Color Description.TROUBLESHOOTING GUIDE3.1 Outside DimensionsWidth: 700 mm (27.56’’)Depth: 466 mm (18.35’’)Height: 1017 mm (40.0’’)3.2 Cooling SystemHoneywell Evaporative Air Coolers are built to maximize energy efficiency and keep costs low. Warm air is drawn into the cooler through a dust and odor-reducing carbon filter and enters the Honeycomb Cooling Media. Water pumped from the tank pours over the honeycomb media. As the warm air passes through the media, the water absorbs the heat, naturally cooling and humidifying the air. A fan propels the cooled air out into the room. This no-compressor system cools naturally, efficiently and inexpensively.Troubleshooting GuideThe following troubleshooting guide is intended to address the most common symptoms and is by no means exhaustive. If symptoms persist, call a qualified service provider. Only a certified electrician should complete any electrical work. Unplug and disconnect the appliance from the power source before attempting to troubleshoot any of the following symptoms.ProblemPossible CauseSolutionNo discharge of airThe cord is not plugged in.Make sure the power cord is plugged in and the supply switch is on.The power is not on.Turn the unit ON.Humidity output minimal to noneWater is below the minimum water level in the tank.Turn off the unit.Follow the instructions to fill the water tank with clean water.The water pump is damaged.Replace the water pump according to procedure 2.3.Watercolor yellowish at initial useColor fasts from honeycomb filter.This is natural. After several uses, the watercolor will be clean.Abnormal noise inside the productThe noise of the water pump when water is not up-to-min water level. the product again.Turn off the product. Add water, and then turn onMotor or blade problem.Turn off and unplug the product or change the main motor according to procedure 2.4.Musty or unpleasant odorWhen the Cooler is new.When the unit is used for the first time, the Honeycomb Cooling Media will have an odor, which will dissipate within a few hours of initial use.Stale or stagnant water in the water tank.Drain, flush and clean the water tankMedia mildewed or clogged.Replace media according to the procedure 2.1.Not coolingPump is not turned on.Check the water level and turn on the pump.Low or no water.Damaged water pump.Replace the water pump according to procedure 2.3.SCHEMATIC DIAGRAM4.1 Wiring Diagram4.2 Wiring Color DescriptionPower Cord:(1) Brown(2) Blue(3) Green + YellowLiveNeutralEarth (Ground)to speed switch(4)motor COM(black)to motor earthMain Motor:(1) White(2) Yellow(3) Blue(4) Black(5) Red(6) Brown(7) Green + YellowHigh speedMedium speedLow speedNeutralEarth (Ground)to speed switch(1)to speed switch(2)to speed switch(3)to N wire of power cordto the capacitor by end-closed connectorto the capacitor by end-closed connectorto power cord earthWater Pump:(1) Brown(2) Blueto pump control switch(1)to N wire of power cordSwing Motor:(1) Pink(2) Pinkto swing control switch(1)to N wire of power cordEXPLODED VIEWREPLACEMENT PARTS LISTSrPART NAMEQUANTITY1Up/Down swing knob22Swing knob pressboard13Horizontal louver 124Horizontal louver 225Horizontal louver 326Horizontal louver 427Horizontal louver 528Horizontal louver middle link19Horizontal louver press board A210Horizontal louver link A211Horizontal louver press board B212Horizontal louver link B213Swing/Cool knob214Speed knob115Control plane116Swing/Cool switch217Speed switch118Air outlet panel119Front panel120Rubber washer2021Vertical louver base422Short vertical louver223Long vertical louver224Switch box125Side panel226Side honeycomb pad227Side water distributor cover228Side water distributor229Side honeycomb pad holder430Swing motor131Swing motor wheel132Vertical louver drive133Base of fan motor frame234Fan motor frame435Fan blade assembly136Fan motor137Top cover138Water fill door139Four directions pipe140Back water distributor tube141Left/Right water distributor tube242Water fill door link243Back water distributor144Back water distributor cover145Left stand pillar146Back honeycomb pad holder247Back honeycomb pad148Back panel149Right stand pillar150Motor capacitor151Suction pipe152Water fill pipe153Float cap154Float holder155Float tube156Water level board157Vertical louver link158Water tank159Water pump160Water pump clip161Continuous water supply connection162Castor263Castor with brake264Water drainage plug165Silica gel ring1CONFIDENTIALWebsite: http://www.honeywellaircoolers.comDownloaded from www.Manualslib.com manuals search engineDocuments / ResourcesHoneywell CO60PM Evaporative Air Cooler [pdf] Instruction ManualCO60PM, Evaporative Air Cooler, CO60PM Evaporative Air Cooler, Air Cooler, CoolerReferencesUser ManualRelated PostsEvaporative Air Cooler With Humidifier SF-615H User ManualEvaporative Air Cooler With Humidifier SF-615H User Manual - Optimized PDF Evaporative Air Cooler With Humidifier SF-615H User…Honeywell TC10PM Series Portable Evaporative Air Cooler User ManualHoneywell TC10PM Series Portable Evaporative Air Cooler Portable Evaporative Air Cooler User Manual Read and save these instructions…kogan KAPMNCL4BA Mini Evaporative Air Cooler User Guidekogan KAPMNCL4BA Mini Evaporative Air Cooler SAFETY & WARNINGS Ensure to read this user guide prior to first…COOLER MASTER Hyper T200 CPU Air Cooler User ManualCOOLER MASTER Hyper T200 CPU Air Cooler IN THE BOX INTEL & AMD AMD AM4/AM3+/AM3/AM2+/AM2/FM2+/FM2/FM1 Intel - LGA1151/1150/1155/1156/1366/775…
Water Inlet (Manually)To refill the water tank, pull out the Water Fill Door located on the top of the unit and fill water to the Max, as indicated on the Water Level Indicator.Do not fill water above the Max water level mark.For maximum cooling performance, put ice cubes inside the Ice Loading Compartment located on the top of the Air Cooler.Filling With Water (Continuous Water Supply Connection)CAUTION Unplug from power source before fillingThis automated process eliminates the need to manually refill the water tank.Securely connect the continuous water supply connector (located on the lower left side panel) to the water supply.Turn on the water.The water tank will refill automatically.The water float valve will detect the water level and will automatically start or stop the water flow.Plug the unit into the power supply and turn the unit on.Installing Hose Adapter And Float ValveConnect the garden hose to the water supply connectorVerify that connections are secure and turn on the water.Control KnobsSpeed / On – OffConnect to the power supply and turn the Speed knob. The fan will start. Change the speed from 1 for Low to 2 for Medium to 3 for High. To switch OFF the unit turn the Speed knob to “0”.CoolTo begin cooling the desired area turn the “COOL” switch ON. The water pump will operate. You can feel the cooler air after the Honeycomb media is completely wet.SwingVertical LouversTurn the “SWING” switch ON. The louvers will begin to move from right to left automatically. Manually adjust the horizontal louvers to change vertical airflow.Horizontal LouversManually adjust the horizontal louvers to change vertical airflow.CLEANING & MAINTENANCEImportant – Please Read!The cooler is supplied with Honeycomb Cooling Media.The cleaning frequency for the Honeycomb media depends on local air and water conditions. In areas where the mineral content of water is high, mineral deposits may build up on the Honeycomb Cooling Media and restrict airflow. Draining the water reservoir and refilling it with fresh water at least once a week will help reduce mineral deposits. If mineral deposits remain on the Honeycomb media, the media should be removed and washed under fresh water. The media should be cleaned every two months or sooner, depending on your needs.Do not run the unit in COOL mode with stale water in the tank. Empty the tank and refill it with fresh water if the water has been standing in the tank for an extended period of time.For best results, allow the Honeycomb Cooling Media to dry after each use by turning off the cool function 15 minutes before turning the unit off.WARNINGBefore cleaning, turn the unit off and disconnect from the power source.Use a damp cloth to remove dirt and dust from the outside of the unit.Never use abrasive cleaners.When the unit is not in use, store it in a dry place, out of direct sunlight.Maximum water inlet pressure 0.5 MPa.Draining and Cleaning The Water TankTurn the power “off’ and disconnect the air cooler from the power supply.Move the unit to a location where it can be drained.Remove the drain plug and allow the tank to empty.Refill the water tank up to the maximum level with clean water and drain it completely.Fill the water tank and rinse at least 2-3 times before use.After cleaning ensure that the drain plug is back in place.Plug into the power supply and turn on the unit.Cleaning The Honeycomb Cooling MediaTurn off the unit, and unplug the power cord from the wall outlet.Rotate the unit facing the back panel, and locate the Grill Removal Screws. Remove the 4 screws with a screwdriver.Pull the rear grill panel, until it is completely removed.This cooler has Honeycomb cooling media on the right and left panels. The cleaning and removal procedure is the same as the rear panel.The Honeycomb cooling media can now be seen. Clean honeycomb with a clean cloth to remove all the dust & dirt particles.Once cleaning is finished, reassemble the unit.Plug into the power supply and turn on the unit.The air cooler is now ready to be used. This cleaning process should be repeated monthly to maintain the integrity of the unit and to remove particles filtered from the air.DISASSEMBLY INSTRUCTIONSWARNING – Before the following disassembly, POWER is set to OFF and disconnected the power cord.2.1 How To Change Honeycomb Cooling Media(3 sides)2.1.1 Back Panel.Use a screwdriver to remove 5 galvanized screws with plate head (ST4*12) on the back panel.Remove the back panel.2.1.2 Back Honeycomb Cooling Media.Use screwdriver to remove 4 galvanized screws with plate head(ST4*12) on the honeycomb holder.Remove the honeycomb holder.Remove the honeycomb cooling media from the back panel.2.1.3 Right Side Panel.Use a screwdriver to remove 4 galvanized screws with plate head (ST4*12) on the right-side panel.Remove the right side panel.2.1.4 Right Side Honeycomb Cooling Media.Use screwdriver to remove 4 galvanized screws with plate head(ST4*12) on the honeycomb holder.Remove the honeycomb holder.Remove the honeycomb cooling media from the right side panel.2.1.5 Left Side Panel.Use screwdriver to remove 4 galvanized screws with plate head (ST4*12) on the left side panel.Remove the left side panel.2.1.6 Left Side Honeycomb Cooling Media.Use a screwdriver to remove 4 galvanized screws with plate head(ST4*12) on the honeycomb holder.Remove the honeycomb holder.Remove the honeycomb cooling media from the left side panel.2.2 How To Change SwitchRemove the back panel and follow the procedure 2.1.1Remove the right-side panel and follow procedure 2.1.32.2.1. Switch BoxUse a screw driver to remove 4 galvanized screws with plate head(ST3*12) on the switch box.Remove switch box.2.2.2. Switch(cool/speed/swing)Use screw driver to remove 2 galvanized screws (ST3X10) on each switch of the control panel(cool/speed/swing).Cool switchSpeed switchSwing switch2.2.3. Wiring Color ConnectionWiring color connection refers to part 4.2 Wiring Color Description.2.3 How To Change Water PumpRemove the back panel and follow the procedure 2.1.1Remove the right-side panel and follow procedure 2.1.3Remove the switch box and follow the procedure 2.2.12.3.1 Water pump pipe and water pump clip.Remove the water pump pipe.Use a screw driver to remove 2 SS screws(ST4*12) on the water pump clip.2.3.2 Cool Switch And Wiring ConnectorUse a screwdriver to remove 2 galvanized screws (ST3X10) on the cool switch of the control panel.Remove the brown wire on the cool switch.Remove the wiring cap (below picture shown) to get the water pump.Note: connection is between the water pump and the N wire of the power cord.2.3.3 Water Pump Wiring ConnectionThe water pump wiring connection refers to part 4.2 Wiring Color Description.2.4 How To Change Fan MotorRemove the back panel and follow the procedure 2.1.1Remove the right-side panel and follow procedure 2.1.3Remove the switch box and follow the procedure 2.2.12.4.1 Speed Switch And Wiring Connector.Use a screwdriver to remove 2 galvanized screws (ST3X10) on the speed switch of the control panel.Remove the white/yellow/blue wire on the speed switch.Remove the wiring cap (below picture shown).Note: connection is between fan motor COM wire(black) and N wire of power cord.Remove the wiring cap (below picture shown).Note: connection is between motor and power cord earth wire.Remove the wiring cap (below picture shown).Note: connection is between the capacitor and the motor.Remove the wiring cap (below picture shown).Note: connection is between capacitor and the motor.2.4.2 Fan Blade And Fan MotorUse a screwdriver to remove 1galvanized screws (M6X14) on the fan blade.Remove the fan blade.Use a screw driver to remove 8 galvanized screws (M5X12) on fan motor to get the fanmotor.2.4.3 Main Motor Wiring ConnectionMain motor wiring connection refers to part 4.2 Wiring Color Description.2.5 How To Change Swing MotorRemove the back panel and follow the procedure 2.1.1Remove the right-side panel and follow procedure 2.1.3Remove the switch box and follow the procedure 2.2.12.5.1 Swing Switch And Wiring Connector.Use a screwdriver to remove 2 galvanized screws (ST3X10) on the swing switch of the control panel.Remove the pink wire on the swing switch.Remove the wiring cap (below picture shown).Note: connection is between swing motor and N wire of power cord.2.5.2 Swing Motor And Swing Motor Wheel.Use a screwdriver to remove 2 galvanized screws(ST4X12) on the swing motor.Remove the swing motor.Use screwdriver to remove 1 galvanized screw(ST3*8) on the swing motor wheel.Remove the swing motor wheel.Get the swing motor.2.5.3 Swing Motor Wiring ConnectionSwing motor wiring connection refers to part 4.2 Wiring Color Description.TROUBLESHOOTING GUIDE3.1 Outside DimensionsWidth: 700 mm (27.56’’)Depth: 466 mm (18.35’’)Height: 1017 mm (40.0’’)3.2 Cooling SystemHoneywell Evaporative Air Coolers are built to maximize energy efficiency and keep costs low. Warm air is drawn into the cooler through a dust and odor-reducing carbon filter and enters the Honeycomb Cooling Media. Water pumped from the tank pours over the honeycomb media. As the warm air passes through the media, the water absorbs the heat, naturally cooling and humidifying the air. A fan propels the cooled air out into the room. This no-compressor system cools naturally, efficiently and inexpensively.Troubleshooting GuideThe following troubleshooting guide is intended to address the most common symptoms and is by no means exhaustive. If symptoms persist, call a qualified service provider. Only a certified electrician should complete any electrical work. Unplug and disconnect the appliance from the power source before attempting to troubleshoot any of the following symptoms.ProblemPossible CauseSolutionNo discharge of airThe cord is not plugged in.Make sure the power cord is plugged in and the supply switch is on.The power is not on.Turn the unit ON.Humidity output minimal to noneWater is below the minimum water level in the tank.Turn off the unit.Follow the instructions to fill the water tank with clean water.The water pump is damaged.Replace the water pump according to procedure 2.3.Watercolor yellowish at initial useColor fasts from honeycomb filter.This is natural. After several uses, the watercolor will be clean.Abnormal noise inside the productThe noise of the water pump when water is not up-to-min water level. the product again.Turn off the product. Add water, and then turn onMotor or blade problem.Turn off and unplug the product or change the main motor according to procedure 2.4.Musty or unpleasant odorWhen the Cooler is new.When the unit is used for the first time, the Honeycomb Cooling Media will have an odor, which will dissipate within a few hours of initial use.Stale or stagnant water in the water tank.Drain, flush and clean the water tankMedia mildewed or clogged.Replace media according to the procedure 2.1.Not coolingPump is not turned on.Check the water level and turn on the pump.Low or no water.Damaged water pump.Replace the water pump according to procedure 2.3.SCHEMATIC DIAGRAM4.1 Wiring Diagram4.2 Wiring Color DescriptionPower Cord:(1) Brown(2) Blue(3) Green + YellowLiveNeutralEarth (Ground)to speed switch(4)motor COM(black)to motor earthMain Motor:(1) White(2) Yellow(3) Blue(4) Black(5) Red(6) Brown(7) Green + YellowHigh speedMedium speedLow speedNeutralEarth (Ground)to speed switch(1)to speed switch(2)to speed switch(3)to N wire of power cordto the capacitor by end-closed connectorto the capacitor by end-closed connectorto power cord earthWater Pump:(1) Brown(2) Blueto pump control switch(1)to N wire of power cordSwing Motor:(1) Pink(2) Pinkto swing control switch(1)to N wire of power cordEXPLODED VIEWREPLACEMENT PARTS LISTSrPART NAMEQUANTITY1Up/Down swing knob22Swing knob pressboard13Horizontal louver 124Horizontal louver 225Horizontal louver 326Horizontal louver 427Horizontal louver 528Horizontal louver middle link19Horizontal louver press board A210Horizontal louver link A211Horizontal louver press board B212Horizontal louver link B213Swing/Cool knob214Speed knob115Control plane116Swing/Cool switch217Speed switch118Air outlet panel119Front panel120Rubber washer2021Vertical louver base422Short vertical louver223Long vertical louver224Switch box125Side panel226Side honeycomb pad227Side water distributor cover228Side water distributor229Side honeycomb pad holder430Swing motor131Swing motor wheel132Vertical louver drive133Base of fan motor frame234Fan motor frame435Fan blade assembly136Fan motor137Top cover138Water fill door139Four directions pipe140Back water distributor tube141Left/Right water distributor tube242Water fill door link243Back water distributor144Back water distributor cover145Left stand pillar146Back honeycomb pad holder247Back honeycomb pad148Back panel149Right stand pillar150Motor capacitor151Suction pipe152Water fill pipe153Float cap154Float holder155Float tube156Water level board157Vertical louver link158Water tank159Water pump160Water pump clip161Continuous water supply connection162Castor263Castor with brake264Water drainage plug165Silica gel ring1CONFIDENTIALWebsite: http://www.honeywellaircoolers.comDownloaded from www.Manualslib.com manuals search engineDocuments / ResourcesHoneywell CO60PM Evaporative Air Cooler [pdf] Instruction ManualCO60PM, Evaporative Air Cooler, CO60PM Evaporative Air Cooler, Air Cooler, CoolerReferencesUser ManualRelated PostsEvaporative Air Cooler With Humidifier SF-615H User ManualEvaporative Air Cooler With Humidifier SF-615H User Manual - Optimized PDF Evaporative Air Cooler With Humidifier SF-615H User…Honeywell TC10PM Series Portable Evaporative Air Cooler User ManualHoneywell TC10PM Series Portable Evaporative Air Cooler Portable Evaporative Air Cooler User Manual Read and save these instructions…kogan KAPMNCL4BA Mini Evaporative Air Cooler User Guidekogan KAPMNCL4BA Mini Evaporative Air Cooler SAFETY & WARNINGS Ensure to read this user guide prior to first…COOLER MASTER Hyper T200 CPU Air Cooler User ManualCOOLER MASTER Hyper T200 CPU Air Cooler IN THE BOX INTEL & AMD AMD AM4/AM3+/AM3/AM2+/AM2/FM2+/FM2/FM1 Intel - LGA1151/1150/1155/1156/1366/775…
2.2.3. Wiring Color ConnectionWiring color connection refers to part 4.2 Wiring Color Description.2.3 How To Change Water PumpRemove the back panel and follow the procedure 2.1.1Remove the right-side panel and follow procedure 2.1.3Remove the switch box and follow the procedure 2.2.12.3.1 Water pump pipe and water pump clip.Remove the water pump pipe.Use a screw driver to remove 2 SS screws(ST4*12) on the water pump clip.2.3.2 Cool Switch And Wiring ConnectorUse a screwdriver to remove 2 galvanized screws (ST3X10) on the cool switch of the control panel.Remove the brown wire on the cool switch.Remove the wiring cap (below picture shown) to get the water pump.Note: connection is between the water pump and the N wire of the power cord.2.3.3 Water Pump Wiring ConnectionThe water pump wiring connection refers to part 4.2 Wiring Color Description.2.4 How To Change Fan MotorRemove the back panel and follow the procedure 2.1.1Remove the right-side panel and follow procedure 2.1.3Remove the switch box and follow the procedure 2.2.12.4.1 Speed Switch And Wiring Connector.Use a screwdriver to remove 2 galvanized screws (ST3X10) on the speed switch of the control panel.Remove the white/yellow/blue wire on the speed switch.Remove the wiring cap (below picture shown).Note: connection is between fan motor COM wire(black) and N wire of power cord.Remove the wiring cap (below picture shown).Note: connection is between motor and power cord earth wire.Remove the wiring cap (below picture shown).Note: connection is between the capacitor and the motor.Remove the wiring cap (below picture shown).Note: connection is between capacitor and the motor.2.4.2 Fan Blade And Fan MotorUse a screwdriver to remove 1galvanized screws (M6X14) on the fan blade.Remove the fan blade.Use a screw driver to remove 8 galvanized screws (M5X12) on fan motor to get the fanmotor.2.4.3 Main Motor Wiring ConnectionMain motor wiring connection refers to part 4.2 Wiring Color Description.2.5 How To Change Swing MotorRemove the back panel and follow the procedure 2.1.1Remove the right-side panel and follow procedure 2.1.3Remove the switch box and follow the procedure 2.2.12.5.1 Swing Switch And Wiring Connector.Use a screwdriver to remove 2 galvanized screws (ST3X10) on the swing switch of the control panel.Remove the pink wire on the swing switch.Remove the wiring cap (below picture shown).Note: connection is between swing motor and N wire of power cord.2.5.2 Swing Motor And Swing Motor Wheel.Use a screwdriver to remove 2 galvanized screws(ST4X12) on the swing motor.Remove the swing motor.Use screwdriver to remove 1 galvanized screw(ST3*8) on the swing motor wheel.Remove the swing motor wheel.Get the swing motor.2.5.3 Swing Motor Wiring ConnectionSwing motor wiring connection refers to part 4.2 Wiring Color Description.TROUBLESHOOTING GUIDE3.1 Outside DimensionsWidth: 700 mm (27.56’’)Depth: 466 mm (18.35’’)Height: 1017 mm (40.0’’)3.2 Cooling SystemHoneywell Evaporative Air Coolers are built to maximize energy efficiency and keep costs low. Warm air is drawn into the cooler through a dust and odor-reducing carbon filter and enters the Honeycomb Cooling Media. Water pumped from the tank pours over the honeycomb media. As the warm air passes through the media, the water absorbs the heat, naturally cooling and humidifying the air. A fan propels the cooled air out into the room. This no-compressor system cools naturally, efficiently and inexpensively.Troubleshooting GuideThe following troubleshooting guide is intended to address the most common symptoms and is by no means exhaustive. If symptoms persist, call a qualified service provider. Only a certified electrician should complete any electrical work. Unplug and disconnect the appliance from the power source before attempting to troubleshoot any of the following symptoms.ProblemPossible CauseSolutionNo discharge of airThe cord is not plugged in.Make sure the power cord is plugged in and the supply switch is on.The power is not on.Turn the unit ON.Humidity output minimal to noneWater is below the minimum water level in the tank.Turn off the unit.Follow the instructions to fill the water tank with clean water.The water pump is damaged.Replace the water pump according to procedure 2.3.Watercolor yellowish at initial useColor fasts from honeycomb filter.This is natural. After several uses, the watercolor will be clean.Abnormal noise inside the productThe noise of the water pump when water is not up-to-min water level. the product again.Turn off the product. Add water, and then turn onMotor or blade problem.Turn off and unplug the product or change the main motor according to procedure 2.4.Musty or unpleasant odorWhen the Cooler is new.When the unit is used for the first time, the Honeycomb Cooling Media will have an odor, which will dissipate within a few hours of initial use.Stale or stagnant water in the water tank.Drain, flush and clean the water tankMedia mildewed or clogged.Replace media according to the procedure 2.1.Not coolingPump is not turned on.Check the water level and turn on the pump.Low or no water.Damaged water pump.Replace the water pump according to procedure 2.3.SCHEMATIC DIAGRAM4.1 Wiring Diagram4.2 Wiring Color DescriptionPower Cord:(1) Brown(2) Blue(3) Green + YellowLiveNeutralEarth (Ground)to speed switch(4)motor COM(black)to motor earthMain Motor:(1) White(2) Yellow(3) Blue(4) Black(5) Red(6) Brown(7) Green + YellowHigh speedMedium speedLow speedNeutralEarth (Ground)to speed switch(1)to speed switch(2)to speed switch(3)to N wire of power cordto the capacitor by end-closed connectorto the capacitor by end-closed connectorto power cord earthWater Pump:(1) Brown(2) Blueto pump control switch(1)to N wire of power cordSwing Motor:(1) Pink(2) Pinkto swing control switch(1)to N wire of power cordEXPLODED VIEWREPLACEMENT PARTS LISTSrPART NAMEQUANTITY1Up/Down swing knob22Swing knob pressboard13Horizontal louver 124Horizontal louver 225Horizontal louver 326Horizontal louver 427Horizontal louver 528Horizontal louver middle link19Horizontal louver press board A210Horizontal louver link A211Horizontal louver press board B212Horizontal louver link B213Swing/Cool knob214Speed knob115Control plane116Swing/Cool switch217Speed switch118Air outlet panel119Front panel120Rubber washer2021Vertical louver base422Short vertical louver223Long vertical louver224Switch box125Side panel226Side honeycomb pad227Side water distributor cover228Side water distributor229Side honeycomb pad holder430Swing motor131Swing motor wheel132Vertical louver drive133Base of fan motor frame234Fan motor frame435Fan blade assembly136Fan motor137Top cover138Water fill door139Four directions pipe140Back water distributor tube141Left/Right water distributor tube242Water fill door link243Back water distributor144Back water distributor cover145Left stand pillar146Back honeycomb pad holder247Back honeycomb pad148Back panel149Right stand pillar150Motor capacitor151Suction pipe152Water fill pipe153Float cap154Float holder155Float tube156Water level board157Vertical louver link158Water tank159Water pump160Water pump clip161Continuous water supply connection162Castor263Castor with brake264Water drainage plug165Silica gel ring1CONFIDENTIALWebsite: http://www.honeywellaircoolers.comDownloaded from www.Manualslib.com manuals search engineDocuments / ResourcesHoneywell CO60PM Evaporative Air Cooler [pdf] Instruction ManualCO60PM, Evaporative Air Cooler, CO60PM Evaporative Air Cooler, Air Cooler, CoolerReferencesUser ManualRelated PostsEvaporative Air Cooler With Humidifier SF-615H User ManualEvaporative Air Cooler With Humidifier SF-615H User Manual - Optimized PDF Evaporative Air Cooler With Humidifier SF-615H User…Honeywell TC10PM Series Portable Evaporative Air Cooler User ManualHoneywell TC10PM Series Portable Evaporative Air Cooler Portable Evaporative Air Cooler User Manual Read and save these instructions…kogan KAPMNCL4BA Mini Evaporative Air Cooler User Guidekogan KAPMNCL4BA Mini Evaporative Air Cooler SAFETY & WARNINGS Ensure to read this user guide prior to first…COOLER MASTER Hyper T200 CPU Air Cooler User ManualCOOLER MASTER Hyper T200 CPU Air Cooler IN THE BOX INTEL & AMD AMD AM4/AM3+/AM3/AM2+/AM2/FM2+/FM2/FM1 Intel - LGA1151/1150/1155/1156/1366/775…
2.5 How To Change Swing MotorRemove the back panel and follow the procedure 2.1.1Remove the right-side panel and follow procedure 2.1.3Remove the switch box and follow the procedure 2.2.12.5.1 Swing Switch And Wiring Connector.Use a screwdriver to remove 2 galvanized screws (ST3X10) on the swing switch of the control panel.Remove the pink wire on the swing switch.Remove the wiring cap (below picture shown).Note: connection is between swing motor and N wire of power cord.2.5.2 Swing Motor And Swing Motor Wheel.Use a screwdriver to remove 2 galvanized screws(ST4X12) on the swing motor.Remove the swing motor.Use screwdriver to remove 1 galvanized screw(ST3*8) on the swing motor wheel.Remove the swing motor wheel.Get the swing motor.2.5.3 Swing Motor Wiring ConnectionSwing motor wiring connection refers to part 4.2 Wiring Color Description.TROUBLESHOOTING GUIDE3.1 Outside DimensionsWidth: 700 mm (27.56’’)Depth: 466 mm (18.35’’)Height: 1017 mm (40.0’’)3.2 Cooling SystemHoneywell Evaporative Air Coolers are built to maximize energy efficiency and keep costs low. Warm air is drawn into the cooler through a dust and odor-reducing carbon filter and enters the Honeycomb Cooling Media. Water pumped from the tank pours over the honeycomb media. As the warm air passes through the media, the water absorbs the heat, naturally cooling and humidifying the air. A fan propels the cooled air out into the room. This no-compressor system cools naturally, efficiently and inexpensively.Troubleshooting GuideThe following troubleshooting guide is intended to address the most common symptoms and is by no means exhaustive. If symptoms persist, call a qualified service provider. Only a certified electrician should complete any electrical work. Unplug and disconnect the appliance from the power source before attempting to troubleshoot any of the following symptoms.ProblemPossible CauseSolutionNo discharge of airThe cord is not plugged in.Make sure the power cord is plugged in and the supply switch is on.The power is not on.Turn the unit ON.Humidity output minimal to noneWater is below the minimum water level in the tank.Turn off the unit.Follow the instructions to fill the water tank with clean water.The water pump is damaged.Replace the water pump according to procedure 2.3.Watercolor yellowish at initial useColor fasts from honeycomb filter.This is natural. After several uses, the watercolor will be clean.Abnormal noise inside the productThe noise of the water pump when water is not up-to-min water level. the product again.Turn off the product. Add water, and then turn onMotor or blade problem.Turn off and unplug the product or change the main motor according to procedure 2.4.Musty or unpleasant odorWhen the Cooler is new.When the unit is used for the first time, the Honeycomb Cooling Media will have an odor, which will dissipate within a few hours of initial use.Stale or stagnant water in the water tank.Drain, flush and clean the water tankMedia mildewed or clogged.Replace media according to the procedure 2.1.Not coolingPump is not turned on.Check the water level and turn on the pump.Low or no water.Damaged water pump.Replace the water pump according to procedure 2.3.SCHEMATIC DIAGRAM4.1 Wiring Diagram4.2 Wiring Color DescriptionPower Cord:(1) Brown(2) Blue(3) Green + YellowLiveNeutralEarth (Ground)to speed switch(4)motor COM(black)to motor earthMain Motor:(1) White(2) Yellow(3) Blue(4) Black(5) Red(6) Brown(7) Green + YellowHigh speedMedium speedLow speedNeutralEarth (Ground)to speed switch(1)to speed switch(2)to speed switch(3)to N wire of power cordto the capacitor by end-closed connectorto the capacitor by end-closed connectorto power cord earthWater Pump:(1) Brown(2) Blueto pump control switch(1)to N wire of power cordSwing Motor:(1) Pink(2) Pinkto swing control switch(1)to N wire of power cordEXPLODED VIEWREPLACEMENT PARTS LISTSrPART NAMEQUANTITY1Up/Down swing knob22Swing knob pressboard13Horizontal louver 124Horizontal louver 225Horizontal louver 326Horizontal louver 427Horizontal louver 528Horizontal louver middle link19Horizontal louver press board A210Horizontal louver link A211Horizontal louver press board B212Horizontal louver link B213Swing/Cool knob214Speed knob115Control plane116Swing/Cool switch217Speed switch118Air outlet panel119Front panel120Rubber washer2021Vertical louver base422Short vertical louver223Long vertical louver224Switch box125Side panel226Side honeycomb pad227Side water distributor cover228Side water distributor229Side honeycomb pad holder430Swing motor131Swing motor wheel132Vertical louver drive133Base of fan motor frame234Fan motor frame435Fan blade assembly136Fan motor137Top cover138Water fill door139Four directions pipe140Back water distributor tube141Left/Right water distributor tube242Water fill door link243Back water distributor144Back water distributor cover145Left stand pillar146Back honeycomb pad holder247Back honeycomb pad148Back panel149Right stand pillar150Motor capacitor151Suction pipe152Water fill pipe153Float cap154Float holder155Float tube156Water level board157Vertical louver link158Water tank159Water pump160Water pump clip161Continuous water supply connection162Castor263Castor with brake264Water drainage plug165Silica gel ring1CONFIDENTIALWebsite: http://www.honeywellaircoolers.comDownloaded from www.Manualslib.com manuals search engineDocuments / ResourcesHoneywell CO60PM Evaporative Air Cooler [pdf] Instruction ManualCO60PM, Evaporative Air Cooler, CO60PM Evaporative Air Cooler, Air Cooler, CoolerReferencesUser ManualRelated PostsEvaporative Air Cooler With Humidifier SF-615H User ManualEvaporative Air Cooler With Humidifier SF-615H User Manual - Optimized PDF Evaporative Air Cooler With Humidifier SF-615H User…Honeywell TC10PM Series Portable Evaporative Air Cooler User ManualHoneywell TC10PM Series Portable Evaporative Air Cooler Portable Evaporative Air Cooler User Manual Read and save these instructions…kogan KAPMNCL4BA Mini Evaporative Air Cooler User Guidekogan KAPMNCL4BA Mini Evaporative Air Cooler SAFETY & WARNINGS Ensure to read this user guide prior to first…COOLER MASTER Hyper T200 CPU Air Cooler User ManualCOOLER MASTER Hyper T200 CPU Air Cooler IN THE BOX INTEL & AMD AMD AM4/AM3+/AM3/AM2+/AM2/FM2+/FM2/FM1 Intel - LGA1151/1150/1155/1156/1366/775…
CADDpump how to use
http://localhost:1947/_int_/config_to.htmlThe following screen will appear... 2. Ensure that aggressive search is enabled.
4.1 Wiring Diagram4.2 Wiring Color DescriptionPower Cord:(1) Brown(2) Blue(3) Green + YellowLiveNeutralEarth (Ground)to speed switch(4)motor COM(black)to motor earthMain Motor:(1) White(2) Yellow(3) Blue(4) Black(5) Red(6) Brown(7) Green + YellowHigh speedMedium speedLow speedNeutralEarth (Ground)to speed switch(1)to speed switch(2)to speed switch(3)to N wire of power cordto the capacitor by end-closed connectorto the capacitor by end-closed connectorto power cord earthWater Pump:(1) Brown(2) Blueto pump control switch(1)to N wire of power cordSwing Motor:(1) Pink(2) Pinkto swing control switch(1)to N wire of power cordEXPLODED VIEWREPLACEMENT PARTS LISTSrPART NAMEQUANTITY1Up/Down swing knob22Swing knob pressboard13Horizontal louver 124Horizontal louver 225Horizontal louver 326Horizontal louver 427Horizontal louver 528Horizontal louver middle link19Horizontal louver press board A210Horizontal louver link A211Horizontal louver press board B212Horizontal louver link B213Swing/Cool knob214Speed knob115Control plane116Swing/Cool switch217Speed switch118Air outlet panel119Front panel120Rubber washer2021Vertical louver base422Short vertical louver223Long vertical louver224Switch box125Side panel226Side honeycomb pad227Side water distributor cover228Side water distributor229Side honeycomb pad holder430Swing motor131Swing motor wheel132Vertical louver drive133Base of fan motor frame234Fan motor frame435Fan blade assembly136Fan motor137Top cover138Water fill door139Four directions pipe140Back water distributor tube141Left/Right water distributor tube242Water fill door link243Back water distributor144Back water distributor cover145Left stand pillar146Back honeycomb pad holder247Back honeycomb pad148Back panel149Right stand pillar150Motor capacitor151Suction pipe152Water fill pipe153Float cap154Float holder155Float tube156Water level board157Vertical louver link158Water tank159Water pump160Water pump clip161Continuous water supply connection162Castor263Castor with brake264Water drainage plug165Silica gel ring1CONFIDENTIALWebsite: http://www.honeywellaircoolers.comDownloaded from www.Manualslib.com manuals search engineDocuments / ResourcesHoneywell CO60PM Evaporative Air Cooler [pdf] Instruction ManualCO60PM, Evaporative Air Cooler, CO60PM Evaporative Air Cooler, Air Cooler, CoolerReferencesUser ManualRelated PostsEvaporative Air Cooler With Humidifier SF-615H User ManualEvaporative Air Cooler With Humidifier SF-615H User Manual - Optimized PDF Evaporative Air Cooler With Humidifier SF-615H User…Honeywell TC10PM Series Portable Evaporative Air Cooler User ManualHoneywell TC10PM Series Portable Evaporative Air Cooler Portable Evaporative Air Cooler User Manual Read and save these instructions…kogan KAPMNCL4BA Mini Evaporative Air Cooler User Guidekogan KAPMNCL4BA Mini Evaporative Air Cooler SAFETY & WARNINGS Ensure to read this user guide prior to first…COOLER MASTER Hyper T200 CPU Air Cooler User ManualCOOLER MASTER Hyper T200 CPU Air Cooler IN THE BOX INTEL & AMD AMD AM4/AM3+/AM3/AM2+/AM2/FM2+/FM2/FM1 Intel - LGA1151/1150/1155/1156/1366/775…
PCAkeynurse
The string value that needs to be entered can be found by running the n4ce License Manager on the SERVER hosting the network license. Once the V2C has been applied to the Server.
2.4.1 Speed Switch And Wiring Connector.Use a screwdriver to remove 2 galvanized screws (ST3X10) on the speed switch of the control panel.Remove the white/yellow/blue wire on the speed switch.Remove the wiring cap (below picture shown).Note: connection is between fan motor COM wire(black) and N wire of power cord.Remove the wiring cap (below picture shown).Note: connection is between motor and power cord earth wire.Remove the wiring cap (below picture shown).Note: connection is between the capacitor and the motor.Remove the wiring cap (below picture shown).Note: connection is between capacitor and the motor.2.4.2 Fan Blade And Fan MotorUse a screwdriver to remove 1galvanized screws (M6X14) on the fan blade.Remove the fan blade.Use a screw driver to remove 8 galvanized screws (M5X12) on fan motor to get the fanmotor.2.4.3 Main Motor Wiring ConnectionMain motor wiring connection refers to part 4.2 Wiring Color Description.2.5 How To Change Swing MotorRemove the back panel and follow the procedure 2.1.1Remove the right-side panel and follow procedure 2.1.3Remove the switch box and follow the procedure 2.2.12.5.1 Swing Switch And Wiring Connector.Use a screwdriver to remove 2 galvanized screws (ST3X10) on the swing switch of the control panel.Remove the pink wire on the swing switch.Remove the wiring cap (below picture shown).Note: connection is between swing motor and N wire of power cord.2.5.2 Swing Motor And Swing Motor Wheel.Use a screwdriver to remove 2 galvanized screws(ST4X12) on the swing motor.Remove the swing motor.Use screwdriver to remove 1 galvanized screw(ST3*8) on the swing motor wheel.Remove the swing motor wheel.Get the swing motor.2.5.3 Swing Motor Wiring ConnectionSwing motor wiring connection refers to part 4.2 Wiring Color Description.TROUBLESHOOTING GUIDE3.1 Outside DimensionsWidth: 700 mm (27.56’’)Depth: 466 mm (18.35’’)Height: 1017 mm (40.0’’)3.2 Cooling SystemHoneywell Evaporative Air Coolers are built to maximize energy efficiency and keep costs low. Warm air is drawn into the cooler through a dust and odor-reducing carbon filter and enters the Honeycomb Cooling Media. Water pumped from the tank pours over the honeycomb media. As the warm air passes through the media, the water absorbs the heat, naturally cooling and humidifying the air. A fan propels the cooled air out into the room. This no-compressor system cools naturally, efficiently and inexpensively.Troubleshooting GuideThe following troubleshooting guide is intended to address the most common symptoms and is by no means exhaustive. If symptoms persist, call a qualified service provider. Only a certified electrician should complete any electrical work. Unplug and disconnect the appliance from the power source before attempting to troubleshoot any of the following symptoms.ProblemPossible CauseSolutionNo discharge of airThe cord is not plugged in.Make sure the power cord is plugged in and the supply switch is on.The power is not on.Turn the unit ON.Humidity output minimal to noneWater is below the minimum water level in the tank.Turn off the unit.Follow the instructions to fill the water tank with clean water.The water pump is damaged.Replace the water pump according to procedure 2.3.Watercolor yellowish at initial useColor fasts from honeycomb filter.This is natural. After several uses, the watercolor will be clean.Abnormal noise inside the productThe noise of the water pump when water is not up-to-min water level. the product again.Turn off the product. Add water, and then turn onMotor or blade problem.Turn off and unplug the product or change the main motor according to procedure 2.4.Musty or unpleasant odorWhen the Cooler is new.When the unit is used for the first time, the Honeycomb Cooling Media will have an odor, which will dissipate within a few hours of initial use.Stale or stagnant water in the water tank.Drain, flush and clean the water tankMedia mildewed or clogged.Replace media according to the procedure 2.1.Not coolingPump is not turned on.Check the water level and turn on the pump.Low or no water.Damaged water pump.Replace the water pump according to procedure 2.3.SCHEMATIC DIAGRAM4.1 Wiring Diagram4.2 Wiring Color DescriptionPower Cord:(1) Brown(2) Blue(3) Green + YellowLiveNeutralEarth (Ground)to speed switch(4)motor COM(black)to motor earthMain Motor:(1) White(2) Yellow(3) Blue(4) Black(5) Red(6) Brown(7) Green + YellowHigh speedMedium speedLow speedNeutralEarth (Ground)to speed switch(1)to speed switch(2)to speed switch(3)to N wire of power cordto the capacitor by end-closed connectorto the capacitor by end-closed connectorto power cord earthWater Pump:(1) Brown(2) Blueto pump control switch(1)to N wire of power cordSwing Motor:(1) Pink(2) Pinkto swing control switch(1)to N wire of power cordEXPLODED VIEWREPLACEMENT PARTS LISTSrPART NAMEQUANTITY1Up/Down swing knob22Swing knob pressboard13Horizontal louver 124Horizontal louver 225Horizontal louver 326Horizontal louver 427Horizontal louver 528Horizontal louver middle link19Horizontal louver press board A210Horizontal louver link A211Horizontal louver press board B212Horizontal louver link B213Swing/Cool knob214Speed knob115Control plane116Swing/Cool switch217Speed switch118Air outlet panel119Front panel120Rubber washer2021Vertical louver base422Short vertical louver223Long vertical louver224Switch box125Side panel226Side honeycomb pad227Side water distributor cover228Side water distributor229Side honeycomb pad holder430Swing motor131Swing motor wheel132Vertical louver drive133Base of fan motor frame234Fan motor frame435Fan blade assembly136Fan motor137Top cover138Water fill door139Four directions pipe140Back water distributor tube141Left/Right water distributor tube242Water fill door link243Back water distributor144Back water distributor cover145Left stand pillar146Back honeycomb pad holder247Back honeycomb pad148Back panel149Right stand pillar150Motor capacitor151Suction pipe152Water fill pipe153Float cap154Float holder155Float tube156Water level board157Vertical louver link158Water tank159Water pump160Water pump clip161Continuous water supply connection162Castor263Castor with brake264Water drainage plug165Silica gel ring1CONFIDENTIALWebsite: http://www.honeywellaircoolers.comDownloaded from www.Manualslib.com manuals search engineDocuments / ResourcesHoneywell CO60PM Evaporative Air Cooler [pdf] Instruction ManualCO60PM, Evaporative Air Cooler, CO60PM Evaporative Air Cooler, Air Cooler, CoolerReferencesUser ManualRelated PostsEvaporative Air Cooler With Humidifier SF-615H User ManualEvaporative Air Cooler With Humidifier SF-615H User Manual - Optimized PDF Evaporative Air Cooler With Humidifier SF-615H User…Honeywell TC10PM Series Portable Evaporative Air Cooler User ManualHoneywell TC10PM Series Portable Evaporative Air Cooler Portable Evaporative Air Cooler User Manual Read and save these instructions…kogan KAPMNCL4BA Mini Evaporative Air Cooler User Guidekogan KAPMNCL4BA Mini Evaporative Air Cooler SAFETY & WARNINGS Ensure to read this user guide prior to first…COOLER MASTER Hyper T200 CPU Air Cooler User ManualCOOLER MASTER Hyper T200 CPU Air Cooler IN THE BOX INTEL & AMD AMD AM4/AM3+/AM3/AM2+/AM2/FM2+/FM2/FM1 Intel - LGA1151/1150/1155/1156/1366/775…
This website is an independent publication and is neither affiliated with nor endorsed by any of the trademark owners. The "Bluetooth®" word mark and logos are registered trademarks owned by Bluetooth SIG, Inc. The "Wi-Fi®" word mark and logos are registered trademarks owned by the Wi-Fi Alliance. Any use of these marks on this website does not imply any affiliation with or endorsement.
EVAPORATIVE AIR COOLERSERVICE MANUALMODEL NO.: CO60PM (FOR INDOOR & OUTDOOR USE)CAUTION:Before servicing the unit, read the “Safety Precautions” in this manual.Only for authorized service.Contents hide1 PREFACE2 Specifications3 Features4 Operation Instructions:5 CLEANING & MAINTENANCE6 DISASSEMBLY INSTRUCTIONS7 TROUBLESHOOTING GUIDE8 Troubleshooting Guide9 SCHEMATIC DIAGRAM10 EXPLODED VIEW11 REPLACEMENT PARTS LIST12 Documents / Resources12.1 References13 Related PostsPREFACEThis manual is designed to provide you with important service information. Be sure to read the safety precautions prior to servicing the unit.1.1 Safety PrecautionsWhen servicing, set the POWER of the CONTROL PANEL to OFF and unplug the power cord.Observe the original lead dress. If a short circuit is found, replace all parts which have been overheated or damaged by the short circuit.After servicing, make an insulation resistance test to prevent the customer’s exposure to shock hazards.1.1 Safety PrecautionsWhen servicing, set the POWER of the CONTROL PANEL to OFF and unplug the power cord.Observe the original lead dress. If a short circuit is found, replace all parts which have been overheated or damaged by the short circuit.After servicing, make an insulation resistance test to prevent the customer’s exposure to shock hazards.1.2 Insulation Resistance TestUnplug the power cord and connect a jumper between 2 pins.The grounding conductor (green or green & yellow) is to be open.Measure the resistance value with an ohm meter between the jumper lead and each exposed metallic part on the equipment at all MODES (except POWER OFF).The value should be over 1 MΩ.SpecificationsMODELS/ITEMSCO60PMPower Supply120V, 50HzInput (W)220WRunning Current (A)1.83AFan Type16″ metal fan bladeFan Speeds3Operation ControlControl PanelAir Direction ControlVertical Louver (Right & Left) – AutoHorizontal Louver (Up & Down) – ManualProtectorFan Motor Internal Thermal ProtectorWater Pump Internal Thermal ProtectorFilter3 Sides Honeycomb media (Back 591.5 x 538 x 40mm2 Sides 591.5 x 270 x 40mm)Power Cord2.5 m (3 wire with grounding)Water Fill SystemManual (from top cover)Auto (from continuous water supply connection)Drain SystemManual drain plugWater Tank Capacity15.8 US Gallon / 60 L*Net Weight39.2 lbs / 17.8 kgOuter Dimension (WxDxH)27.56″ x 18.35″ x 40.0″700 x 466 x 1017 mm*Due to continuous updates to the product on account of compliance requirements, tank capacity may be changed by the manufacturer over a period of timeFeaturesThree functions in one: air cooler, humidifier & fan.Very powerful airflow: up to 2610 m³ /hr or 1540 CFMCooling area: up to 80 m² or 850 ft²Air throw distance: 11 m or 36 ft.3 sides of honeycomb cooling media for optimum performance.Oscillating louvers.Mounted with castors for easy mobility.3 speeds: high, medium, and low.60-liter water tank capacity.1.4 Warning & Safety RulesWARNING – This appliance is intended for use outdoors, in the home, or in office environments. Any other use is not recommended by the manufacturer and may cause fire, electrical shocks, or injury to a person or property.When using electrical appliances, basic safety precautions should always be followed:Your cooler should run on 120V Volt AC, 50 Hz current only.Check the household voltage to ensure it matches the appliance’s rate specification.Before operating the product remove it from its packaging and check it is in good condition.If the supply cord is damaged, it must be replaced by the manufacturer, its service agent or similarly qualified persons in order to avoid a hazard.DO NOT operate any product with a damaged cord or plug.DO NOT use an extension cord with this appliance.DO NOT run power cord under carpeting, or cover with rugs or runners. Arrange the cord away from areas where it may be tripped over.Unplug the appliance during filling and cleaning.Always unplug the appliance from the power source before servicing or removing the unit.Disconnect the power supply before servicing or cleaning operation.Remove the power cord from the electrical receptacle by grasping and pulling on the power cord plug-end only, never from the cord.DO NOT use the product in areas where gasoline, paint or other flammable goods and objects are stored.When using the ‘’COOL’’ setting, please check the water indicator level to ensure it is above the minimum water level. Operation of this unit on the ‘’COOL’’ setting on or below minimum water level could result in damage to the water pump.DO NOT attempt repair or adjustment to any electrical or mechanical functions of the cooler.Verify that the voltage power source matches the appliance’s electrical specifications. The improper voltage will burn out the blower/fan, oscillating, and/or pump motor windings and will void the warranty.DO NOT cover the air inlet or outlet on the appliance as this may cause motor damage.DO NOT insert or allow objects to enter any ventilation, exhaust opening, or water tank as this may damage the product and could cause an electrical shock or fire.DO NOT operate with media removed as this will overload and damage the motor.To reduce the risk of fire or electric shock, do not use this fan with any solid-state speed control device.DO NOT leave the appliance operating unattended for any extended period of time.This appliance is not intended for use by persons (including children or the elderly) with reduced physical, sensory or mental capabilities, or lack of experience and knowledge unless they have been given supervision or instruction concerning the use of the appliance by a person responsible for their safety.DO NOT let children play with any appliance packaging or plastic bags. Injury may resultfrom such practice.Children should be supervised to ensure that they do not play with the appliance.If the unit is damaged or it malfunctions, do not continue to operate it.Place the unit on the floor only.This product is not intended for use in wet or damp locations. Never locate the product where it may fall into a bathtub or other water container. DO NOT use in bathrooms. When it is not in use always store in a dry area.Don’t use indoor extension cords outside. Look for extension cords specifically marked for outdoor use. Look for extension cords that have a GFCI (Ground Fault Circuit Interrupter) built in.Make sure the amperage rating for the extension cord is higher than the amperage rating for the appliance. Check labels and owner’s manuals on the appliance and the extension cord for amperage ratings.Power cords have to be contained. If they must run along the ground, make sure every inch of them is secured so they will not be tripped over.The wiring and connections must be waterproof. Be sure the connections (to the air cooler) never get wet. Your unit is waterproof, but everything attached to it must be waterproof, too.Set up your unit so it cannot be tripped over or wobble loose. It must rest on solid support.NOTE: OPERATE THE UNIT WHEN THE WATER TANK IS FILLED WITH CLEAN WATER1.5 Parts Description1 Water Inlet and Ice2 Handle3 Left Honeycomb Panel4 Lever for Horizontal Louvers5 Water Tank6 Casters7 Horizontal Louvers8 Water Level Indicator9 Control Panel Loading Compartment10 Right Honeycomb Panel11 Continuous Water Supply Connection12 Drain Plug13 Backside Honeycomb Panel14 Power Cord & Plug15 Rear Grill Removal Screws16 Water Fill Door17 Honeycomb Cooling Media18 Water Inlet (Optional) for manual refill 1.6 OperationsControl Panel:NOTE:The speed control may be marked as High/Med/Low in certain units.Operation Instructions: Cooler Location:Place the cooler in front of an open door or window. Ensure that there is adequate cross–ventilation in the room by leaving a door or window open opposite the cooler. Following these guidelines will ensure your cooler will work as effectively as possible.Not an Air Conditioner:The evaporative air cooler is not an air conditioner as it does not use a compressor or refrigerant gas. It should not be expected to cool as efficiently as a refrigerated air conditioner. The recommended maximum relative humidity level is 60% or less, which allows a noticeable temperature decrease. The temperature decrease will be greater in drier climates because higher evaporation occurs when the humidity is low.The evaporative air cooler should not be used in enclosed spaces. It must be kept level and there must be water in the water tank. The room should have doors and windows opened to allow free airflow. The evaporative air cooler works best when placed near an open window so that outside air is drawn into the evaporative air cooler, the air circulates in the room, and then exits via the door. The maximum cooling effect is felt when a person is in the flow of air coming out of the evaporative air cooler.The evaporative air cooler can also be used to humidify dry air during cool weather. To be used for humidification the windows and doors should be closed to allow the humidified air to accumulate. The evaporative air cooler is not an air conditioner as it does not use a compressor or refrigerant gas. It should not be expected to cool as efficiently as a refrigerated air conditioner.NOTE: When the product is used for the first time the Honeycomb Cooling Media will have an odor that will dissipate in a week or so of initial use.FILL WATER:Water can be filled into the air cooler by:Water Inlet (Manually)Water / Ice can be put into the tank through the top opening. There is a hole for water to flow into the tank.Continuous water supply (Auto-Refill)Connect a garden hose to the continuous water supply inlet.Water Inlet (Manually)To refill the water tank, pull out the Water Fill Door located on the top of the unit and fill water to the Max, as indicated on the Water Level Indicator.Do not fill water above the Max water level mark.For maximum cooling performance, put ice cubes inside the Ice Loading Compartment located on the top of the Air Cooler.Filling With Water (Continuous Water Supply Connection)CAUTION Unplug from power source before fillingThis automated process eliminates the need to manually refill the water tank.Securely connect the continuous water supply connector (located on the lower left side panel) to the water supply.Turn on the water.The water tank will refill automatically.The water float valve will detect the water level and will automatically start or stop the water flow.Plug the unit into the power supply and turn the unit on.Installing Hose Adapter And Float ValveConnect the garden hose to the water supply connectorVerify that connections are secure and turn on the water.Control KnobsSpeed / On – OffConnect to the power supply and turn the Speed knob. The fan will start. Change the speed from 1 for Low to 2 for Medium to 3 for High. To switch OFF the unit turn the Speed knob to “0”.CoolTo begin cooling the desired area turn the “COOL” switch ON. The water pump will operate. You can feel the cooler air after the Honeycomb media is completely wet.SwingVertical LouversTurn the “SWING” switch ON. The louvers will begin to move from right to left automatically. Manually adjust the horizontal louvers to change vertical airflow.Horizontal LouversManually adjust the horizontal louvers to change vertical airflow.CLEANING & MAINTENANCEImportant – Please Read!The cooler is supplied with Honeycomb Cooling Media.The cleaning frequency for the Honeycomb media depends on local air and water conditions. In areas where the mineral content of water is high, mineral deposits may build up on the Honeycomb Cooling Media and restrict airflow. Draining the water reservoir and refilling it with fresh water at least once a week will help reduce mineral deposits. If mineral deposits remain on the Honeycomb media, the media should be removed and washed under fresh water. The media should be cleaned every two months or sooner, depending on your needs.Do not run the unit in COOL mode with stale water in the tank. Empty the tank and refill it with fresh water if the water has been standing in the tank for an extended period of time.For best results, allow the Honeycomb Cooling Media to dry after each use by turning off the cool function 15 minutes before turning the unit off.WARNINGBefore cleaning, turn the unit off and disconnect from the power source.Use a damp cloth to remove dirt and dust from the outside of the unit.Never use abrasive cleaners.When the unit is not in use, store it in a dry place, out of direct sunlight.Maximum water inlet pressure 0.5 MPa.Draining and Cleaning The Water TankTurn the power “off’ and disconnect the air cooler from the power supply.Move the unit to a location where it can be drained.Remove the drain plug and allow the tank to empty.Refill the water tank up to the maximum level with clean water and drain it completely.Fill the water tank and rinse at least 2-3 times before use.After cleaning ensure that the drain plug is back in place.Plug into the power supply and turn on the unit.Cleaning The Honeycomb Cooling MediaTurn off the unit, and unplug the power cord from the wall outlet.Rotate the unit facing the back panel, and locate the Grill Removal Screws. Remove the 4 screws with a screwdriver.Pull the rear grill panel, until it is completely removed.This cooler has Honeycomb cooling media on the right and left panels. The cleaning and removal procedure is the same as the rear panel.The Honeycomb cooling media can now be seen. Clean honeycomb with a clean cloth to remove all the dust & dirt particles.Once cleaning is finished, reassemble the unit.Plug into the power supply and turn on the unit.The air cooler is now ready to be used. This cleaning process should be repeated monthly to maintain the integrity of the unit and to remove particles filtered from the air.DISASSEMBLY INSTRUCTIONSWARNING – Before the following disassembly, POWER is set to OFF and disconnected the power cord.2.1 How To Change Honeycomb Cooling Media(3 sides)2.1.1 Back Panel.Use a screwdriver to remove 5 galvanized screws with plate head (ST4*12) on the back panel.Remove the back panel.2.1.2 Back Honeycomb Cooling Media.Use screwdriver to remove 4 galvanized screws with plate head(ST4*12) on the honeycomb holder.Remove the honeycomb holder.Remove the honeycomb cooling media from the back panel.2.1.3 Right Side Panel.Use a screwdriver to remove 4 galvanized screws with plate head (ST4*12) on the right-side panel.Remove the right side panel.2.1.4 Right Side Honeycomb Cooling Media.Use screwdriver to remove 4 galvanized screws with plate head(ST4*12) on the honeycomb holder.Remove the honeycomb holder.Remove the honeycomb cooling media from the right side panel.2.1.5 Left Side Panel.Use screwdriver to remove 4 galvanized screws with plate head (ST4*12) on the left side panel.Remove the left side panel.2.1.6 Left Side Honeycomb Cooling Media.Use a screwdriver to remove 4 galvanized screws with plate head(ST4*12) on the honeycomb holder.Remove the honeycomb holder.Remove the honeycomb cooling media from the left side panel.2.2 How To Change SwitchRemove the back panel and follow the procedure 2.1.1Remove the right-side panel and follow procedure 2.1.32.2.1. Switch BoxUse a screw driver to remove 4 galvanized screws with plate head(ST3*12) on the switch box.Remove switch box.2.2.2. Switch(cool/speed/swing)Use screw driver to remove 2 galvanized screws (ST3X10) on each switch of the control panel(cool/speed/swing).Cool switchSpeed switchSwing switch2.2.3. Wiring Color ConnectionWiring color connection refers to part 4.2 Wiring Color Description.2.3 How To Change Water PumpRemove the back panel and follow the procedure 2.1.1Remove the right-side panel and follow procedure 2.1.3Remove the switch box and follow the procedure 2.2.12.3.1 Water pump pipe and water pump clip.Remove the water pump pipe.Use a screw driver to remove 2 SS screws(ST4*12) on the water pump clip.2.3.2 Cool Switch And Wiring ConnectorUse a screwdriver to remove 2 galvanized screws (ST3X10) on the cool switch of the control panel.Remove the brown wire on the cool switch.Remove the wiring cap (below picture shown) to get the water pump.Note: connection is between the water pump and the N wire of the power cord.2.3.3 Water Pump Wiring ConnectionThe water pump wiring connection refers to part 4.2 Wiring Color Description.2.4 How To Change Fan MotorRemove the back panel and follow the procedure 2.1.1Remove the right-side panel and follow procedure 2.1.3Remove the switch box and follow the procedure 2.2.12.4.1 Speed Switch And Wiring Connector.Use a screwdriver to remove 2 galvanized screws (ST3X10) on the speed switch of the control panel.Remove the white/yellow/blue wire on the speed switch.Remove the wiring cap (below picture shown).Note: connection is between fan motor COM wire(black) and N wire of power cord.Remove the wiring cap (below picture shown).Note: connection is between motor and power cord earth wire.Remove the wiring cap (below picture shown).Note: connection is between the capacitor and the motor.Remove the wiring cap (below picture shown).Note: connection is between capacitor and the motor.2.4.2 Fan Blade And Fan MotorUse a screwdriver to remove 1galvanized screws (M6X14) on the fan blade.Remove the fan blade.Use a screw driver to remove 8 galvanized screws (M5X12) on fan motor to get the fanmotor.2.4.3 Main Motor Wiring ConnectionMain motor wiring connection refers to part 4.2 Wiring Color Description.2.5 How To Change Swing MotorRemove the back panel and follow the procedure 2.1.1Remove the right-side panel and follow procedure 2.1.3Remove the switch box and follow the procedure 2.2.12.5.1 Swing Switch And Wiring Connector.Use a screwdriver to remove 2 galvanized screws (ST3X10) on the swing switch of the control panel.Remove the pink wire on the swing switch.Remove the wiring cap (below picture shown).Note: connection is between swing motor and N wire of power cord.2.5.2 Swing Motor And Swing Motor Wheel.Use a screwdriver to remove 2 galvanized screws(ST4X12) on the swing motor.Remove the swing motor.Use screwdriver to remove 1 galvanized screw(ST3*8) on the swing motor wheel.Remove the swing motor wheel.Get the swing motor.2.5.3 Swing Motor Wiring ConnectionSwing motor wiring connection refers to part 4.2 Wiring Color Description.TROUBLESHOOTING GUIDE3.1 Outside DimensionsWidth: 700 mm (27.56’’)Depth: 466 mm (18.35’’)Height: 1017 mm (40.0’’)3.2 Cooling SystemHoneywell Evaporative Air Coolers are built to maximize energy efficiency and keep costs low. Warm air is drawn into the cooler through a dust and odor-reducing carbon filter and enters the Honeycomb Cooling Media. Water pumped from the tank pours over the honeycomb media. As the warm air passes through the media, the water absorbs the heat, naturally cooling and humidifying the air. A fan propels the cooled air out into the room. This no-compressor system cools naturally, efficiently and inexpensively.Troubleshooting GuideThe following troubleshooting guide is intended to address the most common symptoms and is by no means exhaustive. If symptoms persist, call a qualified service provider. Only a certified electrician should complete any electrical work. Unplug and disconnect the appliance from the power source before attempting to troubleshoot any of the following symptoms.ProblemPossible CauseSolutionNo discharge of airThe cord is not plugged in.Make sure the power cord is plugged in and the supply switch is on.The power is not on.Turn the unit ON.Humidity output minimal to noneWater is below the minimum water level in the tank.Turn off the unit.Follow the instructions to fill the water tank with clean water.The water pump is damaged.Replace the water pump according to procedure 2.3.Watercolor yellowish at initial useColor fasts from honeycomb filter.This is natural. After several uses, the watercolor will be clean.Abnormal noise inside the productThe noise of the water pump when water is not up-to-min water level. the product again.Turn off the product. Add water, and then turn onMotor or blade problem.Turn off and unplug the product or change the main motor according to procedure 2.4.Musty or unpleasant odorWhen the Cooler is new.When the unit is used for the first time, the Honeycomb Cooling Media will have an odor, which will dissipate within a few hours of initial use.Stale or stagnant water in the water tank.Drain, flush and clean the water tankMedia mildewed or clogged.Replace media according to the procedure 2.1.Not coolingPump is not turned on.Check the water level and turn on the pump.Low or no water.Damaged water pump.Replace the water pump according to procedure 2.3.SCHEMATIC DIAGRAM4.1 Wiring Diagram4.2 Wiring Color DescriptionPower Cord:(1) Brown(2) Blue(3) Green + YellowLiveNeutralEarth (Ground)to speed switch(4)motor COM(black)to motor earthMain Motor:(1) White(2) Yellow(3) Blue(4) Black(5) Red(6) Brown(7) Green + YellowHigh speedMedium speedLow speedNeutralEarth (Ground)to speed switch(1)to speed switch(2)to speed switch(3)to N wire of power cordto the capacitor by end-closed connectorto the capacitor by end-closed connectorto power cord earthWater Pump:(1) Brown(2) Blueto pump control switch(1)to N wire of power cordSwing Motor:(1) Pink(2) Pinkto swing control switch(1)to N wire of power cordEXPLODED VIEWREPLACEMENT PARTS LISTSrPART NAMEQUANTITY1Up/Down swing knob22Swing knob pressboard13Horizontal louver 124Horizontal louver 225Horizontal louver 326Horizontal louver 427Horizontal louver 528Horizontal louver middle link19Horizontal louver press board A210Horizontal louver link A211Horizontal louver press board B212Horizontal louver link B213Swing/Cool knob214Speed knob115Control plane116Swing/Cool switch217Speed switch118Air outlet panel119Front panel120Rubber washer2021Vertical louver base422Short vertical louver223Long vertical louver224Switch box125Side panel226Side honeycomb pad227Side water distributor cover228Side water distributor229Side honeycomb pad holder430Swing motor131Swing motor wheel132Vertical louver drive133Base of fan motor frame234Fan motor frame435Fan blade assembly136Fan motor137Top cover138Water fill door139Four directions pipe140Back water distributor tube141Left/Right water distributor tube242Water fill door link243Back water distributor144Back water distributor cover145Left stand pillar146Back honeycomb pad holder247Back honeycomb pad148Back panel149Right stand pillar150Motor capacitor151Suction pipe152Water fill pipe153Float cap154Float holder155Float tube156Water level board157Vertical louver link158Water tank159Water pump160Water pump clip161Continuous water supply connection162Castor263Castor with brake264Water drainage plug165Silica gel ring1CONFIDENTIALWebsite: http://www.honeywellaircoolers.comDownloaded from www.Manualslib.com manuals search engineDocuments / ResourcesHoneywell CO60PM Evaporative Air Cooler [pdf] Instruction ManualCO60PM, Evaporative Air Cooler, CO60PM Evaporative Air Cooler, Air Cooler, CoolerReferencesUser ManualRelated PostsEvaporative Air Cooler With Humidifier SF-615H User ManualEvaporative Air Cooler With Humidifier SF-615H User Manual - Optimized PDF Evaporative Air Cooler With Humidifier SF-615H User…Honeywell TC10PM Series Portable Evaporative Air Cooler User ManualHoneywell TC10PM Series Portable Evaporative Air Cooler Portable Evaporative Air Cooler User Manual Read and save these instructions…kogan KAPMNCL4BA Mini Evaporative Air Cooler User Guidekogan KAPMNCL4BA Mini Evaporative Air Cooler SAFETY & WARNINGS Ensure to read this user guide prior to first…COOLER MASTER Hyper T200 CPU Air Cooler User ManualCOOLER MASTER Hyper T200 CPU Air Cooler IN THE BOX INTEL & AMD AMD AM4/AM3+/AM3/AM2+/AM2/FM2+/FM2/FM1 Intel - LGA1151/1150/1155/1156/1366/775…
2.3.1 Water pump pipe and water pump clip.Remove the water pump pipe.Use a screw driver to remove 2 SS screws(ST4*12) on the water pump clip.2.3.2 Cool Switch And Wiring ConnectorUse a screwdriver to remove 2 galvanized screws (ST3X10) on the cool switch of the control panel.Remove the brown wire on the cool switch.Remove the wiring cap (below picture shown) to get the water pump.Note: connection is between the water pump and the N wire of the power cord.2.3.3 Water Pump Wiring ConnectionThe water pump wiring connection refers to part 4.2 Wiring Color Description.2.4 How To Change Fan MotorRemove the back panel and follow the procedure 2.1.1Remove the right-side panel and follow procedure 2.1.3Remove the switch box and follow the procedure 2.2.12.4.1 Speed Switch And Wiring Connector.Use a screwdriver to remove 2 galvanized screws (ST3X10) on the speed switch of the control panel.Remove the white/yellow/blue wire on the speed switch.Remove the wiring cap (below picture shown).Note: connection is between fan motor COM wire(black) and N wire of power cord.Remove the wiring cap (below picture shown).Note: connection is between motor and power cord earth wire.Remove the wiring cap (below picture shown).Note: connection is between the capacitor and the motor.Remove the wiring cap (below picture shown).Note: connection is between capacitor and the motor.2.4.2 Fan Blade And Fan MotorUse a screwdriver to remove 1galvanized screws (M6X14) on the fan blade.Remove the fan blade.Use a screw driver to remove 8 galvanized screws (M5X12) on fan motor to get the fanmotor.2.4.3 Main Motor Wiring ConnectionMain motor wiring connection refers to part 4.2 Wiring Color Description.2.5 How To Change Swing MotorRemove the back panel and follow the procedure 2.1.1Remove the right-side panel and follow procedure 2.1.3Remove the switch box and follow the procedure 2.2.12.5.1 Swing Switch And Wiring Connector.Use a screwdriver to remove 2 galvanized screws (ST3X10) on the swing switch of the control panel.Remove the pink wire on the swing switch.Remove the wiring cap (below picture shown).Note: connection is between swing motor and N wire of power cord.2.5.2 Swing Motor And Swing Motor Wheel.Use a screwdriver to remove 2 galvanized screws(ST4X12) on the swing motor.Remove the swing motor.Use screwdriver to remove 1 galvanized screw(ST3*8) on the swing motor wheel.Remove the swing motor wheel.Get the swing motor.2.5.3 Swing Motor Wiring ConnectionSwing motor wiring connection refers to part 4.2 Wiring Color Description.TROUBLESHOOTING GUIDE3.1 Outside DimensionsWidth: 700 mm (27.56’’)Depth: 466 mm (18.35’’)Height: 1017 mm (40.0’’)3.2 Cooling SystemHoneywell Evaporative Air Coolers are built to maximize energy efficiency and keep costs low. Warm air is drawn into the cooler through a dust and odor-reducing carbon filter and enters the Honeycomb Cooling Media. Water pumped from the tank pours over the honeycomb media. As the warm air passes through the media, the water absorbs the heat, naturally cooling and humidifying the air. A fan propels the cooled air out into the room. This no-compressor system cools naturally, efficiently and inexpensively.Troubleshooting GuideThe following troubleshooting guide is intended to address the most common symptoms and is by no means exhaustive. If symptoms persist, call a qualified service provider. Only a certified electrician should complete any electrical work. Unplug and disconnect the appliance from the power source before attempting to troubleshoot any of the following symptoms.ProblemPossible CauseSolutionNo discharge of airThe cord is not plugged in.Make sure the power cord is plugged in and the supply switch is on.The power is not on.Turn the unit ON.Humidity output minimal to noneWater is below the minimum water level in the tank.Turn off the unit.Follow the instructions to fill the water tank with clean water.The water pump is damaged.Replace the water pump according to procedure 2.3.Watercolor yellowish at initial useColor fasts from honeycomb filter.This is natural. After several uses, the watercolor will be clean.Abnormal noise inside the productThe noise of the water pump when water is not up-to-min water level. the product again.Turn off the product. Add water, and then turn onMotor or blade problem.Turn off and unplug the product or change the main motor according to procedure 2.4.Musty or unpleasant odorWhen the Cooler is new.When the unit is used for the first time, the Honeycomb Cooling Media will have an odor, which will dissipate within a few hours of initial use.Stale or stagnant water in the water tank.Drain, flush and clean the water tankMedia mildewed or clogged.Replace media according to the procedure 2.1.Not coolingPump is not turned on.Check the water level and turn on the pump.Low or no water.Damaged water pump.Replace the water pump according to procedure 2.3.SCHEMATIC DIAGRAM4.1 Wiring Diagram4.2 Wiring Color DescriptionPower Cord:(1) Brown(2) Blue(3) Green + YellowLiveNeutralEarth (Ground)to speed switch(4)motor COM(black)to motor earthMain Motor:(1) White(2) Yellow(3) Blue(4) Black(5) Red(6) Brown(7) Green + YellowHigh speedMedium speedLow speedNeutralEarth (Ground)to speed switch(1)to speed switch(2)to speed switch(3)to N wire of power cordto the capacitor by end-closed connectorto the capacitor by end-closed connectorto power cord earthWater Pump:(1) Brown(2) Blueto pump control switch(1)to N wire of power cordSwing Motor:(1) Pink(2) Pinkto swing control switch(1)to N wire of power cordEXPLODED VIEWREPLACEMENT PARTS LISTSrPART NAMEQUANTITY1Up/Down swing knob22Swing knob pressboard13Horizontal louver 124Horizontal louver 225Horizontal louver 326Horizontal louver 427Horizontal louver 528Horizontal louver middle link19Horizontal louver press board A210Horizontal louver link A211Horizontal louver press board B212Horizontal louver link B213Swing/Cool knob214Speed knob115Control plane116Swing/Cool switch217Speed switch118Air outlet panel119Front panel120Rubber washer2021Vertical louver base422Short vertical louver223Long vertical louver224Switch box125Side panel226Side honeycomb pad227Side water distributor cover228Side water distributor229Side honeycomb pad holder430Swing motor131Swing motor wheel132Vertical louver drive133Base of fan motor frame234Fan motor frame435Fan blade assembly136Fan motor137Top cover138Water fill door139Four directions pipe140Back water distributor tube141Left/Right water distributor tube242Water fill door link243Back water distributor144Back water distributor cover145Left stand pillar146Back honeycomb pad holder247Back honeycomb pad148Back panel149Right stand pillar150Motor capacitor151Suction pipe152Water fill pipe153Float cap154Float holder155Float tube156Water level board157Vertical louver link158Water tank159Water pump160Water pump clip161Continuous water supply connection162Castor263Castor with brake264Water drainage plug165Silica gel ring1CONFIDENTIALWebsite: http://www.honeywellaircoolers.comDownloaded from www.Manualslib.com manuals search engineDocuments / ResourcesHoneywell CO60PM Evaporative Air Cooler [pdf] Instruction ManualCO60PM, Evaporative Air Cooler, CO60PM Evaporative Air Cooler, Air Cooler, CoolerReferencesUser ManualRelated PostsEvaporative Air Cooler With Humidifier SF-615H User ManualEvaporative Air Cooler With Humidifier SF-615H User Manual - Optimized PDF Evaporative Air Cooler With Humidifier SF-615H User…Honeywell TC10PM Series Portable Evaporative Air Cooler User ManualHoneywell TC10PM Series Portable Evaporative Air Cooler Portable Evaporative Air Cooler User Manual Read and save these instructions…kogan KAPMNCL4BA Mini Evaporative Air Cooler User Guidekogan KAPMNCL4BA Mini Evaporative Air Cooler SAFETY & WARNINGS Ensure to read this user guide prior to first…COOLER MASTER Hyper T200 CPU Air Cooler User ManualCOOLER MASTER Hyper T200 CPU Air Cooler IN THE BOX INTEL & AMD AMD AM4/AM3+/AM3/AM2+/AM2/FM2+/FM2/FM1 Intel - LGA1151/1150/1155/1156/1366/775…
2.2.1. Switch BoxUse a screw driver to remove 4 galvanized screws with plate head(ST3*12) on the switch box.Remove switch box.2.2.2. Switch(cool/speed/swing)Use screw driver to remove 2 galvanized screws (ST3X10) on each switch of the control panel(cool/speed/swing).Cool switchSpeed switchSwing switch2.2.3. Wiring Color ConnectionWiring color connection refers to part 4.2 Wiring Color Description.2.3 How To Change Water PumpRemove the back panel and follow the procedure 2.1.1Remove the right-side panel and follow procedure 2.1.3Remove the switch box and follow the procedure 2.2.12.3.1 Water pump pipe and water pump clip.Remove the water pump pipe.Use a screw driver to remove 2 SS screws(ST4*12) on the water pump clip.2.3.2 Cool Switch And Wiring ConnectorUse a screwdriver to remove 2 galvanized screws (ST3X10) on the cool switch of the control panel.Remove the brown wire on the cool switch.Remove the wiring cap (below picture shown) to get the water pump.Note: connection is between the water pump and the N wire of the power cord.2.3.3 Water Pump Wiring ConnectionThe water pump wiring connection refers to part 4.2 Wiring Color Description.2.4 How To Change Fan MotorRemove the back panel and follow the procedure 2.1.1Remove the right-side panel and follow procedure 2.1.3Remove the switch box and follow the procedure 2.2.12.4.1 Speed Switch And Wiring Connector.Use a screwdriver to remove 2 galvanized screws (ST3X10) on the speed switch of the control panel.Remove the white/yellow/blue wire on the speed switch.Remove the wiring cap (below picture shown).Note: connection is between fan motor COM wire(black) and N wire of power cord.Remove the wiring cap (below picture shown).Note: connection is between motor and power cord earth wire.Remove the wiring cap (below picture shown).Note: connection is between the capacitor and the motor.Remove the wiring cap (below picture shown).Note: connection is between capacitor and the motor.2.4.2 Fan Blade And Fan MotorUse a screwdriver to remove 1galvanized screws (M6X14) on the fan blade.Remove the fan blade.Use a screw driver to remove 8 galvanized screws (M5X12) on fan motor to get the fanmotor.2.4.3 Main Motor Wiring ConnectionMain motor wiring connection refers to part 4.2 Wiring Color Description.2.5 How To Change Swing MotorRemove the back panel and follow the procedure 2.1.1Remove the right-side panel and follow procedure 2.1.3Remove the switch box and follow the procedure 2.2.12.5.1 Swing Switch And Wiring Connector.Use a screwdriver to remove 2 galvanized screws (ST3X10) on the swing switch of the control panel.Remove the pink wire on the swing switch.Remove the wiring cap (below picture shown).Note: connection is between swing motor and N wire of power cord.2.5.2 Swing Motor And Swing Motor Wheel.Use a screwdriver to remove 2 galvanized screws(ST4X12) on the swing motor.Remove the swing motor.Use screwdriver to remove 1 galvanized screw(ST3*8) on the swing motor wheel.Remove the swing motor wheel.Get the swing motor.2.5.3 Swing Motor Wiring ConnectionSwing motor wiring connection refers to part 4.2 Wiring Color Description.TROUBLESHOOTING GUIDE3.1 Outside DimensionsWidth: 700 mm (27.56’’)Depth: 466 mm (18.35’’)Height: 1017 mm (40.0’’)3.2 Cooling SystemHoneywell Evaporative Air Coolers are built to maximize energy efficiency and keep costs low. Warm air is drawn into the cooler through a dust and odor-reducing carbon filter and enters the Honeycomb Cooling Media. Water pumped from the tank pours over the honeycomb media. As the warm air passes through the media, the water absorbs the heat, naturally cooling and humidifying the air. A fan propels the cooled air out into the room. This no-compressor system cools naturally, efficiently and inexpensively.Troubleshooting GuideThe following troubleshooting guide is intended to address the most common symptoms and is by no means exhaustive. If symptoms persist, call a qualified service provider. Only a certified electrician should complete any electrical work. Unplug and disconnect the appliance from the power source before attempting to troubleshoot any of the following symptoms.ProblemPossible CauseSolutionNo discharge of airThe cord is not plugged in.Make sure the power cord is plugged in and the supply switch is on.The power is not on.Turn the unit ON.Humidity output minimal to noneWater is below the minimum water level in the tank.Turn off the unit.Follow the instructions to fill the water tank with clean water.The water pump is damaged.Replace the water pump according to procedure 2.3.Watercolor yellowish at initial useColor fasts from honeycomb filter.This is natural. After several uses, the watercolor will be clean.Abnormal noise inside the productThe noise of the water pump when water is not up-to-min water level. the product again.Turn off the product. Add water, and then turn onMotor or blade problem.Turn off and unplug the product or change the main motor according to procedure 2.4.Musty or unpleasant odorWhen the Cooler is new.When the unit is used for the first time, the Honeycomb Cooling Media will have an odor, which will dissipate within a few hours of initial use.Stale or stagnant water in the water tank.Drain, flush and clean the water tankMedia mildewed or clogged.Replace media according to the procedure 2.1.Not coolingPump is not turned on.Check the water level and turn on the pump.Low or no water.Damaged water pump.Replace the water pump according to procedure 2.3.SCHEMATIC DIAGRAM4.1 Wiring Diagram4.2 Wiring Color DescriptionPower Cord:(1) Brown(2) Blue(3) Green + YellowLiveNeutralEarth (Ground)to speed switch(4)motor COM(black)to motor earthMain Motor:(1) White(2) Yellow(3) Blue(4) Black(5) Red(6) Brown(7) Green + YellowHigh speedMedium speedLow speedNeutralEarth (Ground)to speed switch(1)to speed switch(2)to speed switch(3)to N wire of power cordto the capacitor by end-closed connectorto the capacitor by end-closed connectorto power cord earthWater Pump:(1) Brown(2) Blueto pump control switch(1)to N wire of power cordSwing Motor:(1) Pink(2) Pinkto swing control switch(1)to N wire of power cordEXPLODED VIEWREPLACEMENT PARTS LISTSrPART NAMEQUANTITY1Up/Down swing knob22Swing knob pressboard13Horizontal louver 124Horizontal louver 225Horizontal louver 326Horizontal louver 427Horizontal louver 528Horizontal louver middle link19Horizontal louver press board A210Horizontal louver link A211Horizontal louver press board B212Horizontal louver link B213Swing/Cool knob214Speed knob115Control plane116Swing/Cool switch217Speed switch118Air outlet panel119Front panel120Rubber washer2021Vertical louver base422Short vertical louver223Long vertical louver224Switch box125Side panel226Side honeycomb pad227Side water distributor cover228Side water distributor229Side honeycomb pad holder430Swing motor131Swing motor wheel132Vertical louver drive133Base of fan motor frame234Fan motor frame435Fan blade assembly136Fan motor137Top cover138Water fill door139Four directions pipe140Back water distributor tube141Left/Right water distributor tube242Water fill door link243Back water distributor144Back water distributor cover145Left stand pillar146Back honeycomb pad holder247Back honeycomb pad148Back panel149Right stand pillar150Motor capacitor151Suction pipe152Water fill pipe153Float cap154Float holder155Float tube156Water level board157Vertical louver link158Water tank159Water pump160Water pump clip161Continuous water supply connection162Castor263Castor with brake264Water drainage plug165Silica gel ring1CONFIDENTIALWebsite: http://www.honeywellaircoolers.comDownloaded from www.Manualslib.com manuals search engineDocuments / ResourcesHoneywell CO60PM Evaporative Air Cooler [pdf] Instruction ManualCO60PM, Evaporative Air Cooler, CO60PM Evaporative Air Cooler, Air Cooler, CoolerReferencesUser ManualRelated PostsEvaporative Air Cooler With Humidifier SF-615H User ManualEvaporative Air Cooler With Humidifier SF-615H User Manual - Optimized PDF Evaporative Air Cooler With Humidifier SF-615H User…Honeywell TC10PM Series Portable Evaporative Air Cooler User ManualHoneywell TC10PM Series Portable Evaporative Air Cooler Portable Evaporative Air Cooler User Manual Read and save these instructions…kogan KAPMNCL4BA Mini Evaporative Air Cooler User Guidekogan KAPMNCL4BA Mini Evaporative Air Cooler SAFETY & WARNINGS Ensure to read this user guide prior to first…COOLER MASTER Hyper T200 CPU Air Cooler User ManualCOOLER MASTER Hyper T200 CPU Air Cooler IN THE BOX INTEL & AMD AMD AM4/AM3+/AM3/AM2+/AM2/FM2+/FM2/FM1 Intel - LGA1151/1150/1155/1156/1366/775…
This manual is designed to provide you with important service information. Be sure to read the safety precautions prior to servicing the unit.1.1 Safety PrecautionsWhen servicing, set the POWER of the CONTROL PANEL to OFF and unplug the power cord.Observe the original lead dress. If a short circuit is found, replace all parts which have been overheated or damaged by the short circuit.After servicing, make an insulation resistance test to prevent the customer’s exposure to shock hazards.1.1 Safety PrecautionsWhen servicing, set the POWER of the CONTROL PANEL to OFF and unplug the power cord.Observe the original lead dress. If a short circuit is found, replace all parts which have been overheated or damaged by the short circuit.After servicing, make an insulation resistance test to prevent the customer’s exposure to shock hazards.1.2 Insulation Resistance TestUnplug the power cord and connect a jumper between 2 pins.The grounding conductor (green or green & yellow) is to be open.Measure the resistance value with an ohm meter between the jumper lead and each exposed metallic part on the equipment at all MODES (except POWER OFF).The value should be over 1 MΩ.SpecificationsMODELS/ITEMSCO60PMPower Supply120V, 50HzInput (W)220WRunning Current (A)1.83AFan Type16″ metal fan bladeFan Speeds3Operation ControlControl PanelAir Direction ControlVertical Louver (Right & Left) – AutoHorizontal Louver (Up & Down) – ManualProtectorFan Motor Internal Thermal ProtectorWater Pump Internal Thermal ProtectorFilter3 Sides Honeycomb media (Back 591.5 x 538 x 40mm2 Sides 591.5 x 270 x 40mm)Power Cord2.5 m (3 wire with grounding)Water Fill SystemManual (from top cover)Auto (from continuous water supply connection)Drain SystemManual drain plugWater Tank Capacity15.8 US Gallon / 60 L*Net Weight39.2 lbs / 17.8 kgOuter Dimension (WxDxH)27.56″ x 18.35″ x 40.0″700 x 466 x 1017 mm*Due to continuous updates to the product on account of compliance requirements, tank capacity may be changed by the manufacturer over a period of timeFeaturesThree functions in one: air cooler, humidifier & fan.Very powerful airflow: up to 2610 m³ /hr or 1540 CFMCooling area: up to 80 m² or 850 ft²Air throw distance: 11 m or 36 ft.3 sides of honeycomb cooling media for optimum performance.Oscillating louvers.Mounted with castors for easy mobility.3 speeds: high, medium, and low.60-liter water tank capacity.1.4 Warning & Safety RulesWARNING – This appliance is intended for use outdoors, in the home, or in office environments. Any other use is not recommended by the manufacturer and may cause fire, electrical shocks, or injury to a person or property.When using electrical appliances, basic safety precautions should always be followed:Your cooler should run on 120V Volt AC, 50 Hz current only.Check the household voltage to ensure it matches the appliance’s rate specification.Before operating the product remove it from its packaging and check it is in good condition.If the supply cord is damaged, it must be replaced by the manufacturer, its service agent or similarly qualified persons in order to avoid a hazard.DO NOT operate any product with a damaged cord or plug.DO NOT use an extension cord with this appliance.DO NOT run power cord under carpeting, or cover with rugs or runners. Arrange the cord away from areas where it may be tripped over.Unplug the appliance during filling and cleaning.Always unplug the appliance from the power source before servicing or removing the unit.Disconnect the power supply before servicing or cleaning operation.Remove the power cord from the electrical receptacle by grasping and pulling on the power cord plug-end only, never from the cord.DO NOT use the product in areas where gasoline, paint or other flammable goods and objects are stored.When using the ‘’COOL’’ setting, please check the water indicator level to ensure it is above the minimum water level. Operation of this unit on the ‘’COOL’’ setting on or below minimum water level could result in damage to the water pump.DO NOT attempt repair or adjustment to any electrical or mechanical functions of the cooler.Verify that the voltage power source matches the appliance’s electrical specifications. The improper voltage will burn out the blower/fan, oscillating, and/or pump motor windings and will void the warranty.DO NOT cover the air inlet or outlet on the appliance as this may cause motor damage.DO NOT insert or allow objects to enter any ventilation, exhaust opening, or water tank as this may damage the product and could cause an electrical shock or fire.DO NOT operate with media removed as this will overload and damage the motor.To reduce the risk of fire or electric shock, do not use this fan with any solid-state speed control device.DO NOT leave the appliance operating unattended for any extended period of time.This appliance is not intended for use by persons (including children or the elderly) with reduced physical, sensory or mental capabilities, or lack of experience and knowledge unless they have been given supervision or instruction concerning the use of the appliance by a person responsible for their safety.DO NOT let children play with any appliance packaging or plastic bags. Injury may resultfrom such practice.Children should be supervised to ensure that they do not play with the appliance.If the unit is damaged or it malfunctions, do not continue to operate it.Place the unit on the floor only.This product is not intended for use in wet or damp locations. Never locate the product where it may fall into a bathtub or other water container. DO NOT use in bathrooms. When it is not in use always store in a dry area.Don’t use indoor extension cords outside. Look for extension cords specifically marked for outdoor use. Look for extension cords that have a GFCI (Ground Fault Circuit Interrupter) built in.Make sure the amperage rating for the extension cord is higher than the amperage rating for the appliance. Check labels and owner’s manuals on the appliance and the extension cord for amperage ratings.Power cords have to be contained. If they must run along the ground, make sure every inch of them is secured so they will not be tripped over.The wiring and connections must be waterproof. Be sure the connections (to the air cooler) never get wet. Your unit is waterproof, but everything attached to it must be waterproof, too.Set up your unit so it cannot be tripped over or wobble loose. It must rest on solid support.NOTE: OPERATE THE UNIT WHEN THE WATER TANK IS FILLED WITH CLEAN WATER1.5 Parts Description1 Water Inlet and Ice2 Handle3 Left Honeycomb Panel4 Lever for Horizontal Louvers5 Water Tank6 Casters7 Horizontal Louvers8 Water Level Indicator9 Control Panel Loading Compartment10 Right Honeycomb Panel11 Continuous Water Supply Connection12 Drain Plug13 Backside Honeycomb Panel14 Power Cord & Plug15 Rear Grill Removal Screws16 Water Fill Door17 Honeycomb Cooling Media18 Water Inlet (Optional) for manual refill 1.6 OperationsControl Panel:NOTE:The speed control may be marked as High/Med/Low in certain units.Operation Instructions: Cooler Location:Place the cooler in front of an open door or window. Ensure that there is adequate cross–ventilation in the room by leaving a door or window open opposite the cooler. Following these guidelines will ensure your cooler will work as effectively as possible.Not an Air Conditioner:The evaporative air cooler is not an air conditioner as it does not use a compressor or refrigerant gas. It should not be expected to cool as efficiently as a refrigerated air conditioner. The recommended maximum relative humidity level is 60% or less, which allows a noticeable temperature decrease. The temperature decrease will be greater in drier climates because higher evaporation occurs when the humidity is low.The evaporative air cooler should not be used in enclosed spaces. It must be kept level and there must be water in the water tank. The room should have doors and windows opened to allow free airflow. The evaporative air cooler works best when placed near an open window so that outside air is drawn into the evaporative air cooler, the air circulates in the room, and then exits via the door. The maximum cooling effect is felt when a person is in the flow of air coming out of the evaporative air cooler.The evaporative air cooler can also be used to humidify dry air during cool weather. To be used for humidification the windows and doors should be closed to allow the humidified air to accumulate. The evaporative air cooler is not an air conditioner as it does not use a compressor or refrigerant gas. It should not be expected to cool as efficiently as a refrigerated air conditioner.NOTE: When the product is used for the first time the Honeycomb Cooling Media will have an odor that will dissipate in a week or so of initial use.FILL WATER:Water can be filled into the air cooler by:Water Inlet (Manually)Water / Ice can be put into the tank through the top opening. There is a hole for water to flow into the tank.Continuous water supply (Auto-Refill)Connect a garden hose to the continuous water supply inlet.Water Inlet (Manually)To refill the water tank, pull out the Water Fill Door located on the top of the unit and fill water to the Max, as indicated on the Water Level Indicator.Do not fill water above the Max water level mark.For maximum cooling performance, put ice cubes inside the Ice Loading Compartment located on the top of the Air Cooler.Filling With Water (Continuous Water Supply Connection)CAUTION Unplug from power source before fillingThis automated process eliminates the need to manually refill the water tank.Securely connect the continuous water supply connector (located on the lower left side panel) to the water supply.Turn on the water.The water tank will refill automatically.The water float valve will detect the water level and will automatically start or stop the water flow.Plug the unit into the power supply and turn the unit on.Installing Hose Adapter And Float ValveConnect the garden hose to the water supply connectorVerify that connections are secure and turn on the water.Control KnobsSpeed / On – OffConnect to the power supply and turn the Speed knob. The fan will start. Change the speed from 1 for Low to 2 for Medium to 3 for High. To switch OFF the unit turn the Speed knob to “0”.CoolTo begin cooling the desired area turn the “COOL” switch ON. The water pump will operate. You can feel the cooler air after the Honeycomb media is completely wet.SwingVertical LouversTurn the “SWING” switch ON. The louvers will begin to move from right to left automatically. Manually adjust the horizontal louvers to change vertical airflow.Horizontal LouversManually adjust the horizontal louvers to change vertical airflow.CLEANING & MAINTENANCEImportant – Please Read!The cooler is supplied with Honeycomb Cooling Media.The cleaning frequency for the Honeycomb media depends on local air and water conditions. In areas where the mineral content of water is high, mineral deposits may build up on the Honeycomb Cooling Media and restrict airflow. Draining the water reservoir and refilling it with fresh water at least once a week will help reduce mineral deposits. If mineral deposits remain on the Honeycomb media, the media should be removed and washed under fresh water. The media should be cleaned every two months or sooner, depending on your needs.Do not run the unit in COOL mode with stale water in the tank. Empty the tank and refill it with fresh water if the water has been standing in the tank for an extended period of time.For best results, allow the Honeycomb Cooling Media to dry after each use by turning off the cool function 15 minutes before turning the unit off.WARNINGBefore cleaning, turn the unit off and disconnect from the power source.Use a damp cloth to remove dirt and dust from the outside of the unit.Never use abrasive cleaners.When the unit is not in use, store it in a dry place, out of direct sunlight.Maximum water inlet pressure 0.5 MPa.Draining and Cleaning The Water TankTurn the power “off’ and disconnect the air cooler from the power supply.Move the unit to a location where it can be drained.Remove the drain plug and allow the tank to empty.Refill the water tank up to the maximum level with clean water and drain it completely.Fill the water tank and rinse at least 2-3 times before use.After cleaning ensure that the drain plug is back in place.Plug into the power supply and turn on the unit.Cleaning The Honeycomb Cooling MediaTurn off the unit, and unplug the power cord from the wall outlet.Rotate the unit facing the back panel, and locate the Grill Removal Screws. Remove the 4 screws with a screwdriver.Pull the rear grill panel, until it is completely removed.This cooler has Honeycomb cooling media on the right and left panels. The cleaning and removal procedure is the same as the rear panel.The Honeycomb cooling media can now be seen. Clean honeycomb with a clean cloth to remove all the dust & dirt particles.Once cleaning is finished, reassemble the unit.Plug into the power supply and turn on the unit.The air cooler is now ready to be used. This cleaning process should be repeated monthly to maintain the integrity of the unit and to remove particles filtered from the air.DISASSEMBLY INSTRUCTIONSWARNING – Before the following disassembly, POWER is set to OFF and disconnected the power cord.2.1 How To Change Honeycomb Cooling Media(3 sides)2.1.1 Back Panel.Use a screwdriver to remove 5 galvanized screws with plate head (ST4*12) on the back panel.Remove the back panel.2.1.2 Back Honeycomb Cooling Media.Use screwdriver to remove 4 galvanized screws with plate head(ST4*12) on the honeycomb holder.Remove the honeycomb holder.Remove the honeycomb cooling media from the back panel.2.1.3 Right Side Panel.Use a screwdriver to remove 4 galvanized screws with plate head (ST4*12) on the right-side panel.Remove the right side panel.2.1.4 Right Side Honeycomb Cooling Media.Use screwdriver to remove 4 galvanized screws with plate head(ST4*12) on the honeycomb holder.Remove the honeycomb holder.Remove the honeycomb cooling media from the right side panel.2.1.5 Left Side Panel.Use screwdriver to remove 4 galvanized screws with plate head (ST4*12) on the left side panel.Remove the left side panel.2.1.6 Left Side Honeycomb Cooling Media.Use a screwdriver to remove 4 galvanized screws with plate head(ST4*12) on the honeycomb holder.Remove the honeycomb holder.Remove the honeycomb cooling media from the left side panel.2.2 How To Change SwitchRemove the back panel and follow the procedure 2.1.1Remove the right-side panel and follow procedure 2.1.32.2.1. Switch BoxUse a screw driver to remove 4 galvanized screws with plate head(ST3*12) on the switch box.Remove switch box.2.2.2. Switch(cool/speed/swing)Use screw driver to remove 2 galvanized screws (ST3X10) on each switch of the control panel(cool/speed/swing).Cool switchSpeed switchSwing switch2.2.3. Wiring Color ConnectionWiring color connection refers to part 4.2 Wiring Color Description.2.3 How To Change Water PumpRemove the back panel and follow the procedure 2.1.1Remove the right-side panel and follow procedure 2.1.3Remove the switch box and follow the procedure 2.2.12.3.1 Water pump pipe and water pump clip.Remove the water pump pipe.Use a screw driver to remove 2 SS screws(ST4*12) on the water pump clip.2.3.2 Cool Switch And Wiring ConnectorUse a screwdriver to remove 2 galvanized screws (ST3X10) on the cool switch of the control panel.Remove the brown wire on the cool switch.Remove the wiring cap (below picture shown) to get the water pump.Note: connection is between the water pump and the N wire of the power cord.2.3.3 Water Pump Wiring ConnectionThe water pump wiring connection refers to part 4.2 Wiring Color Description.2.4 How To Change Fan MotorRemove the back panel and follow the procedure 2.1.1Remove the right-side panel and follow procedure 2.1.3Remove the switch box and follow the procedure 2.2.12.4.1 Speed Switch And Wiring Connector.Use a screwdriver to remove 2 galvanized screws (ST3X10) on the speed switch of the control panel.Remove the white/yellow/blue wire on the speed switch.Remove the wiring cap (below picture shown).Note: connection is between fan motor COM wire(black) and N wire of power cord.Remove the wiring cap (below picture shown).Note: connection is between motor and power cord earth wire.Remove the wiring cap (below picture shown).Note: connection is between the capacitor and the motor.Remove the wiring cap (below picture shown).Note: connection is between capacitor and the motor.2.4.2 Fan Blade And Fan MotorUse a screwdriver to remove 1galvanized screws (M6X14) on the fan blade.Remove the fan blade.Use a screw driver to remove 8 galvanized screws (M5X12) on fan motor to get the fanmotor.2.4.3 Main Motor Wiring ConnectionMain motor wiring connection refers to part 4.2 Wiring Color Description.2.5 How To Change Swing MotorRemove the back panel and follow the procedure 2.1.1Remove the right-side panel and follow procedure 2.1.3Remove the switch box and follow the procedure 2.2.12.5.1 Swing Switch And Wiring Connector.Use a screwdriver to remove 2 galvanized screws (ST3X10) on the swing switch of the control panel.Remove the pink wire on the swing switch.Remove the wiring cap (below picture shown).Note: connection is between swing motor and N wire of power cord.2.5.2 Swing Motor And Swing Motor Wheel.Use a screwdriver to remove 2 galvanized screws(ST4X12) on the swing motor.Remove the swing motor.Use screwdriver to remove 1 galvanized screw(ST3*8) on the swing motor wheel.Remove the swing motor wheel.Get the swing motor.2.5.3 Swing Motor Wiring ConnectionSwing motor wiring connection refers to part 4.2 Wiring Color Description.TROUBLESHOOTING GUIDE3.1 Outside DimensionsWidth: 700 mm (27.56’’)Depth: 466 mm (18.35’’)Height: 1017 mm (40.0’’)3.2 Cooling SystemHoneywell Evaporative Air Coolers are built to maximize energy efficiency and keep costs low. Warm air is drawn into the cooler through a dust and odor-reducing carbon filter and enters the Honeycomb Cooling Media. Water pumped from the tank pours over the honeycomb media. As the warm air passes through the media, the water absorbs the heat, naturally cooling and humidifying the air. A fan propels the cooled air out into the room. This no-compressor system cools naturally, efficiently and inexpensively.Troubleshooting GuideThe following troubleshooting guide is intended to address the most common symptoms and is by no means exhaustive. If symptoms persist, call a qualified service provider. Only a certified electrician should complete any electrical work. Unplug and disconnect the appliance from the power source before attempting to troubleshoot any of the following symptoms.ProblemPossible CauseSolutionNo discharge of airThe cord is not plugged in.Make sure the power cord is plugged in and the supply switch is on.The power is not on.Turn the unit ON.Humidity output minimal to noneWater is below the minimum water level in the tank.Turn off the unit.Follow the instructions to fill the water tank with clean water.The water pump is damaged.Replace the water pump according to procedure 2.3.Watercolor yellowish at initial useColor fasts from honeycomb filter.This is natural. After several uses, the watercolor will be clean.Abnormal noise inside the productThe noise of the water pump when water is not up-to-min water level. the product again.Turn off the product. Add water, and then turn onMotor or blade problem.Turn off and unplug the product or change the main motor according to procedure 2.4.Musty or unpleasant odorWhen the Cooler is new.When the unit is used for the first time, the Honeycomb Cooling Media will have an odor, which will dissipate within a few hours of initial use.Stale or stagnant water in the water tank.Drain, flush and clean the water tankMedia mildewed or clogged.Replace media according to the procedure 2.1.Not coolingPump is not turned on.Check the water level and turn on the pump.Low or no water.Damaged water pump.Replace the water pump according to procedure 2.3.SCHEMATIC DIAGRAM4.1 Wiring Diagram4.2 Wiring Color DescriptionPower Cord:(1) Brown(2) Blue(3) Green + YellowLiveNeutralEarth (Ground)to speed switch(4)motor COM(black)to motor earthMain Motor:(1) White(2) Yellow(3) Blue(4) Black(5) Red(6) Brown(7) Green + YellowHigh speedMedium speedLow speedNeutralEarth (Ground)to speed switch(1)to speed switch(2)to speed switch(3)to N wire of power cordto the capacitor by end-closed connectorto the capacitor by end-closed connectorto power cord earthWater Pump:(1) Brown(2) Blueto pump control switch(1)to N wire of power cordSwing Motor:(1) Pink(2) Pinkto swing control switch(1)to N wire of power cordEXPLODED VIEWREPLACEMENT PARTS LISTSrPART NAMEQUANTITY1Up/Down swing knob22Swing knob pressboard13Horizontal louver 124Horizontal louver 225Horizontal louver 326Horizontal louver 427Horizontal louver 528Horizontal louver middle link19Horizontal louver press board A210Horizontal louver link A211Horizontal louver press board B212Horizontal louver link B213Swing/Cool knob214Speed knob115Control plane116Swing/Cool switch217Speed switch118Air outlet panel119Front panel120Rubber washer2021Vertical louver base422Short vertical louver223Long vertical louver224Switch box125Side panel226Side honeycomb pad227Side water distributor cover228Side water distributor229Side honeycomb pad holder430Swing motor131Swing motor wheel132Vertical louver drive133Base of fan motor frame234Fan motor frame435Fan blade assembly136Fan motor137Top cover138Water fill door139Four directions pipe140Back water distributor tube141Left/Right water distributor tube242Water fill door link243Back water distributor144Back water distributor cover145Left stand pillar146Back honeycomb pad holder247Back honeycomb pad148Back panel149Right stand pillar150Motor capacitor151Suction pipe152Water fill pipe153Float cap154Float holder155Float tube156Water level board157Vertical louver link158Water tank159Water pump160Water pump clip161Continuous water supply connection162Castor263Castor with brake264Water drainage plug165Silica gel ring1CONFIDENTIALWebsite: http://www.honeywellaircoolers.comDownloaded from www.Manualslib.com manuals search engineDocuments / ResourcesHoneywell CO60PM Evaporative Air Cooler [pdf] Instruction ManualCO60PM, Evaporative Air Cooler, CO60PM Evaporative Air Cooler, Air Cooler, CoolerReferencesUser ManualRelated PostsEvaporative Air Cooler With Humidifier SF-615H User ManualEvaporative Air Cooler With Humidifier SF-615H User Manual - Optimized PDF Evaporative Air Cooler With Humidifier SF-615H User…Honeywell TC10PM Series Portable Evaporative Air Cooler User ManualHoneywell TC10PM Series Portable Evaporative Air Cooler Portable Evaporative Air Cooler User Manual Read and save these instructions…kogan KAPMNCL4BA Mini Evaporative Air Cooler User Guidekogan KAPMNCL4BA Mini Evaporative Air Cooler SAFETY & WARNINGS Ensure to read this user guide prior to first…COOLER MASTER Hyper T200 CPU Air Cooler User ManualCOOLER MASTER Hyper T200 CPU Air Cooler IN THE BOX INTEL & AMD AMD AM4/AM3+/AM3/AM2+/AM2/FM2+/FM2/FM1 Intel - LGA1151/1150/1155/1156/1366/775…
That will make the following changes to the file hasplm.ini in the folder "C:\Program Files (x86)\Common Files\Aladdin Shared\HASP"
Speed / On – OffConnect to the power supply and turn the Speed knob. The fan will start. Change the speed from 1 for Low to 2 for Medium to 3 for High. To switch OFF the unit turn the Speed knob to “0”.
2.3.3 Water Pump Wiring ConnectionThe water pump wiring connection refers to part 4.2 Wiring Color Description.2.4 How To Change Fan MotorRemove the back panel and follow the procedure 2.1.1Remove the right-side panel and follow procedure 2.1.3Remove the switch box and follow the procedure 2.2.12.4.1 Speed Switch And Wiring Connector.Use a screwdriver to remove 2 galvanized screws (ST3X10) on the speed switch of the control panel.Remove the white/yellow/blue wire on the speed switch.Remove the wiring cap (below picture shown).Note: connection is between fan motor COM wire(black) and N wire of power cord.Remove the wiring cap (below picture shown).Note: connection is between motor and power cord earth wire.Remove the wiring cap (below picture shown).Note: connection is between the capacitor and the motor.Remove the wiring cap (below picture shown).Note: connection is between capacitor and the motor.2.4.2 Fan Blade And Fan MotorUse a screwdriver to remove 1galvanized screws (M6X14) on the fan blade.Remove the fan blade.Use a screw driver to remove 8 galvanized screws (M5X12) on fan motor to get the fanmotor.2.4.3 Main Motor Wiring ConnectionMain motor wiring connection refers to part 4.2 Wiring Color Description.2.5 How To Change Swing MotorRemove the back panel and follow the procedure 2.1.1Remove the right-side panel and follow procedure 2.1.3Remove the switch box and follow the procedure 2.2.12.5.1 Swing Switch And Wiring Connector.Use a screwdriver to remove 2 galvanized screws (ST3X10) on the swing switch of the control panel.Remove the pink wire on the swing switch.Remove the wiring cap (below picture shown).Note: connection is between swing motor and N wire of power cord.2.5.2 Swing Motor And Swing Motor Wheel.Use a screwdriver to remove 2 galvanized screws(ST4X12) on the swing motor.Remove the swing motor.Use screwdriver to remove 1 galvanized screw(ST3*8) on the swing motor wheel.Remove the swing motor wheel.Get the swing motor.2.5.3 Swing Motor Wiring ConnectionSwing motor wiring connection refers to part 4.2 Wiring Color Description.TROUBLESHOOTING GUIDE3.1 Outside DimensionsWidth: 700 mm (27.56’’)Depth: 466 mm (18.35’’)Height: 1017 mm (40.0’’)3.2 Cooling SystemHoneywell Evaporative Air Coolers are built to maximize energy efficiency and keep costs low. Warm air is drawn into the cooler through a dust and odor-reducing carbon filter and enters the Honeycomb Cooling Media. Water pumped from the tank pours over the honeycomb media. As the warm air passes through the media, the water absorbs the heat, naturally cooling and humidifying the air. A fan propels the cooled air out into the room. This no-compressor system cools naturally, efficiently and inexpensively.Troubleshooting GuideThe following troubleshooting guide is intended to address the most common symptoms and is by no means exhaustive. If symptoms persist, call a qualified service provider. Only a certified electrician should complete any electrical work. Unplug and disconnect the appliance from the power source before attempting to troubleshoot any of the following symptoms.ProblemPossible CauseSolutionNo discharge of airThe cord is not plugged in.Make sure the power cord is plugged in and the supply switch is on.The power is not on.Turn the unit ON.Humidity output minimal to noneWater is below the minimum water level in the tank.Turn off the unit.Follow the instructions to fill the water tank with clean water.The water pump is damaged.Replace the water pump according to procedure 2.3.Watercolor yellowish at initial useColor fasts from honeycomb filter.This is natural. After several uses, the watercolor will be clean.Abnormal noise inside the productThe noise of the water pump when water is not up-to-min water level. the product again.Turn off the product. Add water, and then turn onMotor or blade problem.Turn off and unplug the product or change the main motor according to procedure 2.4.Musty or unpleasant odorWhen the Cooler is new.When the unit is used for the first time, the Honeycomb Cooling Media will have an odor, which will dissipate within a few hours of initial use.Stale or stagnant water in the water tank.Drain, flush and clean the water tankMedia mildewed or clogged.Replace media according to the procedure 2.1.Not coolingPump is not turned on.Check the water level and turn on the pump.Low or no water.Damaged water pump.Replace the water pump according to procedure 2.3.SCHEMATIC DIAGRAM4.1 Wiring Diagram4.2 Wiring Color DescriptionPower Cord:(1) Brown(2) Blue(3) Green + YellowLiveNeutralEarth (Ground)to speed switch(4)motor COM(black)to motor earthMain Motor:(1) White(2) Yellow(3) Blue(4) Black(5) Red(6) Brown(7) Green + YellowHigh speedMedium speedLow speedNeutralEarth (Ground)to speed switch(1)to speed switch(2)to speed switch(3)to N wire of power cordto the capacitor by end-closed connectorto the capacitor by end-closed connectorto power cord earthWater Pump:(1) Brown(2) Blueto pump control switch(1)to N wire of power cordSwing Motor:(1) Pink(2) Pinkto swing control switch(1)to N wire of power cordEXPLODED VIEWREPLACEMENT PARTS LISTSrPART NAMEQUANTITY1Up/Down swing knob22Swing knob pressboard13Horizontal louver 124Horizontal louver 225Horizontal louver 326Horizontal louver 427Horizontal louver 528Horizontal louver middle link19Horizontal louver press board A210Horizontal louver link A211Horizontal louver press board B212Horizontal louver link B213Swing/Cool knob214Speed knob115Control plane116Swing/Cool switch217Speed switch118Air outlet panel119Front panel120Rubber washer2021Vertical louver base422Short vertical louver223Long vertical louver224Switch box125Side panel226Side honeycomb pad227Side water distributor cover228Side water distributor229Side honeycomb pad holder430Swing motor131Swing motor wheel132Vertical louver drive133Base of fan motor frame234Fan motor frame435Fan blade assembly136Fan motor137Top cover138Water fill door139Four directions pipe140Back water distributor tube141Left/Right water distributor tube242Water fill door link243Back water distributor144Back water distributor cover145Left stand pillar146Back honeycomb pad holder247Back honeycomb pad148Back panel149Right stand pillar150Motor capacitor151Suction pipe152Water fill pipe153Float cap154Float holder155Float tube156Water level board157Vertical louver link158Water tank159Water pump160Water pump clip161Continuous water supply connection162Castor263Castor with brake264Water drainage plug165Silica gel ring1CONFIDENTIALWebsite: http://www.honeywellaircoolers.comDownloaded from www.Manualslib.com manuals search engineDocuments / ResourcesHoneywell CO60PM Evaporative Air Cooler [pdf] Instruction ManualCO60PM, Evaporative Air Cooler, CO60PM Evaporative Air Cooler, Air Cooler, CoolerReferencesUser ManualRelated PostsEvaporative Air Cooler With Humidifier SF-615H User ManualEvaporative Air Cooler With Humidifier SF-615H User Manual - Optimized PDF Evaporative Air Cooler With Humidifier SF-615H User…Honeywell TC10PM Series Portable Evaporative Air Cooler User ManualHoneywell TC10PM Series Portable Evaporative Air Cooler Portable Evaporative Air Cooler User Manual Read and save these instructions…kogan KAPMNCL4BA Mini Evaporative Air Cooler User Guidekogan KAPMNCL4BA Mini Evaporative Air Cooler SAFETY & WARNINGS Ensure to read this user guide prior to first…COOLER MASTER Hyper T200 CPU Air Cooler User ManualCOOLER MASTER Hyper T200 CPU Air Cooler IN THE BOX INTEL & AMD AMD AM4/AM3+/AM3/AM2+/AM2/FM2+/FM2/FM1 Intel - LGA1151/1150/1155/1156/1366/775…
1.5 Parts Description1 Water Inlet and Ice2 Handle3 Left Honeycomb Panel4 Lever for Horizontal Louvers5 Water Tank6 Casters7 Horizontal Louvers8 Water Level Indicator9 Control Panel Loading Compartment10 Right Honeycomb Panel11 Continuous Water Supply Connection12 Drain Plug13 Backside Honeycomb Panel14 Power Cord & Plug15 Rear Grill Removal Screws16 Water Fill Door17 Honeycomb Cooling Media18 Water Inlet (Optional) for manual refill 1.6 OperationsControl Panel:NOTE:The speed control may be marked as High/Med/Low in certain units.Operation Instructions: Cooler Location:Place the cooler in front of an open door or window. Ensure that there is adequate cross–ventilation in the room by leaving a door or window open opposite the cooler. Following these guidelines will ensure your cooler will work as effectively as possible.Not an Air Conditioner:The evaporative air cooler is not an air conditioner as it does not use a compressor or refrigerant gas. It should not be expected to cool as efficiently as a refrigerated air conditioner. The recommended maximum relative humidity level is 60% or less, which allows a noticeable temperature decrease. The temperature decrease will be greater in drier climates because higher evaporation occurs when the humidity is low.The evaporative air cooler should not be used in enclosed spaces. It must be kept level and there must be water in the water tank. The room should have doors and windows opened to allow free airflow. The evaporative air cooler works best when placed near an open window so that outside air is drawn into the evaporative air cooler, the air circulates in the room, and then exits via the door. The maximum cooling effect is felt when a person is in the flow of air coming out of the evaporative air cooler.The evaporative air cooler can also be used to humidify dry air during cool weather. To be used for humidification the windows and doors should be closed to allow the humidified air to accumulate. The evaporative air cooler is not an air conditioner as it does not use a compressor or refrigerant gas. It should not be expected to cool as efficiently as a refrigerated air conditioner.NOTE: When the product is used for the first time the Honeycomb Cooling Media will have an odor that will dissipate in a week or so of initial use.FILL WATER:Water can be filled into the air cooler by:Water Inlet (Manually)Water / Ice can be put into the tank through the top opening. There is a hole for water to flow into the tank.Continuous water supply (Auto-Refill)Connect a garden hose to the continuous water supply inlet.Water Inlet (Manually)To refill the water tank, pull out the Water Fill Door located on the top of the unit and fill water to the Max, as indicated on the Water Level Indicator.Do not fill water above the Max water level mark.For maximum cooling performance, put ice cubes inside the Ice Loading Compartment located on the top of the Air Cooler.Filling With Water (Continuous Water Supply Connection)CAUTION Unplug from power source before fillingThis automated process eliminates the need to manually refill the water tank.Securely connect the continuous water supply connector (located on the lower left side panel) to the water supply.Turn on the water.The water tank will refill automatically.The water float valve will detect the water level and will automatically start or stop the water flow.Plug the unit into the power supply and turn the unit on.Installing Hose Adapter And Float ValveConnect the garden hose to the water supply connectorVerify that connections are secure and turn on the water.Control KnobsSpeed / On – OffConnect to the power supply and turn the Speed knob. The fan will start. Change the speed from 1 for Low to 2 for Medium to 3 for High. To switch OFF the unit turn the Speed knob to “0”.CoolTo begin cooling the desired area turn the “COOL” switch ON. The water pump will operate. You can feel the cooler air after the Honeycomb media is completely wet.SwingVertical LouversTurn the “SWING” switch ON. The louvers will begin to move from right to left automatically. Manually adjust the horizontal louvers to change vertical airflow.Horizontal LouversManually adjust the horizontal louvers to change vertical airflow.CLEANING & MAINTENANCEImportant – Please Read!The cooler is supplied with Honeycomb Cooling Media.The cleaning frequency for the Honeycomb media depends on local air and water conditions. In areas where the mineral content of water is high, mineral deposits may build up on the Honeycomb Cooling Media and restrict airflow. Draining the water reservoir and refilling it with fresh water at least once a week will help reduce mineral deposits. If mineral deposits remain on the Honeycomb media, the media should be removed and washed under fresh water. The media should be cleaned every two months or sooner, depending on your needs.Do not run the unit in COOL mode with stale water in the tank. Empty the tank and refill it with fresh water if the water has been standing in the tank for an extended period of time.For best results, allow the Honeycomb Cooling Media to dry after each use by turning off the cool function 15 minutes before turning the unit off.WARNINGBefore cleaning, turn the unit off and disconnect from the power source.Use a damp cloth to remove dirt and dust from the outside of the unit.Never use abrasive cleaners.When the unit is not in use, store it in a dry place, out of direct sunlight.Maximum water inlet pressure 0.5 MPa.Draining and Cleaning The Water TankTurn the power “off’ and disconnect the air cooler from the power supply.Move the unit to a location where it can be drained.Remove the drain plug and allow the tank to empty.Refill the water tank up to the maximum level with clean water and drain it completely.Fill the water tank and rinse at least 2-3 times before use.After cleaning ensure that the drain plug is back in place.Plug into the power supply and turn on the unit.Cleaning The Honeycomb Cooling MediaTurn off the unit, and unplug the power cord from the wall outlet.Rotate the unit facing the back panel, and locate the Grill Removal Screws. Remove the 4 screws with a screwdriver.Pull the rear grill panel, until it is completely removed.This cooler has Honeycomb cooling media on the right and left panels. The cleaning and removal procedure is the same as the rear panel.The Honeycomb cooling media can now be seen. Clean honeycomb with a clean cloth to remove all the dust & dirt particles.Once cleaning is finished, reassemble the unit.Plug into the power supply and turn on the unit.The air cooler is now ready to be used. This cleaning process should be repeated monthly to maintain the integrity of the unit and to remove particles filtered from the air.DISASSEMBLY INSTRUCTIONSWARNING – Before the following disassembly, POWER is set to OFF and disconnected the power cord.2.1 How To Change Honeycomb Cooling Media(3 sides)2.1.1 Back Panel.Use a screwdriver to remove 5 galvanized screws with plate head (ST4*12) on the back panel.Remove the back panel.2.1.2 Back Honeycomb Cooling Media.Use screwdriver to remove 4 galvanized screws with plate head(ST4*12) on the honeycomb holder.Remove the honeycomb holder.Remove the honeycomb cooling media from the back panel.2.1.3 Right Side Panel.Use a screwdriver to remove 4 galvanized screws with plate head (ST4*12) on the right-side panel.Remove the right side panel.2.1.4 Right Side Honeycomb Cooling Media.Use screwdriver to remove 4 galvanized screws with plate head(ST4*12) on the honeycomb holder.Remove the honeycomb holder.Remove the honeycomb cooling media from the right side panel.2.1.5 Left Side Panel.Use screwdriver to remove 4 galvanized screws with plate head (ST4*12) on the left side panel.Remove the left side panel.2.1.6 Left Side Honeycomb Cooling Media.Use a screwdriver to remove 4 galvanized screws with plate head(ST4*12) on the honeycomb holder.Remove the honeycomb holder.Remove the honeycomb cooling media from the left side panel.2.2 How To Change SwitchRemove the back panel and follow the procedure 2.1.1Remove the right-side panel and follow procedure 2.1.32.2.1. Switch BoxUse a screw driver to remove 4 galvanized screws with plate head(ST3*12) on the switch box.Remove switch box.2.2.2. Switch(cool/speed/swing)Use screw driver to remove 2 galvanized screws (ST3X10) on each switch of the control panel(cool/speed/swing).Cool switchSpeed switchSwing switch2.2.3. Wiring Color ConnectionWiring color connection refers to part 4.2 Wiring Color Description.2.3 How To Change Water PumpRemove the back panel and follow the procedure 2.1.1Remove the right-side panel and follow procedure 2.1.3Remove the switch box and follow the procedure 2.2.12.3.1 Water pump pipe and water pump clip.Remove the water pump pipe.Use a screw driver to remove 2 SS screws(ST4*12) on the water pump clip.2.3.2 Cool Switch And Wiring ConnectorUse a screwdriver to remove 2 galvanized screws (ST3X10) on the cool switch of the control panel.Remove the brown wire on the cool switch.Remove the wiring cap (below picture shown) to get the water pump.Note: connection is between the water pump and the N wire of the power cord.2.3.3 Water Pump Wiring ConnectionThe water pump wiring connection refers to part 4.2 Wiring Color Description.2.4 How To Change Fan MotorRemove the back panel and follow the procedure 2.1.1Remove the right-side panel and follow procedure 2.1.3Remove the switch box and follow the procedure 2.2.12.4.1 Speed Switch And Wiring Connector.Use a screwdriver to remove 2 galvanized screws (ST3X10) on the speed switch of the control panel.Remove the white/yellow/blue wire on the speed switch.Remove the wiring cap (below picture shown).Note: connection is between fan motor COM wire(black) and N wire of power cord.Remove the wiring cap (below picture shown).Note: connection is between motor and power cord earth wire.Remove the wiring cap (below picture shown).Note: connection is between the capacitor and the motor.Remove the wiring cap (below picture shown).Note: connection is between capacitor and the motor.2.4.2 Fan Blade And Fan MotorUse a screwdriver to remove 1galvanized screws (M6X14) on the fan blade.Remove the fan blade.Use a screw driver to remove 8 galvanized screws (M5X12) on fan motor to get the fanmotor.2.4.3 Main Motor Wiring ConnectionMain motor wiring connection refers to part 4.2 Wiring Color Description.2.5 How To Change Swing MotorRemove the back panel and follow the procedure 2.1.1Remove the right-side panel and follow procedure 2.1.3Remove the switch box and follow the procedure 2.2.12.5.1 Swing Switch And Wiring Connector.Use a screwdriver to remove 2 galvanized screws (ST3X10) on the swing switch of the control panel.Remove the pink wire on the swing switch.Remove the wiring cap (below picture shown).Note: connection is between swing motor and N wire of power cord.2.5.2 Swing Motor And Swing Motor Wheel.Use a screwdriver to remove 2 galvanized screws(ST4X12) on the swing motor.Remove the swing motor.Use screwdriver to remove 1 galvanized screw(ST3*8) on the swing motor wheel.Remove the swing motor wheel.Get the swing motor.2.5.3 Swing Motor Wiring ConnectionSwing motor wiring connection refers to part 4.2 Wiring Color Description.TROUBLESHOOTING GUIDE3.1 Outside DimensionsWidth: 700 mm (27.56’’)Depth: 466 mm (18.35’’)Height: 1017 mm (40.0’’)3.2 Cooling SystemHoneywell Evaporative Air Coolers are built to maximize energy efficiency and keep costs low. Warm air is drawn into the cooler through a dust and odor-reducing carbon filter and enters the Honeycomb Cooling Media. Water pumped from the tank pours over the honeycomb media. As the warm air passes through the media, the water absorbs the heat, naturally cooling and humidifying the air. A fan propels the cooled air out into the room. This no-compressor system cools naturally, efficiently and inexpensively.Troubleshooting GuideThe following troubleshooting guide is intended to address the most common symptoms and is by no means exhaustive. If symptoms persist, call a qualified service provider. Only a certified electrician should complete any electrical work. Unplug and disconnect the appliance from the power source before attempting to troubleshoot any of the following symptoms.ProblemPossible CauseSolutionNo discharge of airThe cord is not plugged in.Make sure the power cord is plugged in and the supply switch is on.The power is not on.Turn the unit ON.Humidity output minimal to noneWater is below the minimum water level in the tank.Turn off the unit.Follow the instructions to fill the water tank with clean water.The water pump is damaged.Replace the water pump according to procedure 2.3.Watercolor yellowish at initial useColor fasts from honeycomb filter.This is natural. After several uses, the watercolor will be clean.Abnormal noise inside the productThe noise of the water pump when water is not up-to-min water level. the product again.Turn off the product. Add water, and then turn onMotor or blade problem.Turn off and unplug the product or change the main motor according to procedure 2.4.Musty or unpleasant odorWhen the Cooler is new.When the unit is used for the first time, the Honeycomb Cooling Media will have an odor, which will dissipate within a few hours of initial use.Stale or stagnant water in the water tank.Drain, flush and clean the water tankMedia mildewed or clogged.Replace media according to the procedure 2.1.Not coolingPump is not turned on.Check the water level and turn on the pump.Low or no water.Damaged water pump.Replace the water pump according to procedure 2.3.SCHEMATIC DIAGRAM4.1 Wiring Diagram4.2 Wiring Color DescriptionPower Cord:(1) Brown(2) Blue(3) Green + YellowLiveNeutralEarth (Ground)to speed switch(4)motor COM(black)to motor earthMain Motor:(1) White(2) Yellow(3) Blue(4) Black(5) Red(6) Brown(7) Green + YellowHigh speedMedium speedLow speedNeutralEarth (Ground)to speed switch(1)to speed switch(2)to speed switch(3)to N wire of power cordto the capacitor by end-closed connectorto the capacitor by end-closed connectorto power cord earthWater Pump:(1) Brown(2) Blueto pump control switch(1)to N wire of power cordSwing Motor:(1) Pink(2) Pinkto swing control switch(1)to N wire of power cordEXPLODED VIEWREPLACEMENT PARTS LISTSrPART NAMEQUANTITY1Up/Down swing knob22Swing knob pressboard13Horizontal louver 124Horizontal louver 225Horizontal louver 326Horizontal louver 427Horizontal louver 528Horizontal louver middle link19Horizontal louver press board A210Horizontal louver link A211Horizontal louver press board B212Horizontal louver link B213Swing/Cool knob214Speed knob115Control plane116Swing/Cool switch217Speed switch118Air outlet panel119Front panel120Rubber washer2021Vertical louver base422Short vertical louver223Long vertical louver224Switch box125Side panel226Side honeycomb pad227Side water distributor cover228Side water distributor229Side honeycomb pad holder430Swing motor131Swing motor wheel132Vertical louver drive133Base of fan motor frame234Fan motor frame435Fan blade assembly136Fan motor137Top cover138Water fill door139Four directions pipe140Back water distributor tube141Left/Right water distributor tube242Water fill door link243Back water distributor144Back water distributor cover145Left stand pillar146Back honeycomb pad holder247Back honeycomb pad148Back panel149Right stand pillar150Motor capacitor151Suction pipe152Water fill pipe153Float cap154Float holder155Float tube156Water level board157Vertical louver link158Water tank159Water pump160Water pump clip161Continuous water supply connection162Castor263Castor with brake264Water drainage plug165Silica gel ring1CONFIDENTIALWebsite: http://www.honeywellaircoolers.comDownloaded from www.Manualslib.com manuals search engineDocuments / ResourcesHoneywell CO60PM Evaporative Air Cooler [pdf] Instruction ManualCO60PM, Evaporative Air Cooler, CO60PM Evaporative Air Cooler, Air Cooler, CoolerReferencesUser ManualRelated PostsEvaporative Air Cooler With Humidifier SF-615H User ManualEvaporative Air Cooler With Humidifier SF-615H User Manual - Optimized PDF Evaporative Air Cooler With Humidifier SF-615H User…Honeywell TC10PM Series Portable Evaporative Air Cooler User ManualHoneywell TC10PM Series Portable Evaporative Air Cooler Portable Evaporative Air Cooler User Manual Read and save these instructions…kogan KAPMNCL4BA Mini Evaporative Air Cooler User Guidekogan KAPMNCL4BA Mini Evaporative Air Cooler SAFETY & WARNINGS Ensure to read this user guide prior to first…COOLER MASTER Hyper T200 CPU Air Cooler User ManualCOOLER MASTER Hyper T200 CPU Air Cooler IN THE BOX INTEL & AMD AMD AM4/AM3+/AM3/AM2+/AM2/FM2+/FM2/FM1 Intel - LGA1151/1150/1155/1156/1366/775…
To install n4ce via the n4ce.msi file in silent mode, you must first open cmd (Command Prompt) with administrator privileges.
3.2 Cooling SystemHoneywell Evaporative Air Coolers are built to maximize energy efficiency and keep costs low. Warm air is drawn into the cooler through a dust and odor-reducing carbon filter and enters the Honeycomb Cooling Media. Water pumped from the tank pours over the honeycomb media. As the warm air passes through the media, the water absorbs the heat, naturally cooling and humidifying the air. A fan propels the cooled air out into the room. This no-compressor system cools naturally, efficiently and inexpensively.Troubleshooting GuideThe following troubleshooting guide is intended to address the most common symptoms and is by no means exhaustive. If symptoms persist, call a qualified service provider. Only a certified electrician should complete any electrical work. Unplug and disconnect the appliance from the power source before attempting to troubleshoot any of the following symptoms.ProblemPossible CauseSolutionNo discharge of airThe cord is not plugged in.Make sure the power cord is plugged in and the supply switch is on.The power is not on.Turn the unit ON.Humidity output minimal to noneWater is below the minimum water level in the tank.Turn off the unit.Follow the instructions to fill the water tank with clean water.The water pump is damaged.Replace the water pump according to procedure 2.3.Watercolor yellowish at initial useColor fasts from honeycomb filter.This is natural. After several uses, the watercolor will be clean.Abnormal noise inside the productThe noise of the water pump when water is not up-to-min water level. the product again.Turn off the product. Add water, and then turn onMotor or blade problem.Turn off and unplug the product or change the main motor according to procedure 2.4.Musty or unpleasant odorWhen the Cooler is new.When the unit is used for the first time, the Honeycomb Cooling Media will have an odor, which will dissipate within a few hours of initial use.Stale or stagnant water in the water tank.Drain, flush and clean the water tankMedia mildewed or clogged.Replace media according to the procedure 2.1.Not coolingPump is not turned on.Check the water level and turn on the pump.Low or no water.Damaged water pump.Replace the water pump according to procedure 2.3.SCHEMATIC DIAGRAM4.1 Wiring Diagram4.2 Wiring Color DescriptionPower Cord:(1) Brown(2) Blue(3) Green + YellowLiveNeutralEarth (Ground)to speed switch(4)motor COM(black)to motor earthMain Motor:(1) White(2) Yellow(3) Blue(4) Black(5) Red(6) Brown(7) Green + YellowHigh speedMedium speedLow speedNeutralEarth (Ground)to speed switch(1)to speed switch(2)to speed switch(3)to N wire of power cordto the capacitor by end-closed connectorto the capacitor by end-closed connectorto power cord earthWater Pump:(1) Brown(2) Blueto pump control switch(1)to N wire of power cordSwing Motor:(1) Pink(2) Pinkto swing control switch(1)to N wire of power cordEXPLODED VIEWREPLACEMENT PARTS LISTSrPART NAMEQUANTITY1Up/Down swing knob22Swing knob pressboard13Horizontal louver 124Horizontal louver 225Horizontal louver 326Horizontal louver 427Horizontal louver 528Horizontal louver middle link19Horizontal louver press board A210Horizontal louver link A211Horizontal louver press board B212Horizontal louver link B213Swing/Cool knob214Speed knob115Control plane116Swing/Cool switch217Speed switch118Air outlet panel119Front panel120Rubber washer2021Vertical louver base422Short vertical louver223Long vertical louver224Switch box125Side panel226Side honeycomb pad227Side water distributor cover228Side water distributor229Side honeycomb pad holder430Swing motor131Swing motor wheel132Vertical louver drive133Base of fan motor frame234Fan motor frame435Fan blade assembly136Fan motor137Top cover138Water fill door139Four directions pipe140Back water distributor tube141Left/Right water distributor tube242Water fill door link243Back water distributor144Back water distributor cover145Left stand pillar146Back honeycomb pad holder247Back honeycomb pad148Back panel149Right stand pillar150Motor capacitor151Suction pipe152Water fill pipe153Float cap154Float holder155Float tube156Water level board157Vertical louver link158Water tank159Water pump160Water pump clip161Continuous water supply connection162Castor263Castor with brake264Water drainage plug165Silica gel ring1CONFIDENTIALWebsite: http://www.honeywellaircoolers.comDownloaded from www.Manualslib.com manuals search engineDocuments / ResourcesHoneywell CO60PM Evaporative Air Cooler [pdf] Instruction ManualCO60PM, Evaporative Air Cooler, CO60PM Evaporative Air Cooler, Air Cooler, CoolerReferencesUser ManualRelated PostsEvaporative Air Cooler With Humidifier SF-615H User ManualEvaporative Air Cooler With Humidifier SF-615H User Manual - Optimized PDF Evaporative Air Cooler With Humidifier SF-615H User…Honeywell TC10PM Series Portable Evaporative Air Cooler User ManualHoneywell TC10PM Series Portable Evaporative Air Cooler Portable Evaporative Air Cooler User Manual Read and save these instructions…kogan KAPMNCL4BA Mini Evaporative Air Cooler User Guidekogan KAPMNCL4BA Mini Evaporative Air Cooler SAFETY & WARNINGS Ensure to read this user guide prior to first…COOLER MASTER Hyper T200 CPU Air Cooler User ManualCOOLER MASTER Hyper T200 CPU Air Cooler IN THE BOX INTEL & AMD AMD AM4/AM3+/AM3/AM2+/AM2/FM2+/FM2/FM1 Intel - LGA1151/1150/1155/1156/1366/775…
CONFIDENTIALWebsite: http://www.honeywellaircoolers.comDownloaded from www.Manualslib.com manuals search engineDocuments / ResourcesHoneywell CO60PM Evaporative Air Cooler [pdf] Instruction ManualCO60PM, Evaporative Air Cooler, CO60PM Evaporative Air Cooler, Air Cooler, CoolerReferencesUser ManualRelated PostsEvaporative Air Cooler With Humidifier SF-615H User ManualEvaporative Air Cooler With Humidifier SF-615H User Manual - Optimized PDF Evaporative Air Cooler With Humidifier SF-615H User…Honeywell TC10PM Series Portable Evaporative Air Cooler User ManualHoneywell TC10PM Series Portable Evaporative Air Cooler Portable Evaporative Air Cooler User Manual Read and save these instructions…kogan KAPMNCL4BA Mini Evaporative Air Cooler User Guidekogan KAPMNCL4BA Mini Evaporative Air Cooler SAFETY & WARNINGS Ensure to read this user guide prior to first…COOLER MASTER Hyper T200 CPU Air Cooler User ManualCOOLER MASTER Hyper T200 CPU Air Cooler IN THE BOX INTEL & AMD AMD AM4/AM3+/AM3/AM2+/AM2/FM2+/FM2/FM1 Intel - LGA1151/1150/1155/1156/1366/775…
Because n4ce can be licensed via a USB dongle or a software key, the correct files need to be copied into the n4ce Program folder after the silent installation completes. This process is normally undertaken with a custom app that is called once the general installation is complete. But because it has been installed silently, then that is not going to happen.
2 Jan 2018 — The Asian Military Review is the largest circulated defence magazine in Asia-Pacific region. The publication is the journal of choice for ...
Remove the back panel and follow the procedure 2.1.1Remove the right-side panel and follow procedure 2.1.3Remove the switch box and follow the procedure 2.2.12.3.1 Water pump pipe and water pump clip.Remove the water pump pipe.Use a screw driver to remove 2 SS screws(ST4*12) on the water pump clip.2.3.2 Cool Switch And Wiring ConnectorUse a screwdriver to remove 2 galvanized screws (ST3X10) on the cool switch of the control panel.Remove the brown wire on the cool switch.Remove the wiring cap (below picture shown) to get the water pump.Note: connection is between the water pump and the N wire of the power cord.2.3.3 Water Pump Wiring ConnectionThe water pump wiring connection refers to part 4.2 Wiring Color Description.2.4 How To Change Fan MotorRemove the back panel and follow the procedure 2.1.1Remove the right-side panel and follow procedure 2.1.3Remove the switch box and follow the procedure 2.2.12.4.1 Speed Switch And Wiring Connector.Use a screwdriver to remove 2 galvanized screws (ST3X10) on the speed switch of the control panel.Remove the white/yellow/blue wire on the speed switch.Remove the wiring cap (below picture shown).Note: connection is between fan motor COM wire(black) and N wire of power cord.Remove the wiring cap (below picture shown).Note: connection is between motor and power cord earth wire.Remove the wiring cap (below picture shown).Note: connection is between the capacitor and the motor.Remove the wiring cap (below picture shown).Note: connection is between capacitor and the motor.2.4.2 Fan Blade And Fan MotorUse a screwdriver to remove 1galvanized screws (M6X14) on the fan blade.Remove the fan blade.Use a screw driver to remove 8 galvanized screws (M5X12) on fan motor to get the fanmotor.2.4.3 Main Motor Wiring ConnectionMain motor wiring connection refers to part 4.2 Wiring Color Description.2.5 How To Change Swing MotorRemove the back panel and follow the procedure 2.1.1Remove the right-side panel and follow procedure 2.1.3Remove the switch box and follow the procedure 2.2.12.5.1 Swing Switch And Wiring Connector.Use a screwdriver to remove 2 galvanized screws (ST3X10) on the swing switch of the control panel.Remove the pink wire on the swing switch.Remove the wiring cap (below picture shown).Note: connection is between swing motor and N wire of power cord.2.5.2 Swing Motor And Swing Motor Wheel.Use a screwdriver to remove 2 galvanized screws(ST4X12) on the swing motor.Remove the swing motor.Use screwdriver to remove 1 galvanized screw(ST3*8) on the swing motor wheel.Remove the swing motor wheel.Get the swing motor.2.5.3 Swing Motor Wiring ConnectionSwing motor wiring connection refers to part 4.2 Wiring Color Description.TROUBLESHOOTING GUIDE3.1 Outside DimensionsWidth: 700 mm (27.56’’)Depth: 466 mm (18.35’’)Height: 1017 mm (40.0’’)3.2 Cooling SystemHoneywell Evaporative Air Coolers are built to maximize energy efficiency and keep costs low. Warm air is drawn into the cooler through a dust and odor-reducing carbon filter and enters the Honeycomb Cooling Media. Water pumped from the tank pours over the honeycomb media. As the warm air passes through the media, the water absorbs the heat, naturally cooling and humidifying the air. A fan propels the cooled air out into the room. This no-compressor system cools naturally, efficiently and inexpensively.Troubleshooting GuideThe following troubleshooting guide is intended to address the most common symptoms and is by no means exhaustive. If symptoms persist, call a qualified service provider. Only a certified electrician should complete any electrical work. Unplug and disconnect the appliance from the power source before attempting to troubleshoot any of the following symptoms.ProblemPossible CauseSolutionNo discharge of airThe cord is not plugged in.Make sure the power cord is plugged in and the supply switch is on.The power is not on.Turn the unit ON.Humidity output minimal to noneWater is below the minimum water level in the tank.Turn off the unit.Follow the instructions to fill the water tank with clean water.The water pump is damaged.Replace the water pump according to procedure 2.3.Watercolor yellowish at initial useColor fasts from honeycomb filter.This is natural. After several uses, the watercolor will be clean.Abnormal noise inside the productThe noise of the water pump when water is not up-to-min water level. the product again.Turn off the product. Add water, and then turn onMotor or blade problem.Turn off and unplug the product or change the main motor according to procedure 2.4.Musty or unpleasant odorWhen the Cooler is new.When the unit is used for the first time, the Honeycomb Cooling Media will have an odor, which will dissipate within a few hours of initial use.Stale or stagnant water in the water tank.Drain, flush and clean the water tankMedia mildewed or clogged.Replace media according to the procedure 2.1.Not coolingPump is not turned on.Check the water level and turn on the pump.Low or no water.Damaged water pump.Replace the water pump according to procedure 2.3.SCHEMATIC DIAGRAM4.1 Wiring Diagram4.2 Wiring Color DescriptionPower Cord:(1) Brown(2) Blue(3) Green + YellowLiveNeutralEarth (Ground)to speed switch(4)motor COM(black)to motor earthMain Motor:(1) White(2) Yellow(3) Blue(4) Black(5) Red(6) Brown(7) Green + YellowHigh speedMedium speedLow speedNeutralEarth (Ground)to speed switch(1)to speed switch(2)to speed switch(3)to N wire of power cordto the capacitor by end-closed connectorto the capacitor by end-closed connectorto power cord earthWater Pump:(1) Brown(2) Blueto pump control switch(1)to N wire of power cordSwing Motor:(1) Pink(2) Pinkto swing control switch(1)to N wire of power cordEXPLODED VIEWREPLACEMENT PARTS LISTSrPART NAMEQUANTITY1Up/Down swing knob22Swing knob pressboard13Horizontal louver 124Horizontal louver 225Horizontal louver 326Horizontal louver 427Horizontal louver 528Horizontal louver middle link19Horizontal louver press board A210Horizontal louver link A211Horizontal louver press board B212Horizontal louver link B213Swing/Cool knob214Speed knob115Control plane116Swing/Cool switch217Speed switch118Air outlet panel119Front panel120Rubber washer2021Vertical louver base422Short vertical louver223Long vertical louver224Switch box125Side panel226Side honeycomb pad227Side water distributor cover228Side water distributor229Side honeycomb pad holder430Swing motor131Swing motor wheel132Vertical louver drive133Base of fan motor frame234Fan motor frame435Fan blade assembly136Fan motor137Top cover138Water fill door139Four directions pipe140Back water distributor tube141Left/Right water distributor tube242Water fill door link243Back water distributor144Back water distributor cover145Left stand pillar146Back honeycomb pad holder247Back honeycomb pad148Back panel149Right stand pillar150Motor capacitor151Suction pipe152Water fill pipe153Float cap154Float holder155Float tube156Water level board157Vertical louver link158Water tank159Water pump160Water pump clip161Continuous water supply connection162Castor263Castor with brake264Water drainage plug165Silica gel ring1CONFIDENTIALWebsite: http://www.honeywellaircoolers.comDownloaded from www.Manualslib.com manuals search engineDocuments / ResourcesHoneywell CO60PM Evaporative Air Cooler [pdf] Instruction ManualCO60PM, Evaporative Air Cooler, CO60PM Evaporative Air Cooler, Air Cooler, CoolerReferencesUser ManualRelated PostsEvaporative Air Cooler With Humidifier SF-615H User ManualEvaporative Air Cooler With Humidifier SF-615H User Manual - Optimized PDF Evaporative Air Cooler With Humidifier SF-615H User…Honeywell TC10PM Series Portable Evaporative Air Cooler User ManualHoneywell TC10PM Series Portable Evaporative Air Cooler Portable Evaporative Air Cooler User Manual Read and save these instructions…kogan KAPMNCL4BA Mini Evaporative Air Cooler User Guidekogan KAPMNCL4BA Mini Evaporative Air Cooler SAFETY & WARNINGS Ensure to read this user guide prior to first…COOLER MASTER Hyper T200 CPU Air Cooler User ManualCOOLER MASTER Hyper T200 CPU Air Cooler IN THE BOX INTEL & AMD AMD AM4/AM3+/AM3/AM2+/AM2/FM2+/FM2/FM1 Intel - LGA1151/1150/1155/1156/1366/775…
Water Pump:(1) Brown(2) Blueto pump control switch(1)to N wire of power cordSwing Motor:(1) Pink(2) Pinkto swing control switch(1)to N wire of power cordEXPLODED VIEWREPLACEMENT PARTS LISTSrPART NAMEQUANTITY1Up/Down swing knob22Swing knob pressboard13Horizontal louver 124Horizontal louver 225Horizontal louver 326Horizontal louver 427Horizontal louver 528Horizontal louver middle link19Horizontal louver press board A210Horizontal louver link A211Horizontal louver press board B212Horizontal louver link B213Swing/Cool knob214Speed knob115Control plane116Swing/Cool switch217Speed switch118Air outlet panel119Front panel120Rubber washer2021Vertical louver base422Short vertical louver223Long vertical louver224Switch box125Side panel226Side honeycomb pad227Side water distributor cover228Side water distributor229Side honeycomb pad holder430Swing motor131Swing motor wheel132Vertical louver drive133Base of fan motor frame234Fan motor frame435Fan blade assembly136Fan motor137Top cover138Water fill door139Four directions pipe140Back water distributor tube141Left/Right water distributor tube242Water fill door link243Back water distributor144Back water distributor cover145Left stand pillar146Back honeycomb pad holder247Back honeycomb pad148Back panel149Right stand pillar150Motor capacitor151Suction pipe152Water fill pipe153Float cap154Float holder155Float tube156Water level board157Vertical louver link158Water tank159Water pump160Water pump clip161Continuous water supply connection162Castor263Castor with brake264Water drainage plug165Silica gel ring1CONFIDENTIALWebsite: http://www.honeywellaircoolers.comDownloaded from www.Manualslib.com manuals search engineDocuments / ResourcesHoneywell CO60PM Evaporative Air Cooler [pdf] Instruction ManualCO60PM, Evaporative Air Cooler, CO60PM Evaporative Air Cooler, Air Cooler, CoolerReferencesUser ManualRelated PostsEvaporative Air Cooler With Humidifier SF-615H User ManualEvaporative Air Cooler With Humidifier SF-615H User Manual - Optimized PDF Evaporative Air Cooler With Humidifier SF-615H User…Honeywell TC10PM Series Portable Evaporative Air Cooler User ManualHoneywell TC10PM Series Portable Evaporative Air Cooler Portable Evaporative Air Cooler User Manual Read and save these instructions…kogan KAPMNCL4BA Mini Evaporative Air Cooler User Guidekogan KAPMNCL4BA Mini Evaporative Air Cooler SAFETY & WARNINGS Ensure to read this user guide prior to first…COOLER MASTER Hyper T200 CPU Air Cooler User ManualCOOLER MASTER Hyper T200 CPU Air Cooler IN THE BOX INTEL & AMD AMD AM4/AM3+/AM3/AM2+/AM2/FM2+/FM2/FM1 Intel - LGA1151/1150/1155/1156/1366/775…
What is a PCAkey
NK 1250 stemplet. kr 1.00. 1995: Juleposten. NK 1250 stemplet antall. Kjøp. Kategori: 1995/1996. Beskrivelse. Beskrivelse. 1995: Juleposten ...
2.2 How To Change SwitchRemove the back panel and follow the procedure 2.1.1Remove the right-side panel and follow procedure 2.1.32.2.1. Switch BoxUse a screw driver to remove 4 galvanized screws with plate head(ST3*12) on the switch box.Remove switch box.2.2.2. Switch(cool/speed/swing)Use screw driver to remove 2 galvanized screws (ST3X10) on each switch of the control panel(cool/speed/swing).Cool switchSpeed switchSwing switch2.2.3. Wiring Color ConnectionWiring color connection refers to part 4.2 Wiring Color Description.2.3 How To Change Water PumpRemove the back panel and follow the procedure 2.1.1Remove the right-side panel and follow procedure 2.1.3Remove the switch box and follow the procedure 2.2.12.3.1 Water pump pipe and water pump clip.Remove the water pump pipe.Use a screw driver to remove 2 SS screws(ST4*12) on the water pump clip.2.3.2 Cool Switch And Wiring ConnectorUse a screwdriver to remove 2 galvanized screws (ST3X10) on the cool switch of the control panel.Remove the brown wire on the cool switch.Remove the wiring cap (below picture shown) to get the water pump.Note: connection is between the water pump and the N wire of the power cord.2.3.3 Water Pump Wiring ConnectionThe water pump wiring connection refers to part 4.2 Wiring Color Description.2.4 How To Change Fan MotorRemove the back panel and follow the procedure 2.1.1Remove the right-side panel and follow procedure 2.1.3Remove the switch box and follow the procedure 2.2.12.4.1 Speed Switch And Wiring Connector.Use a screwdriver to remove 2 galvanized screws (ST3X10) on the speed switch of the control panel.Remove the white/yellow/blue wire on the speed switch.Remove the wiring cap (below picture shown).Note: connection is between fan motor COM wire(black) and N wire of power cord.Remove the wiring cap (below picture shown).Note: connection is between motor and power cord earth wire.Remove the wiring cap (below picture shown).Note: connection is between the capacitor and the motor.Remove the wiring cap (below picture shown).Note: connection is between capacitor and the motor.2.4.2 Fan Blade And Fan MotorUse a screwdriver to remove 1galvanized screws (M6X14) on the fan blade.Remove the fan blade.Use a screw driver to remove 8 galvanized screws (M5X12) on fan motor to get the fanmotor.2.4.3 Main Motor Wiring ConnectionMain motor wiring connection refers to part 4.2 Wiring Color Description.2.5 How To Change Swing MotorRemove the back panel and follow the procedure 2.1.1Remove the right-side panel and follow procedure 2.1.3Remove the switch box and follow the procedure 2.2.12.5.1 Swing Switch And Wiring Connector.Use a screwdriver to remove 2 galvanized screws (ST3X10) on the swing switch of the control panel.Remove the pink wire on the swing switch.Remove the wiring cap (below picture shown).Note: connection is between swing motor and N wire of power cord.2.5.2 Swing Motor And Swing Motor Wheel.Use a screwdriver to remove 2 galvanized screws(ST4X12) on the swing motor.Remove the swing motor.Use screwdriver to remove 1 galvanized screw(ST3*8) on the swing motor wheel.Remove the swing motor wheel.Get the swing motor.2.5.3 Swing Motor Wiring ConnectionSwing motor wiring connection refers to part 4.2 Wiring Color Description.TROUBLESHOOTING GUIDE3.1 Outside DimensionsWidth: 700 mm (27.56’’)Depth: 466 mm (18.35’’)Height: 1017 mm (40.0’’)3.2 Cooling SystemHoneywell Evaporative Air Coolers are built to maximize energy efficiency and keep costs low. Warm air is drawn into the cooler through a dust and odor-reducing carbon filter and enters the Honeycomb Cooling Media. Water pumped from the tank pours over the honeycomb media. As the warm air passes through the media, the water absorbs the heat, naturally cooling and humidifying the air. A fan propels the cooled air out into the room. This no-compressor system cools naturally, efficiently and inexpensively.Troubleshooting GuideThe following troubleshooting guide is intended to address the most common symptoms and is by no means exhaustive. If symptoms persist, call a qualified service provider. Only a certified electrician should complete any electrical work. Unplug and disconnect the appliance from the power source before attempting to troubleshoot any of the following symptoms.ProblemPossible CauseSolutionNo discharge of airThe cord is not plugged in.Make sure the power cord is plugged in and the supply switch is on.The power is not on.Turn the unit ON.Humidity output minimal to noneWater is below the minimum water level in the tank.Turn off the unit.Follow the instructions to fill the water tank with clean water.The water pump is damaged.Replace the water pump according to procedure 2.3.Watercolor yellowish at initial useColor fasts from honeycomb filter.This is natural. After several uses, the watercolor will be clean.Abnormal noise inside the productThe noise of the water pump when water is not up-to-min water level. the product again.Turn off the product. Add water, and then turn onMotor or blade problem.Turn off and unplug the product or change the main motor according to procedure 2.4.Musty or unpleasant odorWhen the Cooler is new.When the unit is used for the first time, the Honeycomb Cooling Media will have an odor, which will dissipate within a few hours of initial use.Stale or stagnant water in the water tank.Drain, flush and clean the water tankMedia mildewed or clogged.Replace media according to the procedure 2.1.Not coolingPump is not turned on.Check the water level and turn on the pump.Low or no water.Damaged water pump.Replace the water pump according to procedure 2.3.SCHEMATIC DIAGRAM4.1 Wiring Diagram4.2 Wiring Color DescriptionPower Cord:(1) Brown(2) Blue(3) Green + YellowLiveNeutralEarth (Ground)to speed switch(4)motor COM(black)to motor earthMain Motor:(1) White(2) Yellow(3) Blue(4) Black(5) Red(6) Brown(7) Green + YellowHigh speedMedium speedLow speedNeutralEarth (Ground)to speed switch(1)to speed switch(2)to speed switch(3)to N wire of power cordto the capacitor by end-closed connectorto the capacitor by end-closed connectorto power cord earthWater Pump:(1) Brown(2) Blueto pump control switch(1)to N wire of power cordSwing Motor:(1) Pink(2) Pinkto swing control switch(1)to N wire of power cordEXPLODED VIEWREPLACEMENT PARTS LISTSrPART NAMEQUANTITY1Up/Down swing knob22Swing knob pressboard13Horizontal louver 124Horizontal louver 225Horizontal louver 326Horizontal louver 427Horizontal louver 528Horizontal louver middle link19Horizontal louver press board A210Horizontal louver link A211Horizontal louver press board B212Horizontal louver link B213Swing/Cool knob214Speed knob115Control plane116Swing/Cool switch217Speed switch118Air outlet panel119Front panel120Rubber washer2021Vertical louver base422Short vertical louver223Long vertical louver224Switch box125Side panel226Side honeycomb pad227Side water distributor cover228Side water distributor229Side honeycomb pad holder430Swing motor131Swing motor wheel132Vertical louver drive133Base of fan motor frame234Fan motor frame435Fan blade assembly136Fan motor137Top cover138Water fill door139Four directions pipe140Back water distributor tube141Left/Right water distributor tube242Water fill door link243Back water distributor144Back water distributor cover145Left stand pillar146Back honeycomb pad holder247Back honeycomb pad148Back panel149Right stand pillar150Motor capacitor151Suction pipe152Water fill pipe153Float cap154Float holder155Float tube156Water level board157Vertical louver link158Water tank159Water pump160Water pump clip161Continuous water supply connection162Castor263Castor with brake264Water drainage plug165Silica gel ring1CONFIDENTIALWebsite: http://www.honeywellaircoolers.comDownloaded from www.Manualslib.com manuals search engineDocuments / ResourcesHoneywell CO60PM Evaporative Air Cooler [pdf] Instruction ManualCO60PM, Evaporative Air Cooler, CO60PM Evaporative Air Cooler, Air Cooler, CoolerReferencesUser ManualRelated PostsEvaporative Air Cooler With Humidifier SF-615H User ManualEvaporative Air Cooler With Humidifier SF-615H User Manual - Optimized PDF Evaporative Air Cooler With Humidifier SF-615H User…Honeywell TC10PM Series Portable Evaporative Air Cooler User ManualHoneywell TC10PM Series Portable Evaporative Air Cooler Portable Evaporative Air Cooler User Manual Read and save these instructions…kogan KAPMNCL4BA Mini Evaporative Air Cooler User Guidekogan KAPMNCL4BA Mini Evaporative Air Cooler SAFETY & WARNINGS Ensure to read this user guide prior to first…COOLER MASTER Hyper T200 CPU Air Cooler User ManualCOOLER MASTER Hyper T200 CPU Air Cooler IN THE BOX INTEL & AMD AMD AM4/AM3+/AM3/AM2+/AM2/FM2+/FM2/FM1 Intel - LGA1151/1150/1155/1156/1366/775…
CADDpump
Control KnobsSpeed / On – OffConnect to the power supply and turn the Speed knob. The fan will start. Change the speed from 1 for Low to 2 for Medium to 3 for High. To switch OFF the unit turn the Speed knob to “0”.CoolTo begin cooling the desired area turn the “COOL” switch ON. The water pump will operate. You can feel the cooler air after the Honeycomb media is completely wet.SwingVertical LouversTurn the “SWING” switch ON. The louvers will begin to move from right to left automatically. Manually adjust the horizontal louvers to change vertical airflow.Horizontal LouversManually adjust the horizontal louvers to change vertical airflow.CLEANING & MAINTENANCEImportant – Please Read!The cooler is supplied with Honeycomb Cooling Media.The cleaning frequency for the Honeycomb media depends on local air and water conditions. In areas where the mineral content of water is high, mineral deposits may build up on the Honeycomb Cooling Media and restrict airflow. Draining the water reservoir and refilling it with fresh water at least once a week will help reduce mineral deposits. If mineral deposits remain on the Honeycomb media, the media should be removed and washed under fresh water. The media should be cleaned every two months or sooner, depending on your needs.Do not run the unit in COOL mode with stale water in the tank. Empty the tank and refill it with fresh water if the water has been standing in the tank for an extended period of time.For best results, allow the Honeycomb Cooling Media to dry after each use by turning off the cool function 15 minutes before turning the unit off.WARNINGBefore cleaning, turn the unit off and disconnect from the power source.Use a damp cloth to remove dirt and dust from the outside of the unit.Never use abrasive cleaners.When the unit is not in use, store it in a dry place, out of direct sunlight.Maximum water inlet pressure 0.5 MPa.Draining and Cleaning The Water TankTurn the power “off’ and disconnect the air cooler from the power supply.Move the unit to a location where it can be drained.Remove the drain plug and allow the tank to empty.Refill the water tank up to the maximum level with clean water and drain it completely.Fill the water tank and rinse at least 2-3 times before use.After cleaning ensure that the drain plug is back in place.Plug into the power supply and turn on the unit.Cleaning The Honeycomb Cooling MediaTurn off the unit, and unplug the power cord from the wall outlet.Rotate the unit facing the back panel, and locate the Grill Removal Screws. Remove the 4 screws with a screwdriver.Pull the rear grill panel, until it is completely removed.This cooler has Honeycomb cooling media on the right and left panels. The cleaning and removal procedure is the same as the rear panel.The Honeycomb cooling media can now be seen. Clean honeycomb with a clean cloth to remove all the dust & dirt particles.Once cleaning is finished, reassemble the unit.Plug into the power supply and turn on the unit.The air cooler is now ready to be used. This cleaning process should be repeated monthly to maintain the integrity of the unit and to remove particles filtered from the air.DISASSEMBLY INSTRUCTIONSWARNING – Before the following disassembly, POWER is set to OFF and disconnected the power cord.2.1 How To Change Honeycomb Cooling Media(3 sides)2.1.1 Back Panel.Use a screwdriver to remove 5 galvanized screws with plate head (ST4*12) on the back panel.Remove the back panel.2.1.2 Back Honeycomb Cooling Media.Use screwdriver to remove 4 galvanized screws with plate head(ST4*12) on the honeycomb holder.Remove the honeycomb holder.Remove the honeycomb cooling media from the back panel.2.1.3 Right Side Panel.Use a screwdriver to remove 4 galvanized screws with plate head (ST4*12) on the right-side panel.Remove the right side panel.2.1.4 Right Side Honeycomb Cooling Media.Use screwdriver to remove 4 galvanized screws with plate head(ST4*12) on the honeycomb holder.Remove the honeycomb holder.Remove the honeycomb cooling media from the right side panel.2.1.5 Left Side Panel.Use screwdriver to remove 4 galvanized screws with plate head (ST4*12) on the left side panel.Remove the left side panel.2.1.6 Left Side Honeycomb Cooling Media.Use a screwdriver to remove 4 galvanized screws with plate head(ST4*12) on the honeycomb holder.Remove the honeycomb holder.Remove the honeycomb cooling media from the left side panel.2.2 How To Change SwitchRemove the back panel and follow the procedure 2.1.1Remove the right-side panel and follow procedure 2.1.32.2.1. Switch BoxUse a screw driver to remove 4 galvanized screws with plate head(ST3*12) on the switch box.Remove switch box.2.2.2. Switch(cool/speed/swing)Use screw driver to remove 2 galvanized screws (ST3X10) on each switch of the control panel(cool/speed/swing).Cool switchSpeed switchSwing switch2.2.3. Wiring Color ConnectionWiring color connection refers to part 4.2 Wiring Color Description.2.3 How To Change Water PumpRemove the back panel and follow the procedure 2.1.1Remove the right-side panel and follow procedure 2.1.3Remove the switch box and follow the procedure 2.2.12.3.1 Water pump pipe and water pump clip.Remove the water pump pipe.Use a screw driver to remove 2 SS screws(ST4*12) on the water pump clip.2.3.2 Cool Switch And Wiring ConnectorUse a screwdriver to remove 2 galvanized screws (ST3X10) on the cool switch of the control panel.Remove the brown wire on the cool switch.Remove the wiring cap (below picture shown) to get the water pump.Note: connection is between the water pump and the N wire of the power cord.2.3.3 Water Pump Wiring ConnectionThe water pump wiring connection refers to part 4.2 Wiring Color Description.2.4 How To Change Fan MotorRemove the back panel and follow the procedure 2.1.1Remove the right-side panel and follow procedure 2.1.3Remove the switch box and follow the procedure 2.2.12.4.1 Speed Switch And Wiring Connector.Use a screwdriver to remove 2 galvanized screws (ST3X10) on the speed switch of the control panel.Remove the white/yellow/blue wire on the speed switch.Remove the wiring cap (below picture shown).Note: connection is between fan motor COM wire(black) and N wire of power cord.Remove the wiring cap (below picture shown).Note: connection is between motor and power cord earth wire.Remove the wiring cap (below picture shown).Note: connection is between the capacitor and the motor.Remove the wiring cap (below picture shown).Note: connection is between capacitor and the motor.2.4.2 Fan Blade And Fan MotorUse a screwdriver to remove 1galvanized screws (M6X14) on the fan blade.Remove the fan blade.Use a screw driver to remove 8 galvanized screws (M5X12) on fan motor to get the fanmotor.2.4.3 Main Motor Wiring ConnectionMain motor wiring connection refers to part 4.2 Wiring Color Description.2.5 How To Change Swing MotorRemove the back panel and follow the procedure 2.1.1Remove the right-side panel and follow procedure 2.1.3Remove the switch box and follow the procedure 2.2.12.5.1 Swing Switch And Wiring Connector.Use a screwdriver to remove 2 galvanized screws (ST3X10) on the swing switch of the control panel.Remove the pink wire on the swing switch.Remove the wiring cap (below picture shown).Note: connection is between swing motor and N wire of power cord.2.5.2 Swing Motor And Swing Motor Wheel.Use a screwdriver to remove 2 galvanized screws(ST4X12) on the swing motor.Remove the swing motor.Use screwdriver to remove 1 galvanized screw(ST3*8) on the swing motor wheel.Remove the swing motor wheel.Get the swing motor.2.5.3 Swing Motor Wiring ConnectionSwing motor wiring connection refers to part 4.2 Wiring Color Description.TROUBLESHOOTING GUIDE3.1 Outside DimensionsWidth: 700 mm (27.56’’)Depth: 466 mm (18.35’’)Height: 1017 mm (40.0’’)3.2 Cooling SystemHoneywell Evaporative Air Coolers are built to maximize energy efficiency and keep costs low. Warm air is drawn into the cooler through a dust and odor-reducing carbon filter and enters the Honeycomb Cooling Media. Water pumped from the tank pours over the honeycomb media. As the warm air passes through the media, the water absorbs the heat, naturally cooling and humidifying the air. A fan propels the cooled air out into the room. This no-compressor system cools naturally, efficiently and inexpensively.Troubleshooting GuideThe following troubleshooting guide is intended to address the most common symptoms and is by no means exhaustive. If symptoms persist, call a qualified service provider. Only a certified electrician should complete any electrical work. Unplug and disconnect the appliance from the power source before attempting to troubleshoot any of the following symptoms.ProblemPossible CauseSolutionNo discharge of airThe cord is not plugged in.Make sure the power cord is plugged in and the supply switch is on.The power is not on.Turn the unit ON.Humidity output minimal to noneWater is below the minimum water level in the tank.Turn off the unit.Follow the instructions to fill the water tank with clean water.The water pump is damaged.Replace the water pump according to procedure 2.3.Watercolor yellowish at initial useColor fasts from honeycomb filter.This is natural. After several uses, the watercolor will be clean.Abnormal noise inside the productThe noise of the water pump when water is not up-to-min water level. the product again.Turn off the product. Add water, and then turn onMotor or blade problem.Turn off and unplug the product or change the main motor according to procedure 2.4.Musty or unpleasant odorWhen the Cooler is new.When the unit is used for the first time, the Honeycomb Cooling Media will have an odor, which will dissipate within a few hours of initial use.Stale or stagnant water in the water tank.Drain, flush and clean the water tankMedia mildewed or clogged.Replace media according to the procedure 2.1.Not coolingPump is not turned on.Check the water level and turn on the pump.Low or no water.Damaged water pump.Replace the water pump according to procedure 2.3.SCHEMATIC DIAGRAM4.1 Wiring Diagram4.2 Wiring Color DescriptionPower Cord:(1) Brown(2) Blue(3) Green + YellowLiveNeutralEarth (Ground)to speed switch(4)motor COM(black)to motor earthMain Motor:(1) White(2) Yellow(3) Blue(4) Black(5) Red(6) Brown(7) Green + YellowHigh speedMedium speedLow speedNeutralEarth (Ground)to speed switch(1)to speed switch(2)to speed switch(3)to N wire of power cordto the capacitor by end-closed connectorto the capacitor by end-closed connectorto power cord earthWater Pump:(1) Brown(2) Blueto pump control switch(1)to N wire of power cordSwing Motor:(1) Pink(2) Pinkto swing control switch(1)to N wire of power cordEXPLODED VIEWREPLACEMENT PARTS LISTSrPART NAMEQUANTITY1Up/Down swing knob22Swing knob pressboard13Horizontal louver 124Horizontal louver 225Horizontal louver 326Horizontal louver 427Horizontal louver 528Horizontal louver middle link19Horizontal louver press board A210Horizontal louver link A211Horizontal louver press board B212Horizontal louver link B213Swing/Cool knob214Speed knob115Control plane116Swing/Cool switch217Speed switch118Air outlet panel119Front panel120Rubber washer2021Vertical louver base422Short vertical louver223Long vertical louver224Switch box125Side panel226Side honeycomb pad227Side water distributor cover228Side water distributor229Side honeycomb pad holder430Swing motor131Swing motor wheel132Vertical louver drive133Base of fan motor frame234Fan motor frame435Fan blade assembly136Fan motor137Top cover138Water fill door139Four directions pipe140Back water distributor tube141Left/Right water distributor tube242Water fill door link243Back water distributor144Back water distributor cover145Left stand pillar146Back honeycomb pad holder247Back honeycomb pad148Back panel149Right stand pillar150Motor capacitor151Suction pipe152Water fill pipe153Float cap154Float holder155Float tube156Water level board157Vertical louver link158Water tank159Water pump160Water pump clip161Continuous water supply connection162Castor263Castor with brake264Water drainage plug165Silica gel ring1CONFIDENTIALWebsite: http://www.honeywellaircoolers.comDownloaded from www.Manualslib.com manuals search engineDocuments / ResourcesHoneywell CO60PM Evaporative Air Cooler [pdf] Instruction ManualCO60PM, Evaporative Air Cooler, CO60PM Evaporative Air Cooler, Air Cooler, CoolerReferencesUser ManualRelated PostsEvaporative Air Cooler With Humidifier SF-615H User ManualEvaporative Air Cooler With Humidifier SF-615H User Manual - Optimized PDF Evaporative Air Cooler With Humidifier SF-615H User…Honeywell TC10PM Series Portable Evaporative Air Cooler User ManualHoneywell TC10PM Series Portable Evaporative Air Cooler Portable Evaporative Air Cooler User Manual Read and save these instructions…kogan KAPMNCL4BA Mini Evaporative Air Cooler User Guidekogan KAPMNCL4BA Mini Evaporative Air Cooler SAFETY & WARNINGS Ensure to read this user guide prior to first…COOLER MASTER Hyper T200 CPU Air Cooler User ManualCOOLER MASTER Hyper T200 CPU Air Cooler IN THE BOX INTEL & AMD AMD AM4/AM3+/AM3/AM2+/AM2/FM2+/FM2/FM1 Intel - LGA1151/1150/1155/1156/1366/775…
Most noticeably, the rack is 24U high, providing a compact enclosure for smaller data rooms. ... Wide racks have extra distance between the mounting posts and the ...
3.1 Outside DimensionsWidth: 700 mm (27.56’’)Depth: 466 mm (18.35’’)Height: 1017 mm (40.0’’)3.2 Cooling SystemHoneywell Evaporative Air Coolers are built to maximize energy efficiency and keep costs low. Warm air is drawn into the cooler through a dust and odor-reducing carbon filter and enters the Honeycomb Cooling Media. Water pumped from the tank pours over the honeycomb media. As the warm air passes through the media, the water absorbs the heat, naturally cooling and humidifying the air. A fan propels the cooled air out into the room. This no-compressor system cools naturally, efficiently and inexpensively.Troubleshooting GuideThe following troubleshooting guide is intended to address the most common symptoms and is by no means exhaustive. If symptoms persist, call a qualified service provider. Only a certified electrician should complete any electrical work. Unplug and disconnect the appliance from the power source before attempting to troubleshoot any of the following symptoms.ProblemPossible CauseSolutionNo discharge of airThe cord is not plugged in.Make sure the power cord is plugged in and the supply switch is on.The power is not on.Turn the unit ON.Humidity output minimal to noneWater is below the minimum water level in the tank.Turn off the unit.Follow the instructions to fill the water tank with clean water.The water pump is damaged.Replace the water pump according to procedure 2.3.Watercolor yellowish at initial useColor fasts from honeycomb filter.This is natural. After several uses, the watercolor will be clean.Abnormal noise inside the productThe noise of the water pump when water is not up-to-min water level. the product again.Turn off the product. Add water, and then turn onMotor or blade problem.Turn off and unplug the product or change the main motor according to procedure 2.4.Musty or unpleasant odorWhen the Cooler is new.When the unit is used for the first time, the Honeycomb Cooling Media will have an odor, which will dissipate within a few hours of initial use.Stale or stagnant water in the water tank.Drain, flush and clean the water tankMedia mildewed or clogged.Replace media according to the procedure 2.1.Not coolingPump is not turned on.Check the water level and turn on the pump.Low or no water.Damaged water pump.Replace the water pump according to procedure 2.3.SCHEMATIC DIAGRAM4.1 Wiring Diagram4.2 Wiring Color DescriptionPower Cord:(1) Brown(2) Blue(3) Green + YellowLiveNeutralEarth (Ground)to speed switch(4)motor COM(black)to motor earthMain Motor:(1) White(2) Yellow(3) Blue(4) Black(5) Red(6) Brown(7) Green + YellowHigh speedMedium speedLow speedNeutralEarth (Ground)to speed switch(1)to speed switch(2)to speed switch(3)to N wire of power cordto the capacitor by end-closed connectorto the capacitor by end-closed connectorto power cord earthWater Pump:(1) Brown(2) Blueto pump control switch(1)to N wire of power cordSwing Motor:(1) Pink(2) Pinkto swing control switch(1)to N wire of power cordEXPLODED VIEWREPLACEMENT PARTS LISTSrPART NAMEQUANTITY1Up/Down swing knob22Swing knob pressboard13Horizontal louver 124Horizontal louver 225Horizontal louver 326Horizontal louver 427Horizontal louver 528Horizontal louver middle link19Horizontal louver press board A210Horizontal louver link A211Horizontal louver press board B212Horizontal louver link B213Swing/Cool knob214Speed knob115Control plane116Swing/Cool switch217Speed switch118Air outlet panel119Front panel120Rubber washer2021Vertical louver base422Short vertical louver223Long vertical louver224Switch box125Side panel226Side honeycomb pad227Side water distributor cover228Side water distributor229Side honeycomb pad holder430Swing motor131Swing motor wheel132Vertical louver drive133Base of fan motor frame234Fan motor frame435Fan blade assembly136Fan motor137Top cover138Water fill door139Four directions pipe140Back water distributor tube141Left/Right water distributor tube242Water fill door link243Back water distributor144Back water distributor cover145Left stand pillar146Back honeycomb pad holder247Back honeycomb pad148Back panel149Right stand pillar150Motor capacitor151Suction pipe152Water fill pipe153Float cap154Float holder155Float tube156Water level board157Vertical louver link158Water tank159Water pump160Water pump clip161Continuous water supply connection162Castor263Castor with brake264Water drainage plug165Silica gel ring1CONFIDENTIALWebsite: http://www.honeywellaircoolers.comDownloaded from www.Manualslib.com manuals search engineDocuments / ResourcesHoneywell CO60PM Evaporative Air Cooler [pdf] Instruction ManualCO60PM, Evaporative Air Cooler, CO60PM Evaporative Air Cooler, Air Cooler, CoolerReferencesUser ManualRelated PostsEvaporative Air Cooler With Humidifier SF-615H User ManualEvaporative Air Cooler With Humidifier SF-615H User Manual - Optimized PDF Evaporative Air Cooler With Humidifier SF-615H User…Honeywell TC10PM Series Portable Evaporative Air Cooler User ManualHoneywell TC10PM Series Portable Evaporative Air Cooler Portable Evaporative Air Cooler User Manual Read and save these instructions…kogan KAPMNCL4BA Mini Evaporative Air Cooler User Guidekogan KAPMNCL4BA Mini Evaporative Air Cooler SAFETY & WARNINGS Ensure to read this user guide prior to first…COOLER MASTER Hyper T200 CPU Air Cooler User ManualCOOLER MASTER Hyper T200 CPU Air Cooler IN THE BOX INTEL & AMD AMD AM4/AM3+/AM3/AM2+/AM2/FM2+/FM2/FM1 Intel - LGA1151/1150/1155/1156/1366/775…
A registry key is also required to tell n4ce which Software License to use. n4ce is controlled via the Sentinel HASP LDK protection system which is used by many other software packages as well. So we need to identify the particular software key n4ce needs to use. Open the registry editor and go to the following file path "Computer\HKEY_CURRENT_USER\Software\Applications in Cadd\n4ce". From here we need to create the "Haspid" Key so n4ce knows which license to use. Right-click and select New --> String Value.
COOLER MASTER Hyper T200 CPU Air Cooler IN THE BOX INTEL & AMD AMD AM4/AM3+/AM3/AM2+/AM2/FM2+/FM2/FM1 Intel - LGA1151/1150/1155/1156/1366/775…
Looking for a cruise holiday? Book luxury vacation cruises ship to stunning destinations with comfort stays, entertainment, dining and fun activities at ...
Cooler Location:Place the cooler in front of an open door or window. Ensure that there is adequate cross–ventilation in the room by leaving a door or window open opposite the cooler. Following these guidelines will ensure your cooler will work as effectively as possible.
... FITNESS CENTER OFFERS 21 PRECISES EXERCISES TO ACHIEVE THE SAME RESULTS GIVEN BY CLUB EQUIPMENT THE EXERCISES ARE SUPINE CHEST PRESS, INCLINE CHEST PRESS ...
Buy DCI International 733 SMOOTH ASEPSIS VACUUM TUBING - 1/2 IN, GRAY at PartsSource. Largest Online marketplace for Medical Equipment Replacement Parts ...
Swing Motor:(1) Pink(2) Pinkto swing control switch(1)to N wire of power cordEXPLODED VIEWREPLACEMENT PARTS LISTSrPART NAMEQUANTITY1Up/Down swing knob22Swing knob pressboard13Horizontal louver 124Horizontal louver 225Horizontal louver 326Horizontal louver 427Horizontal louver 528Horizontal louver middle link19Horizontal louver press board A210Horizontal louver link A211Horizontal louver press board B212Horizontal louver link B213Swing/Cool knob214Speed knob115Control plane116Swing/Cool switch217Speed switch118Air outlet panel119Front panel120Rubber washer2021Vertical louver base422Short vertical louver223Long vertical louver224Switch box125Side panel226Side honeycomb pad227Side water distributor cover228Side water distributor229Side honeycomb pad holder430Swing motor131Swing motor wheel132Vertical louver drive133Base of fan motor frame234Fan motor frame435Fan blade assembly136Fan motor137Top cover138Water fill door139Four directions pipe140Back water distributor tube141Left/Right water distributor tube242Water fill door link243Back water distributor144Back water distributor cover145Left stand pillar146Back honeycomb pad holder247Back honeycomb pad148Back panel149Right stand pillar150Motor capacitor151Suction pipe152Water fill pipe153Float cap154Float holder155Float tube156Water level board157Vertical louver link158Water tank159Water pump160Water pump clip161Continuous water supply connection162Castor263Castor with brake264Water drainage plug165Silica gel ring1CONFIDENTIALWebsite: http://www.honeywellaircoolers.comDownloaded from www.Manualslib.com manuals search engineDocuments / ResourcesHoneywell CO60PM Evaporative Air Cooler [pdf] Instruction ManualCO60PM, Evaporative Air Cooler, CO60PM Evaporative Air Cooler, Air Cooler, CoolerReferencesUser ManualRelated PostsEvaporative Air Cooler With Humidifier SF-615H User ManualEvaporative Air Cooler With Humidifier SF-615H User Manual - Optimized PDF Evaporative Air Cooler With Humidifier SF-615H User…Honeywell TC10PM Series Portable Evaporative Air Cooler User ManualHoneywell TC10PM Series Portable Evaporative Air Cooler Portable Evaporative Air Cooler User Manual Read and save these instructions…kogan KAPMNCL4BA Mini Evaporative Air Cooler User Guidekogan KAPMNCL4BA Mini Evaporative Air Cooler SAFETY & WARNINGS Ensure to read this user guide prior to first…COOLER MASTER Hyper T200 CPU Air Cooler User ManualCOOLER MASTER Hyper T200 CPU Air Cooler IN THE BOX INTEL & AMD AMD AM4/AM3+/AM3/AM2+/AM2/FM2+/FM2/FM1 Intel - LGA1151/1150/1155/1156/1366/775…
CADDsolis pumpkeyAmazon
SwingVertical LouversTurn the “SWING” switch ON. The louvers will begin to move from right to left automatically. Manually adjust the horizontal louvers to change vertical airflow.Horizontal LouversManually adjust the horizontal louvers to change vertical airflow.CLEANING & MAINTENANCEImportant – Please Read!The cooler is supplied with Honeycomb Cooling Media.The cleaning frequency for the Honeycomb media depends on local air and water conditions. In areas where the mineral content of water is high, mineral deposits may build up on the Honeycomb Cooling Media and restrict airflow. Draining the water reservoir and refilling it with fresh water at least once a week will help reduce mineral deposits. If mineral deposits remain on the Honeycomb media, the media should be removed and washed under fresh water. The media should be cleaned every two months or sooner, depending on your needs.Do not run the unit in COOL mode with stale water in the tank. Empty the tank and refill it with fresh water if the water has been standing in the tank for an extended period of time.For best results, allow the Honeycomb Cooling Media to dry after each use by turning off the cool function 15 minutes before turning the unit off.WARNINGBefore cleaning, turn the unit off and disconnect from the power source.Use a damp cloth to remove dirt and dust from the outside of the unit.Never use abrasive cleaners.When the unit is not in use, store it in a dry place, out of direct sunlight.Maximum water inlet pressure 0.5 MPa.Draining and Cleaning The Water TankTurn the power “off’ and disconnect the air cooler from the power supply.Move the unit to a location where it can be drained.Remove the drain plug and allow the tank to empty.Refill the water tank up to the maximum level with clean water and drain it completely.Fill the water tank and rinse at least 2-3 times before use.After cleaning ensure that the drain plug is back in place.Plug into the power supply and turn on the unit.Cleaning The Honeycomb Cooling MediaTurn off the unit, and unplug the power cord from the wall outlet.Rotate the unit facing the back panel, and locate the Grill Removal Screws. Remove the 4 screws with a screwdriver.Pull the rear grill panel, until it is completely removed.This cooler has Honeycomb cooling media on the right and left panels. The cleaning and removal procedure is the same as the rear panel.The Honeycomb cooling media can now be seen. Clean honeycomb with a clean cloth to remove all the dust & dirt particles.Once cleaning is finished, reassemble the unit.Plug into the power supply and turn on the unit.The air cooler is now ready to be used. This cleaning process should be repeated monthly to maintain the integrity of the unit and to remove particles filtered from the air.DISASSEMBLY INSTRUCTIONSWARNING – Before the following disassembly, POWER is set to OFF and disconnected the power cord.2.1 How To Change Honeycomb Cooling Media(3 sides)2.1.1 Back Panel.Use a screwdriver to remove 5 galvanized screws with plate head (ST4*12) on the back panel.Remove the back panel.2.1.2 Back Honeycomb Cooling Media.Use screwdriver to remove 4 galvanized screws with plate head(ST4*12) on the honeycomb holder.Remove the honeycomb holder.Remove the honeycomb cooling media from the back panel.2.1.3 Right Side Panel.Use a screwdriver to remove 4 galvanized screws with plate head (ST4*12) on the right-side panel.Remove the right side panel.2.1.4 Right Side Honeycomb Cooling Media.Use screwdriver to remove 4 galvanized screws with plate head(ST4*12) on the honeycomb holder.Remove the honeycomb holder.Remove the honeycomb cooling media from the right side panel.2.1.5 Left Side Panel.Use screwdriver to remove 4 galvanized screws with plate head (ST4*12) on the left side panel.Remove the left side panel.2.1.6 Left Side Honeycomb Cooling Media.Use a screwdriver to remove 4 galvanized screws with plate head(ST4*12) on the honeycomb holder.Remove the honeycomb holder.Remove the honeycomb cooling media from the left side panel.2.2 How To Change SwitchRemove the back panel and follow the procedure 2.1.1Remove the right-side panel and follow procedure 2.1.32.2.1. Switch BoxUse a screw driver to remove 4 galvanized screws with plate head(ST3*12) on the switch box.Remove switch box.2.2.2. Switch(cool/speed/swing)Use screw driver to remove 2 galvanized screws (ST3X10) on each switch of the control panel(cool/speed/swing).Cool switchSpeed switchSwing switch2.2.3. Wiring Color ConnectionWiring color connection refers to part 4.2 Wiring Color Description.2.3 How To Change Water PumpRemove the back panel and follow the procedure 2.1.1Remove the right-side panel and follow procedure 2.1.3Remove the switch box and follow the procedure 2.2.12.3.1 Water pump pipe and water pump clip.Remove the water pump pipe.Use a screw driver to remove 2 SS screws(ST4*12) on the water pump clip.2.3.2 Cool Switch And Wiring ConnectorUse a screwdriver to remove 2 galvanized screws (ST3X10) on the cool switch of the control panel.Remove the brown wire on the cool switch.Remove the wiring cap (below picture shown) to get the water pump.Note: connection is between the water pump and the N wire of the power cord.2.3.3 Water Pump Wiring ConnectionThe water pump wiring connection refers to part 4.2 Wiring Color Description.2.4 How To Change Fan MotorRemove the back panel and follow the procedure 2.1.1Remove the right-side panel and follow procedure 2.1.3Remove the switch box and follow the procedure 2.2.12.4.1 Speed Switch And Wiring Connector.Use a screwdriver to remove 2 galvanized screws (ST3X10) on the speed switch of the control panel.Remove the white/yellow/blue wire on the speed switch.Remove the wiring cap (below picture shown).Note: connection is between fan motor COM wire(black) and N wire of power cord.Remove the wiring cap (below picture shown).Note: connection is between motor and power cord earth wire.Remove the wiring cap (below picture shown).Note: connection is between the capacitor and the motor.Remove the wiring cap (below picture shown).Note: connection is between capacitor and the motor.2.4.2 Fan Blade And Fan MotorUse a screwdriver to remove 1galvanized screws (M6X14) on the fan blade.Remove the fan blade.Use a screw driver to remove 8 galvanized screws (M5X12) on fan motor to get the fanmotor.2.4.3 Main Motor Wiring ConnectionMain motor wiring connection refers to part 4.2 Wiring Color Description.2.5 How To Change Swing MotorRemove the back panel and follow the procedure 2.1.1Remove the right-side panel and follow procedure 2.1.3Remove the switch box and follow the procedure 2.2.12.5.1 Swing Switch And Wiring Connector.Use a screwdriver to remove 2 galvanized screws (ST3X10) on the swing switch of the control panel.Remove the pink wire on the swing switch.Remove the wiring cap (below picture shown).Note: connection is between swing motor and N wire of power cord.2.5.2 Swing Motor And Swing Motor Wheel.Use a screwdriver to remove 2 galvanized screws(ST4X12) on the swing motor.Remove the swing motor.Use screwdriver to remove 1 galvanized screw(ST3*8) on the swing motor wheel.Remove the swing motor wheel.Get the swing motor.2.5.3 Swing Motor Wiring ConnectionSwing motor wiring connection refers to part 4.2 Wiring Color Description.TROUBLESHOOTING GUIDE3.1 Outside DimensionsWidth: 700 mm (27.56’’)Depth: 466 mm (18.35’’)Height: 1017 mm (40.0’’)3.2 Cooling SystemHoneywell Evaporative Air Coolers are built to maximize energy efficiency and keep costs low. Warm air is drawn into the cooler through a dust and odor-reducing carbon filter and enters the Honeycomb Cooling Media. Water pumped from the tank pours over the honeycomb media. As the warm air passes through the media, the water absorbs the heat, naturally cooling and humidifying the air. A fan propels the cooled air out into the room. This no-compressor system cools naturally, efficiently and inexpensively.Troubleshooting GuideThe following troubleshooting guide is intended to address the most common symptoms and is by no means exhaustive. If symptoms persist, call a qualified service provider. Only a certified electrician should complete any electrical work. Unplug and disconnect the appliance from the power source before attempting to troubleshoot any of the following symptoms.ProblemPossible CauseSolutionNo discharge of airThe cord is not plugged in.Make sure the power cord is plugged in and the supply switch is on.The power is not on.Turn the unit ON.Humidity output minimal to noneWater is below the minimum water level in the tank.Turn off the unit.Follow the instructions to fill the water tank with clean water.The water pump is damaged.Replace the water pump according to procedure 2.3.Watercolor yellowish at initial useColor fasts from honeycomb filter.This is natural. After several uses, the watercolor will be clean.Abnormal noise inside the productThe noise of the water pump when water is not up-to-min water level. the product again.Turn off the product. Add water, and then turn onMotor or blade problem.Turn off and unplug the product or change the main motor according to procedure 2.4.Musty or unpleasant odorWhen the Cooler is new.When the unit is used for the first time, the Honeycomb Cooling Media will have an odor, which will dissipate within a few hours of initial use.Stale or stagnant water in the water tank.Drain, flush and clean the water tankMedia mildewed or clogged.Replace media according to the procedure 2.1.Not coolingPump is not turned on.Check the water level and turn on the pump.Low or no water.Damaged water pump.Replace the water pump according to procedure 2.3.SCHEMATIC DIAGRAM4.1 Wiring Diagram4.2 Wiring Color DescriptionPower Cord:(1) Brown(2) Blue(3) Green + YellowLiveNeutralEarth (Ground)to speed switch(4)motor COM(black)to motor earthMain Motor:(1) White(2) Yellow(3) Blue(4) Black(5) Red(6) Brown(7) Green + YellowHigh speedMedium speedLow speedNeutralEarth (Ground)to speed switch(1)to speed switch(2)to speed switch(3)to N wire of power cordto the capacitor by end-closed connectorto the capacitor by end-closed connectorto power cord earthWater Pump:(1) Brown(2) Blueto pump control switch(1)to N wire of power cordSwing Motor:(1) Pink(2) Pinkto swing control switch(1)to N wire of power cordEXPLODED VIEWREPLACEMENT PARTS LISTSrPART NAMEQUANTITY1Up/Down swing knob22Swing knob pressboard13Horizontal louver 124Horizontal louver 225Horizontal louver 326Horizontal louver 427Horizontal louver 528Horizontal louver middle link19Horizontal louver press board A210Horizontal louver link A211Horizontal louver press board B212Horizontal louver link B213Swing/Cool knob214Speed knob115Control plane116Swing/Cool switch217Speed switch118Air outlet panel119Front panel120Rubber washer2021Vertical louver base422Short vertical louver223Long vertical louver224Switch box125Side panel226Side honeycomb pad227Side water distributor cover228Side water distributor229Side honeycomb pad holder430Swing motor131Swing motor wheel132Vertical louver drive133Base of fan motor frame234Fan motor frame435Fan blade assembly136Fan motor137Top cover138Water fill door139Four directions pipe140Back water distributor tube141Left/Right water distributor tube242Water fill door link243Back water distributor144Back water distributor cover145Left stand pillar146Back honeycomb pad holder247Back honeycomb pad148Back panel149Right stand pillar150Motor capacitor151Suction pipe152Water fill pipe153Float cap154Float holder155Float tube156Water level board157Vertical louver link158Water tank159Water pump160Water pump clip161Continuous water supply connection162Castor263Castor with brake264Water drainage plug165Silica gel ring1CONFIDENTIALWebsite: http://www.honeywellaircoolers.comDownloaded from www.Manualslib.com manuals search engineDocuments / ResourcesHoneywell CO60PM Evaporative Air Cooler [pdf] Instruction ManualCO60PM, Evaporative Air Cooler, CO60PM Evaporative Air Cooler, Air Cooler, CoolerReferencesUser ManualRelated PostsEvaporative Air Cooler With Humidifier SF-615H User ManualEvaporative Air Cooler With Humidifier SF-615H User Manual - Optimized PDF Evaporative Air Cooler With Humidifier SF-615H User…Honeywell TC10PM Series Portable Evaporative Air Cooler User ManualHoneywell TC10PM Series Portable Evaporative Air Cooler Portable Evaporative Air Cooler User Manual Read and save these instructions…kogan KAPMNCL4BA Mini Evaporative Air Cooler User Guidekogan KAPMNCL4BA Mini Evaporative Air Cooler SAFETY & WARNINGS Ensure to read this user guide prior to first…COOLER MASTER Hyper T200 CPU Air Cooler User ManualCOOLER MASTER Hyper T200 CPU Air Cooler IN THE BOX INTEL & AMD AMD AM4/AM3+/AM3/AM2+/AM2/FM2+/FM2/FM1 Intel - LGA1151/1150/1155/1156/1366/775…
2.1.4 Right Side Honeycomb Cooling Media.Use screwdriver to remove 4 galvanized screws with plate head(ST4*12) on the honeycomb holder.Remove the honeycomb holder.Remove the honeycomb cooling media from the right side panel.2.1.5 Left Side Panel.Use screwdriver to remove 4 galvanized screws with plate head (ST4*12) on the left side panel.Remove the left side panel.2.1.6 Left Side Honeycomb Cooling Media.Use a screwdriver to remove 4 galvanized screws with plate head(ST4*12) on the honeycomb holder.Remove the honeycomb holder.Remove the honeycomb cooling media from the left side panel.2.2 How To Change SwitchRemove the back panel and follow the procedure 2.1.1Remove the right-side panel and follow procedure 2.1.32.2.1. Switch BoxUse a screw driver to remove 4 galvanized screws with plate head(ST3*12) on the switch box.Remove switch box.2.2.2. Switch(cool/speed/swing)Use screw driver to remove 2 galvanized screws (ST3X10) on each switch of the control panel(cool/speed/swing).Cool switchSpeed switchSwing switch2.2.3. Wiring Color ConnectionWiring color connection refers to part 4.2 Wiring Color Description.2.3 How To Change Water PumpRemove the back panel and follow the procedure 2.1.1Remove the right-side panel and follow procedure 2.1.3Remove the switch box and follow the procedure 2.2.12.3.1 Water pump pipe and water pump clip.Remove the water pump pipe.Use a screw driver to remove 2 SS screws(ST4*12) on the water pump clip.2.3.2 Cool Switch And Wiring ConnectorUse a screwdriver to remove 2 galvanized screws (ST3X10) on the cool switch of the control panel.Remove the brown wire on the cool switch.Remove the wiring cap (below picture shown) to get the water pump.Note: connection is between the water pump and the N wire of the power cord.2.3.3 Water Pump Wiring ConnectionThe water pump wiring connection refers to part 4.2 Wiring Color Description.2.4 How To Change Fan MotorRemove the back panel and follow the procedure 2.1.1Remove the right-side panel and follow procedure 2.1.3Remove the switch box and follow the procedure 2.2.12.4.1 Speed Switch And Wiring Connector.Use a screwdriver to remove 2 galvanized screws (ST3X10) on the speed switch of the control panel.Remove the white/yellow/blue wire on the speed switch.Remove the wiring cap (below picture shown).Note: connection is between fan motor COM wire(black) and N wire of power cord.Remove the wiring cap (below picture shown).Note: connection is between motor and power cord earth wire.Remove the wiring cap (below picture shown).Note: connection is between the capacitor and the motor.Remove the wiring cap (below picture shown).Note: connection is between capacitor and the motor.2.4.2 Fan Blade And Fan MotorUse a screwdriver to remove 1galvanized screws (M6X14) on the fan blade.Remove the fan blade.Use a screw driver to remove 8 galvanized screws (M5X12) on fan motor to get the fanmotor.2.4.3 Main Motor Wiring ConnectionMain motor wiring connection refers to part 4.2 Wiring Color Description.2.5 How To Change Swing MotorRemove the back panel and follow the procedure 2.1.1Remove the right-side panel and follow procedure 2.1.3Remove the switch box and follow the procedure 2.2.12.5.1 Swing Switch And Wiring Connector.Use a screwdriver to remove 2 galvanized screws (ST3X10) on the swing switch of the control panel.Remove the pink wire on the swing switch.Remove the wiring cap (below picture shown).Note: connection is between swing motor and N wire of power cord.2.5.2 Swing Motor And Swing Motor Wheel.Use a screwdriver to remove 2 galvanized screws(ST4X12) on the swing motor.Remove the swing motor.Use screwdriver to remove 1 galvanized screw(ST3*8) on the swing motor wheel.Remove the swing motor wheel.Get the swing motor.2.5.3 Swing Motor Wiring ConnectionSwing motor wiring connection refers to part 4.2 Wiring Color Description.TROUBLESHOOTING GUIDE3.1 Outside DimensionsWidth: 700 mm (27.56’’)Depth: 466 mm (18.35’’)Height: 1017 mm (40.0’’)3.2 Cooling SystemHoneywell Evaporative Air Coolers are built to maximize energy efficiency and keep costs low. Warm air is drawn into the cooler through a dust and odor-reducing carbon filter and enters the Honeycomb Cooling Media. Water pumped from the tank pours over the honeycomb media. As the warm air passes through the media, the water absorbs the heat, naturally cooling and humidifying the air. A fan propels the cooled air out into the room. This no-compressor system cools naturally, efficiently and inexpensively.Troubleshooting GuideThe following troubleshooting guide is intended to address the most common symptoms and is by no means exhaustive. If symptoms persist, call a qualified service provider. Only a certified electrician should complete any electrical work. Unplug and disconnect the appliance from the power source before attempting to troubleshoot any of the following symptoms.ProblemPossible CauseSolutionNo discharge of airThe cord is not plugged in.Make sure the power cord is plugged in and the supply switch is on.The power is not on.Turn the unit ON.Humidity output minimal to noneWater is below the minimum water level in the tank.Turn off the unit.Follow the instructions to fill the water tank with clean water.The water pump is damaged.Replace the water pump according to procedure 2.3.Watercolor yellowish at initial useColor fasts from honeycomb filter.This is natural. After several uses, the watercolor will be clean.Abnormal noise inside the productThe noise of the water pump when water is not up-to-min water level. the product again.Turn off the product. Add water, and then turn onMotor or blade problem.Turn off and unplug the product or change the main motor according to procedure 2.4.Musty or unpleasant odorWhen the Cooler is new.When the unit is used for the first time, the Honeycomb Cooling Media will have an odor, which will dissipate within a few hours of initial use.Stale or stagnant water in the water tank.Drain, flush and clean the water tankMedia mildewed or clogged.Replace media according to the procedure 2.1.Not coolingPump is not turned on.Check the water level and turn on the pump.Low or no water.Damaged water pump.Replace the water pump according to procedure 2.3.SCHEMATIC DIAGRAM4.1 Wiring Diagram4.2 Wiring Color DescriptionPower Cord:(1) Brown(2) Blue(3) Green + YellowLiveNeutralEarth (Ground)to speed switch(4)motor COM(black)to motor earthMain Motor:(1) White(2) Yellow(3) Blue(4) Black(5) Red(6) Brown(7) Green + YellowHigh speedMedium speedLow speedNeutralEarth (Ground)to speed switch(1)to speed switch(2)to speed switch(3)to N wire of power cordto the capacitor by end-closed connectorto the capacitor by end-closed connectorto power cord earthWater Pump:(1) Brown(2) Blueto pump control switch(1)to N wire of power cordSwing Motor:(1) Pink(2) Pinkto swing control switch(1)to N wire of power cordEXPLODED VIEWREPLACEMENT PARTS LISTSrPART NAMEQUANTITY1Up/Down swing knob22Swing knob pressboard13Horizontal louver 124Horizontal louver 225Horizontal louver 326Horizontal louver 427Horizontal louver 528Horizontal louver middle link19Horizontal louver press board A210Horizontal louver link A211Horizontal louver press board B212Horizontal louver link B213Swing/Cool knob214Speed knob115Control plane116Swing/Cool switch217Speed switch118Air outlet panel119Front panel120Rubber washer2021Vertical louver base422Short vertical louver223Long vertical louver224Switch box125Side panel226Side honeycomb pad227Side water distributor cover228Side water distributor229Side honeycomb pad holder430Swing motor131Swing motor wheel132Vertical louver drive133Base of fan motor frame234Fan motor frame435Fan blade assembly136Fan motor137Top cover138Water fill door139Four directions pipe140Back water distributor tube141Left/Right water distributor tube242Water fill door link243Back water distributor144Back water distributor cover145Left stand pillar146Back honeycomb pad holder247Back honeycomb pad148Back panel149Right stand pillar150Motor capacitor151Suction pipe152Water fill pipe153Float cap154Float holder155Float tube156Water level board157Vertical louver link158Water tank159Water pump160Water pump clip161Continuous water supply connection162Castor263Castor with brake264Water drainage plug165Silica gel ring1CONFIDENTIALWebsite: http://www.honeywellaircoolers.comDownloaded from www.Manualslib.com manuals search engineDocuments / ResourcesHoneywell CO60PM Evaporative Air Cooler [pdf] Instruction ManualCO60PM, Evaporative Air Cooler, CO60PM Evaporative Air Cooler, Air Cooler, CoolerReferencesUser ManualRelated PostsEvaporative Air Cooler With Humidifier SF-615H User ManualEvaporative Air Cooler With Humidifier SF-615H User Manual - Optimized PDF Evaporative Air Cooler With Humidifier SF-615H User…Honeywell TC10PM Series Portable Evaporative Air Cooler User ManualHoneywell TC10PM Series Portable Evaporative Air Cooler Portable Evaporative Air Cooler User Manual Read and save these instructions…kogan KAPMNCL4BA Mini Evaporative Air Cooler User Guidekogan KAPMNCL4BA Mini Evaporative Air Cooler SAFETY & WARNINGS Ensure to read this user guide prior to first…COOLER MASTER Hyper T200 CPU Air Cooler User ManualCOOLER MASTER Hyper T200 CPU Air Cooler IN THE BOX INTEL & AMD AMD AM4/AM3+/AM3/AM2+/AM2/FM2+/FM2/FM1 Intel - LGA1151/1150/1155/1156/1366/775…
14 Nov 2022 — Corsair's Vengeance RGB takes the AMD DDR5 platform to a sweet spot. Using the new EXPO 6000 MT/s profile that's optimized for Zen 4 and ...
Your email address will not be published. Required fields are marked *Comment * Name Email Website Save my name, email, and website in this browser for the next time I comment.
This article assumes n4ce is going to be controlled via a software license. So the following files in the folder "C:\Program Files\Applications in Cadd\n4ce 4.30\Program\LDK Files" need to be copied back one to the "C:\Program Files\Applications in Cadd\n4ce 4.30\Program" folder
CADDpump instructions for nurses
When using electrical appliances, basic safety precautions should always be followed:Your cooler should run on 120V Volt AC, 50 Hz current only.Check the household voltage to ensure it matches the appliance’s rate specification.Before operating the product remove it from its packaging and check it is in good condition.If the supply cord is damaged, it must be replaced by the manufacturer, its service agent or similarly qualified persons in order to avoid a hazard.DO NOT operate any product with a damaged cord or plug.DO NOT use an extension cord with this appliance.DO NOT run power cord under carpeting, or cover with rugs or runners. Arrange the cord away from areas where it may be tripped over.Unplug the appliance during filling and cleaning.Always unplug the appliance from the power source before servicing or removing the unit.Disconnect the power supply before servicing or cleaning operation.Remove the power cord from the electrical receptacle by grasping and pulling on the power cord plug-end only, never from the cord.DO NOT use the product in areas where gasoline, paint or other flammable goods and objects are stored.When using the ‘’COOL’’ setting, please check the water indicator level to ensure it is above the minimum water level. Operation of this unit on the ‘’COOL’’ setting on or below minimum water level could result in damage to the water pump.DO NOT attempt repair or adjustment to any electrical or mechanical functions of the cooler.Verify that the voltage power source matches the appliance’s electrical specifications. The improper voltage will burn out the blower/fan, oscillating, and/or pump motor windings and will void the warranty.DO NOT cover the air inlet or outlet on the appliance as this may cause motor damage.DO NOT insert or allow objects to enter any ventilation, exhaust opening, or water tank as this may damage the product and could cause an electrical shock or fire.DO NOT operate with media removed as this will overload and damage the motor.To reduce the risk of fire or electric shock, do not use this fan with any solid-state speed control device.DO NOT leave the appliance operating unattended for any extended period of time.This appliance is not intended for use by persons (including children or the elderly) with reduced physical, sensory or mental capabilities, or lack of experience and knowledge unless they have been given supervision or instruction concerning the use of the appliance by a person responsible for their safety.DO NOT let children play with any appliance packaging or plastic bags. Injury may resultfrom such practice.Children should be supervised to ensure that they do not play with the appliance.If the unit is damaged or it malfunctions, do not continue to operate it.Place the unit on the floor only.This product is not intended for use in wet or damp locations. Never locate the product where it may fall into a bathtub or other water container. DO NOT use in bathrooms. When it is not in use always store in a dry area.Don’t use indoor extension cords outside. Look for extension cords specifically marked for outdoor use. Look for extension cords that have a GFCI (Ground Fault Circuit Interrupter) built in.Make sure the amperage rating for the extension cord is higher than the amperage rating for the appliance. Check labels and owner’s manuals on the appliance and the extension cord for amperage ratings.Power cords have to be contained. If they must run along the ground, make sure every inch of them is secured so they will not be tripped over.The wiring and connections must be waterproof. Be sure the connections (to the air cooler) never get wet. Your unit is waterproof, but everything attached to it must be waterproof, too.Set up your unit so it cannot be tripped over or wobble loose. It must rest on solid support.NOTE: OPERATE THE UNIT WHEN THE WATER TANK IS FILLED WITH CLEAN WATER1.5 Parts Description1 Water Inlet and Ice2 Handle3 Left Honeycomb Panel4 Lever for Horizontal Louvers5 Water Tank6 Casters7 Horizontal Louvers8 Water Level Indicator9 Control Panel Loading Compartment10 Right Honeycomb Panel11 Continuous Water Supply Connection12 Drain Plug13 Backside Honeycomb Panel14 Power Cord & Plug15 Rear Grill Removal Screws16 Water Fill Door17 Honeycomb Cooling Media18 Water Inlet (Optional) for manual refill 1.6 OperationsControl Panel:NOTE:The speed control may be marked as High/Med/Low in certain units.Operation Instructions: Cooler Location:Place the cooler in front of an open door or window. Ensure that there is adequate cross–ventilation in the room by leaving a door or window open opposite the cooler. Following these guidelines will ensure your cooler will work as effectively as possible.Not an Air Conditioner:The evaporative air cooler is not an air conditioner as it does not use a compressor or refrigerant gas. It should not be expected to cool as efficiently as a refrigerated air conditioner. The recommended maximum relative humidity level is 60% or less, which allows a noticeable temperature decrease. The temperature decrease will be greater in drier climates because higher evaporation occurs when the humidity is low.The evaporative air cooler should not be used in enclosed spaces. It must be kept level and there must be water in the water tank. The room should have doors and windows opened to allow free airflow. The evaporative air cooler works best when placed near an open window so that outside air is drawn into the evaporative air cooler, the air circulates in the room, and then exits via the door. The maximum cooling effect is felt when a person is in the flow of air coming out of the evaporative air cooler.The evaporative air cooler can also be used to humidify dry air during cool weather. To be used for humidification the windows and doors should be closed to allow the humidified air to accumulate. The evaporative air cooler is not an air conditioner as it does not use a compressor or refrigerant gas. It should not be expected to cool as efficiently as a refrigerated air conditioner.NOTE: When the product is used for the first time the Honeycomb Cooling Media will have an odor that will dissipate in a week or so of initial use.FILL WATER:Water can be filled into the air cooler by:Water Inlet (Manually)Water / Ice can be put into the tank through the top opening. There is a hole for water to flow into the tank.Continuous water supply (Auto-Refill)Connect a garden hose to the continuous water supply inlet.Water Inlet (Manually)To refill the water tank, pull out the Water Fill Door located on the top of the unit and fill water to the Max, as indicated on the Water Level Indicator.Do not fill water above the Max water level mark.For maximum cooling performance, put ice cubes inside the Ice Loading Compartment located on the top of the Air Cooler.Filling With Water (Continuous Water Supply Connection)CAUTION Unplug from power source before fillingThis automated process eliminates the need to manually refill the water tank.Securely connect the continuous water supply connector (located on the lower left side panel) to the water supply.Turn on the water.The water tank will refill automatically.The water float valve will detect the water level and will automatically start or stop the water flow.Plug the unit into the power supply and turn the unit on.Installing Hose Adapter And Float ValveConnect the garden hose to the water supply connectorVerify that connections are secure and turn on the water.Control KnobsSpeed / On – OffConnect to the power supply and turn the Speed knob. The fan will start. Change the speed from 1 for Low to 2 for Medium to 3 for High. To switch OFF the unit turn the Speed knob to “0”.CoolTo begin cooling the desired area turn the “COOL” switch ON. The water pump will operate. You can feel the cooler air after the Honeycomb media is completely wet.SwingVertical LouversTurn the “SWING” switch ON. The louvers will begin to move from right to left automatically. Manually adjust the horizontal louvers to change vertical airflow.Horizontal LouversManually adjust the horizontal louvers to change vertical airflow.CLEANING & MAINTENANCEImportant – Please Read!The cooler is supplied with Honeycomb Cooling Media.The cleaning frequency for the Honeycomb media depends on local air and water conditions. In areas where the mineral content of water is high, mineral deposits may build up on the Honeycomb Cooling Media and restrict airflow. Draining the water reservoir and refilling it with fresh water at least once a week will help reduce mineral deposits. If mineral deposits remain on the Honeycomb media, the media should be removed and washed under fresh water. The media should be cleaned every two months or sooner, depending on your needs.Do not run the unit in COOL mode with stale water in the tank. Empty the tank and refill it with fresh water if the water has been standing in the tank for an extended period of time.For best results, allow the Honeycomb Cooling Media to dry after each use by turning off the cool function 15 minutes before turning the unit off.WARNINGBefore cleaning, turn the unit off and disconnect from the power source.Use a damp cloth to remove dirt and dust from the outside of the unit.Never use abrasive cleaners.When the unit is not in use, store it in a dry place, out of direct sunlight.Maximum water inlet pressure 0.5 MPa.Draining and Cleaning The Water TankTurn the power “off’ and disconnect the air cooler from the power supply.Move the unit to a location where it can be drained.Remove the drain plug and allow the tank to empty.Refill the water tank up to the maximum level with clean water and drain it completely.Fill the water tank and rinse at least 2-3 times before use.After cleaning ensure that the drain plug is back in place.Plug into the power supply and turn on the unit.Cleaning The Honeycomb Cooling MediaTurn off the unit, and unplug the power cord from the wall outlet.Rotate the unit facing the back panel, and locate the Grill Removal Screws. Remove the 4 screws with a screwdriver.Pull the rear grill panel, until it is completely removed.This cooler has Honeycomb cooling media on the right and left panels. The cleaning and removal procedure is the same as the rear panel.The Honeycomb cooling media can now be seen. Clean honeycomb with a clean cloth to remove all the dust & dirt particles.Once cleaning is finished, reassemble the unit.Plug into the power supply and turn on the unit.The air cooler is now ready to be used. This cleaning process should be repeated monthly to maintain the integrity of the unit and to remove particles filtered from the air.DISASSEMBLY INSTRUCTIONSWARNING – Before the following disassembly, POWER is set to OFF and disconnected the power cord.2.1 How To Change Honeycomb Cooling Media(3 sides)2.1.1 Back Panel.Use a screwdriver to remove 5 galvanized screws with plate head (ST4*12) on the back panel.Remove the back panel.2.1.2 Back Honeycomb Cooling Media.Use screwdriver to remove 4 galvanized screws with plate head(ST4*12) on the honeycomb holder.Remove the honeycomb holder.Remove the honeycomb cooling media from the back panel.2.1.3 Right Side Panel.Use a screwdriver to remove 4 galvanized screws with plate head (ST4*12) on the right-side panel.Remove the right side panel.2.1.4 Right Side Honeycomb Cooling Media.Use screwdriver to remove 4 galvanized screws with plate head(ST4*12) on the honeycomb holder.Remove the honeycomb holder.Remove the honeycomb cooling media from the right side panel.2.1.5 Left Side Panel.Use screwdriver to remove 4 galvanized screws with plate head (ST4*12) on the left side panel.Remove the left side panel.2.1.6 Left Side Honeycomb Cooling Media.Use a screwdriver to remove 4 galvanized screws with plate head(ST4*12) on the honeycomb holder.Remove the honeycomb holder.Remove the honeycomb cooling media from the left side panel.2.2 How To Change SwitchRemove the back panel and follow the procedure 2.1.1Remove the right-side panel and follow procedure 2.1.32.2.1. Switch BoxUse a screw driver to remove 4 galvanized screws with plate head(ST3*12) on the switch box.Remove switch box.2.2.2. Switch(cool/speed/swing)Use screw driver to remove 2 galvanized screws (ST3X10) on each switch of the control panel(cool/speed/swing).Cool switchSpeed switchSwing switch2.2.3. Wiring Color ConnectionWiring color connection refers to part 4.2 Wiring Color Description.2.3 How To Change Water PumpRemove the back panel and follow the procedure 2.1.1Remove the right-side panel and follow procedure 2.1.3Remove the switch box and follow the procedure 2.2.12.3.1 Water pump pipe and water pump clip.Remove the water pump pipe.Use a screw driver to remove 2 SS screws(ST4*12) on the water pump clip.2.3.2 Cool Switch And Wiring ConnectorUse a screwdriver to remove 2 galvanized screws (ST3X10) on the cool switch of the control panel.Remove the brown wire on the cool switch.Remove the wiring cap (below picture shown) to get the water pump.Note: connection is between the water pump and the N wire of the power cord.2.3.3 Water Pump Wiring ConnectionThe water pump wiring connection refers to part 4.2 Wiring Color Description.2.4 How To Change Fan MotorRemove the back panel and follow the procedure 2.1.1Remove the right-side panel and follow procedure 2.1.3Remove the switch box and follow the procedure 2.2.12.4.1 Speed Switch And Wiring Connector.Use a screwdriver to remove 2 galvanized screws (ST3X10) on the speed switch of the control panel.Remove the white/yellow/blue wire on the speed switch.Remove the wiring cap (below picture shown).Note: connection is between fan motor COM wire(black) and N wire of power cord.Remove the wiring cap (below picture shown).Note: connection is between motor and power cord earth wire.Remove the wiring cap (below picture shown).Note: connection is between the capacitor and the motor.Remove the wiring cap (below picture shown).Note: connection is between capacitor and the motor.2.4.2 Fan Blade And Fan MotorUse a screwdriver to remove 1galvanized screws (M6X14) on the fan blade.Remove the fan blade.Use a screw driver to remove 8 galvanized screws (M5X12) on fan motor to get the fanmotor.2.4.3 Main Motor Wiring ConnectionMain motor wiring connection refers to part 4.2 Wiring Color Description.2.5 How To Change Swing MotorRemove the back panel and follow the procedure 2.1.1Remove the right-side panel and follow procedure 2.1.3Remove the switch box and follow the procedure 2.2.12.5.1 Swing Switch And Wiring Connector.Use a screwdriver to remove 2 galvanized screws (ST3X10) on the swing switch of the control panel.Remove the pink wire on the swing switch.Remove the wiring cap (below picture shown).Note: connection is between swing motor and N wire of power cord.2.5.2 Swing Motor And Swing Motor Wheel.Use a screwdriver to remove 2 galvanized screws(ST4X12) on the swing motor.Remove the swing motor.Use screwdriver to remove 1 galvanized screw(ST3*8) on the swing motor wheel.Remove the swing motor wheel.Get the swing motor.2.5.3 Swing Motor Wiring ConnectionSwing motor wiring connection refers to part 4.2 Wiring Color Description.TROUBLESHOOTING GUIDE3.1 Outside DimensionsWidth: 700 mm (27.56’’)Depth: 466 mm (18.35’’)Height: 1017 mm (40.0’’)3.2 Cooling SystemHoneywell Evaporative Air Coolers are built to maximize energy efficiency and keep costs low. Warm air is drawn into the cooler through a dust and odor-reducing carbon filter and enters the Honeycomb Cooling Media. Water pumped from the tank pours over the honeycomb media. As the warm air passes through the media, the water absorbs the heat, naturally cooling and humidifying the air. A fan propels the cooled air out into the room. This no-compressor system cools naturally, efficiently and inexpensively.Troubleshooting GuideThe following troubleshooting guide is intended to address the most common symptoms and is by no means exhaustive. If symptoms persist, call a qualified service provider. Only a certified electrician should complete any electrical work. Unplug and disconnect the appliance from the power source before attempting to troubleshoot any of the following symptoms.ProblemPossible CauseSolutionNo discharge of airThe cord is not plugged in.Make sure the power cord is plugged in and the supply switch is on.The power is not on.Turn the unit ON.Humidity output minimal to noneWater is below the minimum water level in the tank.Turn off the unit.Follow the instructions to fill the water tank with clean water.The water pump is damaged.Replace the water pump according to procedure 2.3.Watercolor yellowish at initial useColor fasts from honeycomb filter.This is natural. After several uses, the watercolor will be clean.Abnormal noise inside the productThe noise of the water pump when water is not up-to-min water level. the product again.Turn off the product. Add water, and then turn onMotor or blade problem.Turn off and unplug the product or change the main motor according to procedure 2.4.Musty or unpleasant odorWhen the Cooler is new.When the unit is used for the first time, the Honeycomb Cooling Media will have an odor, which will dissipate within a few hours of initial use.Stale or stagnant water in the water tank.Drain, flush and clean the water tankMedia mildewed or clogged.Replace media according to the procedure 2.1.Not coolingPump is not turned on.Check the water level and turn on the pump.Low or no water.Damaged water pump.Replace the water pump according to procedure 2.3.SCHEMATIC DIAGRAM4.1 Wiring Diagram4.2 Wiring Color DescriptionPower Cord:(1) Brown(2) Blue(3) Green + YellowLiveNeutralEarth (Ground)to speed switch(4)motor COM(black)to motor earthMain Motor:(1) White(2) Yellow(3) Blue(4) Black(5) Red(6) Brown(7) Green + YellowHigh speedMedium speedLow speedNeutralEarth (Ground)to speed switch(1)to speed switch(2)to speed switch(3)to N wire of power cordto the capacitor by end-closed connectorto the capacitor by end-closed connectorto power cord earthWater Pump:(1) Brown(2) Blueto pump control switch(1)to N wire of power cordSwing Motor:(1) Pink(2) Pinkto swing control switch(1)to N wire of power cordEXPLODED VIEWREPLACEMENT PARTS LISTSrPART NAMEQUANTITY1Up/Down swing knob22Swing knob pressboard13Horizontal louver 124Horizontal louver 225Horizontal louver 326Horizontal louver 427Horizontal louver 528Horizontal louver middle link19Horizontal louver press board A210Horizontal louver link A211Horizontal louver press board B212Horizontal louver link B213Swing/Cool knob214Speed knob115Control plane116Swing/Cool switch217Speed switch118Air outlet panel119Front panel120Rubber washer2021Vertical louver base422Short vertical louver223Long vertical louver224Switch box125Side panel226Side honeycomb pad227Side water distributor cover228Side water distributor229Side honeycomb pad holder430Swing motor131Swing motor wheel132Vertical louver drive133Base of fan motor frame234Fan motor frame435Fan blade assembly136Fan motor137Top cover138Water fill door139Four directions pipe140Back water distributor tube141Left/Right water distributor tube242Water fill door link243Back water distributor144Back water distributor cover145Left stand pillar146Back honeycomb pad holder247Back honeycomb pad148Back panel149Right stand pillar150Motor capacitor151Suction pipe152Water fill pipe153Float cap154Float holder155Float tube156Water level board157Vertical louver link158Water tank159Water pump160Water pump clip161Continuous water supply connection162Castor263Castor with brake264Water drainage plug165Silica gel ring1CONFIDENTIALWebsite: http://www.honeywellaircoolers.comDownloaded from www.Manualslib.com manuals search engineDocuments / ResourcesHoneywell CO60PM Evaporative Air Cooler [pdf] Instruction ManualCO60PM, Evaporative Air Cooler, CO60PM Evaporative Air Cooler, Air Cooler, CoolerReferencesUser ManualRelated PostsEvaporative Air Cooler With Humidifier SF-615H User ManualEvaporative Air Cooler With Humidifier SF-615H User Manual - Optimized PDF Evaporative Air Cooler With Humidifier SF-615H User…Honeywell TC10PM Series Portable Evaporative Air Cooler User ManualHoneywell TC10PM Series Portable Evaporative Air Cooler Portable Evaporative Air Cooler User Manual Read and save these instructions…kogan KAPMNCL4BA Mini Evaporative Air Cooler User Guidekogan KAPMNCL4BA Mini Evaporative Air Cooler SAFETY & WARNINGS Ensure to read this user guide prior to first…COOLER MASTER Hyper T200 CPU Air Cooler User ManualCOOLER MASTER Hyper T200 CPU Air Cooler IN THE BOX INTEL & AMD AMD AM4/AM3+/AM3/AM2+/AM2/FM2+/FM2/FM1 Intel - LGA1151/1150/1155/1156/1366/775…
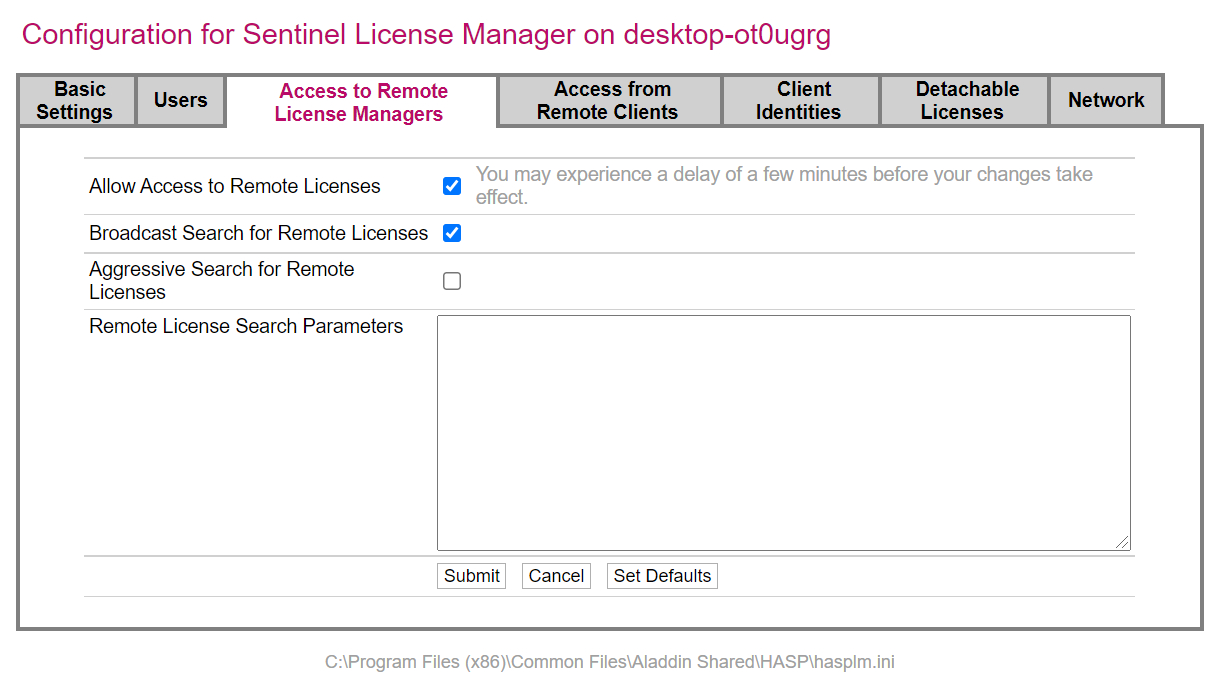
Cleaning The Honeycomb Cooling MediaTurn off the unit, and unplug the power cord from the wall outlet.Rotate the unit facing the back panel, and locate the Grill Removal Screws. Remove the 4 screws with a screwdriver.Pull the rear grill panel, until it is completely removed.This cooler has Honeycomb cooling media on the right and left panels. The cleaning and removal procedure is the same as the rear panel.The Honeycomb cooling media can now be seen. Clean honeycomb with a clean cloth to remove all the dust & dirt particles.Once cleaning is finished, reassemble the unit.Plug into the power supply and turn on the unit.The air cooler is now ready to be used. This cleaning process should be repeated monthly to maintain the integrity of the unit and to remove particles filtered from the air.DISASSEMBLY INSTRUCTIONSWARNING – Before the following disassembly, POWER is set to OFF and disconnected the power cord.2.1 How To Change Honeycomb Cooling Media(3 sides)2.1.1 Back Panel.Use a screwdriver to remove 5 galvanized screws with plate head (ST4*12) on the back panel.Remove the back panel.2.1.2 Back Honeycomb Cooling Media.Use screwdriver to remove 4 galvanized screws with plate head(ST4*12) on the honeycomb holder.Remove the honeycomb holder.Remove the honeycomb cooling media from the back panel.2.1.3 Right Side Panel.Use a screwdriver to remove 4 galvanized screws with plate head (ST4*12) on the right-side panel.Remove the right side panel.2.1.4 Right Side Honeycomb Cooling Media.Use screwdriver to remove 4 galvanized screws with plate head(ST4*12) on the honeycomb holder.Remove the honeycomb holder.Remove the honeycomb cooling media from the right side panel.2.1.5 Left Side Panel.Use screwdriver to remove 4 galvanized screws with plate head (ST4*12) on the left side panel.Remove the left side panel.2.1.6 Left Side Honeycomb Cooling Media.Use a screwdriver to remove 4 galvanized screws with plate head(ST4*12) on the honeycomb holder.Remove the honeycomb holder.Remove the honeycomb cooling media from the left side panel.2.2 How To Change SwitchRemove the back panel and follow the procedure 2.1.1Remove the right-side panel and follow procedure 2.1.32.2.1. Switch BoxUse a screw driver to remove 4 galvanized screws with plate head(ST3*12) on the switch box.Remove switch box.2.2.2. Switch(cool/speed/swing)Use screw driver to remove 2 galvanized screws (ST3X10) on each switch of the control panel(cool/speed/swing).Cool switchSpeed switchSwing switch2.2.3. Wiring Color ConnectionWiring color connection refers to part 4.2 Wiring Color Description.2.3 How To Change Water PumpRemove the back panel and follow the procedure 2.1.1Remove the right-side panel and follow procedure 2.1.3Remove the switch box and follow the procedure 2.2.12.3.1 Water pump pipe and water pump clip.Remove the water pump pipe.Use a screw driver to remove 2 SS screws(ST4*12) on the water pump clip.2.3.2 Cool Switch And Wiring ConnectorUse a screwdriver to remove 2 galvanized screws (ST3X10) on the cool switch of the control panel.Remove the brown wire on the cool switch.Remove the wiring cap (below picture shown) to get the water pump.Note: connection is between the water pump and the N wire of the power cord.2.3.3 Water Pump Wiring ConnectionThe water pump wiring connection refers to part 4.2 Wiring Color Description.2.4 How To Change Fan MotorRemove the back panel and follow the procedure 2.1.1Remove the right-side panel and follow procedure 2.1.3Remove the switch box and follow the procedure 2.2.12.4.1 Speed Switch And Wiring Connector.Use a screwdriver to remove 2 galvanized screws (ST3X10) on the speed switch of the control panel.Remove the white/yellow/blue wire on the speed switch.Remove the wiring cap (below picture shown).Note: connection is between fan motor COM wire(black) and N wire of power cord.Remove the wiring cap (below picture shown).Note: connection is between motor and power cord earth wire.Remove the wiring cap (below picture shown).Note: connection is between the capacitor and the motor.Remove the wiring cap (below picture shown).Note: connection is between capacitor and the motor.2.4.2 Fan Blade And Fan MotorUse a screwdriver to remove 1galvanized screws (M6X14) on the fan blade.Remove the fan blade.Use a screw driver to remove 8 galvanized screws (M5X12) on fan motor to get the fanmotor.2.4.3 Main Motor Wiring ConnectionMain motor wiring connection refers to part 4.2 Wiring Color Description.2.5 How To Change Swing MotorRemove the back panel and follow the procedure 2.1.1Remove the right-side panel and follow procedure 2.1.3Remove the switch box and follow the procedure 2.2.12.5.1 Swing Switch And Wiring Connector.Use a screwdriver to remove 2 galvanized screws (ST3X10) on the swing switch of the control panel.Remove the pink wire on the swing switch.Remove the wiring cap (below picture shown).Note: connection is between swing motor and N wire of power cord.2.5.2 Swing Motor And Swing Motor Wheel.Use a screwdriver to remove 2 galvanized screws(ST4X12) on the swing motor.Remove the swing motor.Use screwdriver to remove 1 galvanized screw(ST3*8) on the swing motor wheel.Remove the swing motor wheel.Get the swing motor.2.5.3 Swing Motor Wiring ConnectionSwing motor wiring connection refers to part 4.2 Wiring Color Description.TROUBLESHOOTING GUIDE3.1 Outside DimensionsWidth: 700 mm (27.56’’)Depth: 466 mm (18.35’’)Height: 1017 mm (40.0’’)3.2 Cooling SystemHoneywell Evaporative Air Coolers are built to maximize energy efficiency and keep costs low. Warm air is drawn into the cooler through a dust and odor-reducing carbon filter and enters the Honeycomb Cooling Media. Water pumped from the tank pours over the honeycomb media. As the warm air passes through the media, the water absorbs the heat, naturally cooling and humidifying the air. A fan propels the cooled air out into the room. This no-compressor system cools naturally, efficiently and inexpensively.Troubleshooting GuideThe following troubleshooting guide is intended to address the most common symptoms and is by no means exhaustive. If symptoms persist, call a qualified service provider. Only a certified electrician should complete any electrical work. Unplug and disconnect the appliance from the power source before attempting to troubleshoot any of the following symptoms.ProblemPossible CauseSolutionNo discharge of airThe cord is not plugged in.Make sure the power cord is plugged in and the supply switch is on.The power is not on.Turn the unit ON.Humidity output minimal to noneWater is below the minimum water level in the tank.Turn off the unit.Follow the instructions to fill the water tank with clean water.The water pump is damaged.Replace the water pump according to procedure 2.3.Watercolor yellowish at initial useColor fasts from honeycomb filter.This is natural. After several uses, the watercolor will be clean.Abnormal noise inside the productThe noise of the water pump when water is not up-to-min water level. the product again.Turn off the product. Add water, and then turn onMotor or blade problem.Turn off and unplug the product or change the main motor according to procedure 2.4.Musty or unpleasant odorWhen the Cooler is new.When the unit is used for the first time, the Honeycomb Cooling Media will have an odor, which will dissipate within a few hours of initial use.Stale or stagnant water in the water tank.Drain, flush and clean the water tankMedia mildewed or clogged.Replace media according to the procedure 2.1.Not coolingPump is not turned on.Check the water level and turn on the pump.Low or no water.Damaged water pump.Replace the water pump according to procedure 2.3.SCHEMATIC DIAGRAM4.1 Wiring Diagram4.2 Wiring Color DescriptionPower Cord:(1) Brown(2) Blue(3) Green + YellowLiveNeutralEarth (Ground)to speed switch(4)motor COM(black)to motor earthMain Motor:(1) White(2) Yellow(3) Blue(4) Black(5) Red(6) Brown(7) Green + YellowHigh speedMedium speedLow speedNeutralEarth (Ground)to speed switch(1)to speed switch(2)to speed switch(3)to N wire of power cordto the capacitor by end-closed connectorto the capacitor by end-closed connectorto power cord earthWater Pump:(1) Brown(2) Blueto pump control switch(1)to N wire of power cordSwing Motor:(1) Pink(2) Pinkto swing control switch(1)to N wire of power cordEXPLODED VIEWREPLACEMENT PARTS LISTSrPART NAMEQUANTITY1Up/Down swing knob22Swing knob pressboard13Horizontal louver 124Horizontal louver 225Horizontal louver 326Horizontal louver 427Horizontal louver 528Horizontal louver middle link19Horizontal louver press board A210Horizontal louver link A211Horizontal louver press board B212Horizontal louver link B213Swing/Cool knob214Speed knob115Control plane116Swing/Cool switch217Speed switch118Air outlet panel119Front panel120Rubber washer2021Vertical louver base422Short vertical louver223Long vertical louver224Switch box125Side panel226Side honeycomb pad227Side water distributor cover228Side water distributor229Side honeycomb pad holder430Swing motor131Swing motor wheel132Vertical louver drive133Base of fan motor frame234Fan motor frame435Fan blade assembly136Fan motor137Top cover138Water fill door139Four directions pipe140Back water distributor tube141Left/Right water distributor tube242Water fill door link243Back water distributor144Back water distributor cover145Left stand pillar146Back honeycomb pad holder247Back honeycomb pad148Back panel149Right stand pillar150Motor capacitor151Suction pipe152Water fill pipe153Float cap154Float holder155Float tube156Water level board157Vertical louver link158Water tank159Water pump160Water pump clip161Continuous water supply connection162Castor263Castor with brake264Water drainage plug165Silica gel ring1CONFIDENTIALWebsite: http://www.honeywellaircoolers.comDownloaded from www.Manualslib.com manuals search engineDocuments / ResourcesHoneywell CO60PM Evaporative Air Cooler [pdf] Instruction ManualCO60PM, Evaporative Air Cooler, CO60PM Evaporative Air Cooler, Air Cooler, CoolerReferencesUser ManualRelated PostsEvaporative Air Cooler With Humidifier SF-615H User ManualEvaporative Air Cooler With Humidifier SF-615H User Manual - Optimized PDF Evaporative Air Cooler With Humidifier SF-615H User…Honeywell TC10PM Series Portable Evaporative Air Cooler User ManualHoneywell TC10PM Series Portable Evaporative Air Cooler Portable Evaporative Air Cooler User Manual Read and save these instructions…kogan KAPMNCL4BA Mini Evaporative Air Cooler User Guidekogan KAPMNCL4BA Mini Evaporative Air Cooler SAFETY & WARNINGS Ensure to read this user guide prior to first…COOLER MASTER Hyper T200 CPU Air Cooler User ManualCOOLER MASTER Hyper T200 CPU Air Cooler IN THE BOX INTEL & AMD AMD AM4/AM3+/AM3/AM2+/AM2/FM2+/FM2/FM1 Intel - LGA1151/1150/1155/1156/1366/775…
The following troubleshooting guide is intended to address the most common symptoms and is by no means exhaustive. If symptoms persist, call a qualified service provider. Only a certified electrician should complete any electrical work. Unplug and disconnect the appliance from the power source before attempting to troubleshoot any of the following symptoms.
*Due to continuous updates to the product on account of compliance requirements, tank capacity may be changed by the manufacturer over a period of timeFeaturesThree functions in one: air cooler, humidifier & fan.Very powerful airflow: up to 2610 m³ /hr or 1540 CFMCooling area: up to 80 m² or 850 ft²Air throw distance: 11 m or 36 ft.3 sides of honeycomb cooling media for optimum performance.Oscillating louvers.Mounted with castors for easy mobility.3 speeds: high, medium, and low.60-liter water tank capacity.1.4 Warning & Safety RulesWARNING – This appliance is intended for use outdoors, in the home, or in office environments. Any other use is not recommended by the manufacturer and may cause fire, electrical shocks, or injury to a person or property.When using electrical appliances, basic safety precautions should always be followed:Your cooler should run on 120V Volt AC, 50 Hz current only.Check the household voltage to ensure it matches the appliance’s rate specification.Before operating the product remove it from its packaging and check it is in good condition.If the supply cord is damaged, it must be replaced by the manufacturer, its service agent or similarly qualified persons in order to avoid a hazard.DO NOT operate any product with a damaged cord or plug.DO NOT use an extension cord with this appliance.DO NOT run power cord under carpeting, or cover with rugs or runners. Arrange the cord away from areas where it may be tripped over.Unplug the appliance during filling and cleaning.Always unplug the appliance from the power source before servicing or removing the unit.Disconnect the power supply before servicing or cleaning operation.Remove the power cord from the electrical receptacle by grasping and pulling on the power cord plug-end only, never from the cord.DO NOT use the product in areas where gasoline, paint or other flammable goods and objects are stored.When using the ‘’COOL’’ setting, please check the water indicator level to ensure it is above the minimum water level. Operation of this unit on the ‘’COOL’’ setting on or below minimum water level could result in damage to the water pump.DO NOT attempt repair or adjustment to any electrical or mechanical functions of the cooler.Verify that the voltage power source matches the appliance’s electrical specifications. The improper voltage will burn out the blower/fan, oscillating, and/or pump motor windings and will void the warranty.DO NOT cover the air inlet or outlet on the appliance as this may cause motor damage.DO NOT insert or allow objects to enter any ventilation, exhaust opening, or water tank as this may damage the product and could cause an electrical shock or fire.DO NOT operate with media removed as this will overload and damage the motor.To reduce the risk of fire or electric shock, do not use this fan with any solid-state speed control device.DO NOT leave the appliance operating unattended for any extended period of time.This appliance is not intended for use by persons (including children or the elderly) with reduced physical, sensory or mental capabilities, or lack of experience and knowledge unless they have been given supervision or instruction concerning the use of the appliance by a person responsible for their safety.DO NOT let children play with any appliance packaging or plastic bags. Injury may resultfrom such practice.Children should be supervised to ensure that they do not play with the appliance.If the unit is damaged or it malfunctions, do not continue to operate it.Place the unit on the floor only.This product is not intended for use in wet or damp locations. Never locate the product where it may fall into a bathtub or other water container. DO NOT use in bathrooms. When it is not in use always store in a dry area.Don’t use indoor extension cords outside. Look for extension cords specifically marked for outdoor use. Look for extension cords that have a GFCI (Ground Fault Circuit Interrupter) built in.Make sure the amperage rating for the extension cord is higher than the amperage rating for the appliance. Check labels and owner’s manuals on the appliance and the extension cord for amperage ratings.Power cords have to be contained. If they must run along the ground, make sure every inch of them is secured so they will not be tripped over.The wiring and connections must be waterproof. Be sure the connections (to the air cooler) never get wet. Your unit is waterproof, but everything attached to it must be waterproof, too.Set up your unit so it cannot be tripped over or wobble loose. It must rest on solid support.NOTE: OPERATE THE UNIT WHEN THE WATER TANK IS FILLED WITH CLEAN WATER1.5 Parts Description1 Water Inlet and Ice2 Handle3 Left Honeycomb Panel4 Lever for Horizontal Louvers5 Water Tank6 Casters7 Horizontal Louvers8 Water Level Indicator9 Control Panel Loading Compartment10 Right Honeycomb Panel11 Continuous Water Supply Connection12 Drain Plug13 Backside Honeycomb Panel14 Power Cord & Plug15 Rear Grill Removal Screws16 Water Fill Door17 Honeycomb Cooling Media18 Water Inlet (Optional) for manual refill 1.6 OperationsControl Panel:NOTE:The speed control may be marked as High/Med/Low in certain units.Operation Instructions: Cooler Location:Place the cooler in front of an open door or window. Ensure that there is adequate cross–ventilation in the room by leaving a door or window open opposite the cooler. Following these guidelines will ensure your cooler will work as effectively as possible.Not an Air Conditioner:The evaporative air cooler is not an air conditioner as it does not use a compressor or refrigerant gas. It should not be expected to cool as efficiently as a refrigerated air conditioner. The recommended maximum relative humidity level is 60% or less, which allows a noticeable temperature decrease. The temperature decrease will be greater in drier climates because higher evaporation occurs when the humidity is low.The evaporative air cooler should not be used in enclosed spaces. It must be kept level and there must be water in the water tank. The room should have doors and windows opened to allow free airflow. The evaporative air cooler works best when placed near an open window so that outside air is drawn into the evaporative air cooler, the air circulates in the room, and then exits via the door. The maximum cooling effect is felt when a person is in the flow of air coming out of the evaporative air cooler.The evaporative air cooler can also be used to humidify dry air during cool weather. To be used for humidification the windows and doors should be closed to allow the humidified air to accumulate. The evaporative air cooler is not an air conditioner as it does not use a compressor or refrigerant gas. It should not be expected to cool as efficiently as a refrigerated air conditioner.NOTE: When the product is used for the first time the Honeycomb Cooling Media will have an odor that will dissipate in a week or so of initial use.FILL WATER:Water can be filled into the air cooler by:Water Inlet (Manually)Water / Ice can be put into the tank through the top opening. There is a hole for water to flow into the tank.Continuous water supply (Auto-Refill)Connect a garden hose to the continuous water supply inlet.Water Inlet (Manually)To refill the water tank, pull out the Water Fill Door located on the top of the unit and fill water to the Max, as indicated on the Water Level Indicator.Do not fill water above the Max water level mark.For maximum cooling performance, put ice cubes inside the Ice Loading Compartment located on the top of the Air Cooler.Filling With Water (Continuous Water Supply Connection)CAUTION Unplug from power source before fillingThis automated process eliminates the need to manually refill the water tank.Securely connect the continuous water supply connector (located on the lower left side panel) to the water supply.Turn on the water.The water tank will refill automatically.The water float valve will detect the water level and will automatically start or stop the water flow.Plug the unit into the power supply and turn the unit on.Installing Hose Adapter And Float ValveConnect the garden hose to the water supply connectorVerify that connections are secure and turn on the water.Control KnobsSpeed / On – OffConnect to the power supply and turn the Speed knob. The fan will start. Change the speed from 1 for Low to 2 for Medium to 3 for High. To switch OFF the unit turn the Speed knob to “0”.CoolTo begin cooling the desired area turn the “COOL” switch ON. The water pump will operate. You can feel the cooler air after the Honeycomb media is completely wet.SwingVertical LouversTurn the “SWING” switch ON. The louvers will begin to move from right to left automatically. Manually adjust the horizontal louvers to change vertical airflow.Horizontal LouversManually adjust the horizontal louvers to change vertical airflow.CLEANING & MAINTENANCEImportant – Please Read!The cooler is supplied with Honeycomb Cooling Media.The cleaning frequency for the Honeycomb media depends on local air and water conditions. In areas where the mineral content of water is high, mineral deposits may build up on the Honeycomb Cooling Media and restrict airflow. Draining the water reservoir and refilling it with fresh water at least once a week will help reduce mineral deposits. If mineral deposits remain on the Honeycomb media, the media should be removed and washed under fresh water. The media should be cleaned every two months or sooner, depending on your needs.Do not run the unit in COOL mode with stale water in the tank. Empty the tank and refill it with fresh water if the water has been standing in the tank for an extended period of time.For best results, allow the Honeycomb Cooling Media to dry after each use by turning off the cool function 15 minutes before turning the unit off.WARNINGBefore cleaning, turn the unit off and disconnect from the power source.Use a damp cloth to remove dirt and dust from the outside of the unit.Never use abrasive cleaners.When the unit is not in use, store it in a dry place, out of direct sunlight.Maximum water inlet pressure 0.5 MPa.Draining and Cleaning The Water TankTurn the power “off’ and disconnect the air cooler from the power supply.Move the unit to a location where it can be drained.Remove the drain plug and allow the tank to empty.Refill the water tank up to the maximum level with clean water and drain it completely.Fill the water tank and rinse at least 2-3 times before use.After cleaning ensure that the drain plug is back in place.Plug into the power supply and turn on the unit.Cleaning The Honeycomb Cooling MediaTurn off the unit, and unplug the power cord from the wall outlet.Rotate the unit facing the back panel, and locate the Grill Removal Screws. Remove the 4 screws with a screwdriver.Pull the rear grill panel, until it is completely removed.This cooler has Honeycomb cooling media on the right and left panels. The cleaning and removal procedure is the same as the rear panel.The Honeycomb cooling media can now be seen. Clean honeycomb with a clean cloth to remove all the dust & dirt particles.Once cleaning is finished, reassemble the unit.Plug into the power supply and turn on the unit.The air cooler is now ready to be used. This cleaning process should be repeated monthly to maintain the integrity of the unit and to remove particles filtered from the air.DISASSEMBLY INSTRUCTIONSWARNING – Before the following disassembly, POWER is set to OFF and disconnected the power cord.2.1 How To Change Honeycomb Cooling Media(3 sides)2.1.1 Back Panel.Use a screwdriver to remove 5 galvanized screws with plate head (ST4*12) on the back panel.Remove the back panel.2.1.2 Back Honeycomb Cooling Media.Use screwdriver to remove 4 galvanized screws with plate head(ST4*12) on the honeycomb holder.Remove the honeycomb holder.Remove the honeycomb cooling media from the back panel.2.1.3 Right Side Panel.Use a screwdriver to remove 4 galvanized screws with plate head (ST4*12) on the right-side panel.Remove the right side panel.2.1.4 Right Side Honeycomb Cooling Media.Use screwdriver to remove 4 galvanized screws with plate head(ST4*12) on the honeycomb holder.Remove the honeycomb holder.Remove the honeycomb cooling media from the right side panel.2.1.5 Left Side Panel.Use screwdriver to remove 4 galvanized screws with plate head (ST4*12) on the left side panel.Remove the left side panel.2.1.6 Left Side Honeycomb Cooling Media.Use a screwdriver to remove 4 galvanized screws with plate head(ST4*12) on the honeycomb holder.Remove the honeycomb holder.Remove the honeycomb cooling media from the left side panel.2.2 How To Change SwitchRemove the back panel and follow the procedure 2.1.1Remove the right-side panel and follow procedure 2.1.32.2.1. Switch BoxUse a screw driver to remove 4 galvanized screws with plate head(ST3*12) on the switch box.Remove switch box.2.2.2. Switch(cool/speed/swing)Use screw driver to remove 2 galvanized screws (ST3X10) on each switch of the control panel(cool/speed/swing).Cool switchSpeed switchSwing switch2.2.3. Wiring Color ConnectionWiring color connection refers to part 4.2 Wiring Color Description.2.3 How To Change Water PumpRemove the back panel and follow the procedure 2.1.1Remove the right-side panel and follow procedure 2.1.3Remove the switch box and follow the procedure 2.2.12.3.1 Water pump pipe and water pump clip.Remove the water pump pipe.Use a screw driver to remove 2 SS screws(ST4*12) on the water pump clip.2.3.2 Cool Switch And Wiring ConnectorUse a screwdriver to remove 2 galvanized screws (ST3X10) on the cool switch of the control panel.Remove the brown wire on the cool switch.Remove the wiring cap (below picture shown) to get the water pump.Note: connection is between the water pump and the N wire of the power cord.2.3.3 Water Pump Wiring ConnectionThe water pump wiring connection refers to part 4.2 Wiring Color Description.2.4 How To Change Fan MotorRemove the back panel and follow the procedure 2.1.1Remove the right-side panel and follow procedure 2.1.3Remove the switch box and follow the procedure 2.2.12.4.1 Speed Switch And Wiring Connector.Use a screwdriver to remove 2 galvanized screws (ST3X10) on the speed switch of the control panel.Remove the white/yellow/blue wire on the speed switch.Remove the wiring cap (below picture shown).Note: connection is between fan motor COM wire(black) and N wire of power cord.Remove the wiring cap (below picture shown).Note: connection is between motor and power cord earth wire.Remove the wiring cap (below picture shown).Note: connection is between the capacitor and the motor.Remove the wiring cap (below picture shown).Note: connection is between capacitor and the motor.2.4.2 Fan Blade And Fan MotorUse a screwdriver to remove 1galvanized screws (M6X14) on the fan blade.Remove the fan blade.Use a screw driver to remove 8 galvanized screws (M5X12) on fan motor to get the fanmotor.2.4.3 Main Motor Wiring ConnectionMain motor wiring connection refers to part 4.2 Wiring Color Description.2.5 How To Change Swing MotorRemove the back panel and follow the procedure 2.1.1Remove the right-side panel and follow procedure 2.1.3Remove the switch box and follow the procedure 2.2.12.5.1 Swing Switch And Wiring Connector.Use a screwdriver to remove 2 galvanized screws (ST3X10) on the swing switch of the control panel.Remove the pink wire on the swing switch.Remove the wiring cap (below picture shown).Note: connection is between swing motor and N wire of power cord.2.5.2 Swing Motor And Swing Motor Wheel.Use a screwdriver to remove 2 galvanized screws(ST4X12) on the swing motor.Remove the swing motor.Use screwdriver to remove 1 galvanized screw(ST3*8) on the swing motor wheel.Remove the swing motor wheel.Get the swing motor.2.5.3 Swing Motor Wiring ConnectionSwing motor wiring connection refers to part 4.2 Wiring Color Description.TROUBLESHOOTING GUIDE3.1 Outside DimensionsWidth: 700 mm (27.56’’)Depth: 466 mm (18.35’’)Height: 1017 mm (40.0’’)3.2 Cooling SystemHoneywell Evaporative Air Coolers are built to maximize energy efficiency and keep costs low. Warm air is drawn into the cooler through a dust and odor-reducing carbon filter and enters the Honeycomb Cooling Media. Water pumped from the tank pours over the honeycomb media. As the warm air passes through the media, the water absorbs the heat, naturally cooling and humidifying the air. A fan propels the cooled air out into the room. This no-compressor system cools naturally, efficiently and inexpensively.Troubleshooting GuideThe following troubleshooting guide is intended to address the most common symptoms and is by no means exhaustive. If symptoms persist, call a qualified service provider. Only a certified electrician should complete any electrical work. Unplug and disconnect the appliance from the power source before attempting to troubleshoot any of the following symptoms.ProblemPossible CauseSolutionNo discharge of airThe cord is not plugged in.Make sure the power cord is plugged in and the supply switch is on.The power is not on.Turn the unit ON.Humidity output minimal to noneWater is below the minimum water level in the tank.Turn off the unit.Follow the instructions to fill the water tank with clean water.The water pump is damaged.Replace the water pump according to procedure 2.3.Watercolor yellowish at initial useColor fasts from honeycomb filter.This is natural. After several uses, the watercolor will be clean.Abnormal noise inside the productThe noise of the water pump when water is not up-to-min water level. the product again.Turn off the product. Add water, and then turn onMotor or blade problem.Turn off and unplug the product or change the main motor according to procedure 2.4.Musty or unpleasant odorWhen the Cooler is new.When the unit is used for the first time, the Honeycomb Cooling Media will have an odor, which will dissipate within a few hours of initial use.Stale or stagnant water in the water tank.Drain, flush and clean the water tankMedia mildewed or clogged.Replace media according to the procedure 2.1.Not coolingPump is not turned on.Check the water level and turn on the pump.Low or no water.Damaged water pump.Replace the water pump according to procedure 2.3.SCHEMATIC DIAGRAM4.1 Wiring Diagram4.2 Wiring Color DescriptionPower Cord:(1) Brown(2) Blue(3) Green + YellowLiveNeutralEarth (Ground)to speed switch(4)motor COM(black)to motor earthMain Motor:(1) White(2) Yellow(3) Blue(4) Black(5) Red(6) Brown(7) Green + YellowHigh speedMedium speedLow speedNeutralEarth (Ground)to speed switch(1)to speed switch(2)to speed switch(3)to N wire of power cordto the capacitor by end-closed connectorto the capacitor by end-closed connectorto power cord earthWater Pump:(1) Brown(2) Blueto pump control switch(1)to N wire of power cordSwing Motor:(1) Pink(2) Pinkto swing control switch(1)to N wire of power cordEXPLODED VIEWREPLACEMENT PARTS LISTSrPART NAMEQUANTITY1Up/Down swing knob22Swing knob pressboard13Horizontal louver 124Horizontal louver 225Horizontal louver 326Horizontal louver 427Horizontal louver 528Horizontal louver middle link19Horizontal louver press board A210Horizontal louver link A211Horizontal louver press board B212Horizontal louver link B213Swing/Cool knob214Speed knob115Control plane116Swing/Cool switch217Speed switch118Air outlet panel119Front panel120Rubber washer2021Vertical louver base422Short vertical louver223Long vertical louver224Switch box125Side panel226Side honeycomb pad227Side water distributor cover228Side water distributor229Side honeycomb pad holder430Swing motor131Swing motor wheel132Vertical louver drive133Base of fan motor frame234Fan motor frame435Fan blade assembly136Fan motor137Top cover138Water fill door139Four directions pipe140Back water distributor tube141Left/Right water distributor tube242Water fill door link243Back water distributor144Back water distributor cover145Left stand pillar146Back honeycomb pad holder247Back honeycomb pad148Back panel149Right stand pillar150Motor capacitor151Suction pipe152Water fill pipe153Float cap154Float holder155Float tube156Water level board157Vertical louver link158Water tank159Water pump160Water pump clip161Continuous water supply connection162Castor263Castor with brake264Water drainage plug165Silica gel ring1CONFIDENTIALWebsite: http://www.honeywellaircoolers.comDownloaded from www.Manualslib.com manuals search engineDocuments / ResourcesHoneywell CO60PM Evaporative Air Cooler [pdf] Instruction ManualCO60PM, Evaporative Air Cooler, CO60PM Evaporative Air Cooler, Air Cooler, CoolerReferencesUser ManualRelated PostsEvaporative Air Cooler With Humidifier SF-615H User ManualEvaporative Air Cooler With Humidifier SF-615H User Manual - Optimized PDF Evaporative Air Cooler With Humidifier SF-615H User…Honeywell TC10PM Series Portable Evaporative Air Cooler User ManualHoneywell TC10PM Series Portable Evaporative Air Cooler Portable Evaporative Air Cooler User Manual Read and save these instructions…kogan KAPMNCL4BA Mini Evaporative Air Cooler User Guidekogan KAPMNCL4BA Mini Evaporative Air Cooler SAFETY & WARNINGS Ensure to read this user guide prior to first…COOLER MASTER Hyper T200 CPU Air Cooler User ManualCOOLER MASTER Hyper T200 CPU Air Cooler IN THE BOX INTEL & AMD AMD AM4/AM3+/AM3/AM2+/AM2/FM2+/FM2/FM1 Intel - LGA1151/1150/1155/1156/1366/775…
FILL WATER:Water can be filled into the air cooler by:Water Inlet (Manually)Water / Ice can be put into the tank through the top opening. There is a hole for water to flow into the tank.Continuous water supply (Auto-Refill)Connect a garden hose to the continuous water supply inlet.
2.5.2 Swing Motor And Swing Motor Wheel.Use a screwdriver to remove 2 galvanized screws(ST4X12) on the swing motor.Remove the swing motor.Use screwdriver to remove 1 galvanized screw(ST3*8) on the swing motor wheel.Remove the swing motor wheel.Get the swing motor.2.5.3 Swing Motor Wiring ConnectionSwing motor wiring connection refers to part 4.2 Wiring Color Description.TROUBLESHOOTING GUIDE3.1 Outside DimensionsWidth: 700 mm (27.56’’)Depth: 466 mm (18.35’’)Height: 1017 mm (40.0’’)3.2 Cooling SystemHoneywell Evaporative Air Coolers are built to maximize energy efficiency and keep costs low. Warm air is drawn into the cooler through a dust and odor-reducing carbon filter and enters the Honeycomb Cooling Media. Water pumped from the tank pours over the honeycomb media. As the warm air passes through the media, the water absorbs the heat, naturally cooling and humidifying the air. A fan propels the cooled air out into the room. This no-compressor system cools naturally, efficiently and inexpensively.Troubleshooting GuideThe following troubleshooting guide is intended to address the most common symptoms and is by no means exhaustive. If symptoms persist, call a qualified service provider. Only a certified electrician should complete any electrical work. Unplug and disconnect the appliance from the power source before attempting to troubleshoot any of the following symptoms.ProblemPossible CauseSolutionNo discharge of airThe cord is not plugged in.Make sure the power cord is plugged in and the supply switch is on.The power is not on.Turn the unit ON.Humidity output minimal to noneWater is below the minimum water level in the tank.Turn off the unit.Follow the instructions to fill the water tank with clean water.The water pump is damaged.Replace the water pump according to procedure 2.3.Watercolor yellowish at initial useColor fasts from honeycomb filter.This is natural. After several uses, the watercolor will be clean.Abnormal noise inside the productThe noise of the water pump when water is not up-to-min water level. the product again.Turn off the product. Add water, and then turn onMotor or blade problem.Turn off and unplug the product or change the main motor according to procedure 2.4.Musty or unpleasant odorWhen the Cooler is new.When the unit is used for the first time, the Honeycomb Cooling Media will have an odor, which will dissipate within a few hours of initial use.Stale or stagnant water in the water tank.Drain, flush and clean the water tankMedia mildewed or clogged.Replace media according to the procedure 2.1.Not coolingPump is not turned on.Check the water level and turn on the pump.Low or no water.Damaged water pump.Replace the water pump according to procedure 2.3.SCHEMATIC DIAGRAM4.1 Wiring Diagram4.2 Wiring Color DescriptionPower Cord:(1) Brown(2) Blue(3) Green + YellowLiveNeutralEarth (Ground)to speed switch(4)motor COM(black)to motor earthMain Motor:(1) White(2) Yellow(3) Blue(4) Black(5) Red(6) Brown(7) Green + YellowHigh speedMedium speedLow speedNeutralEarth (Ground)to speed switch(1)to speed switch(2)to speed switch(3)to N wire of power cordto the capacitor by end-closed connectorto the capacitor by end-closed connectorto power cord earthWater Pump:(1) Brown(2) Blueto pump control switch(1)to N wire of power cordSwing Motor:(1) Pink(2) Pinkto swing control switch(1)to N wire of power cordEXPLODED VIEWREPLACEMENT PARTS LISTSrPART NAMEQUANTITY1Up/Down swing knob22Swing knob pressboard13Horizontal louver 124Horizontal louver 225Horizontal louver 326Horizontal louver 427Horizontal louver 528Horizontal louver middle link19Horizontal louver press board A210Horizontal louver link A211Horizontal louver press board B212Horizontal louver link B213Swing/Cool knob214Speed knob115Control plane116Swing/Cool switch217Speed switch118Air outlet panel119Front panel120Rubber washer2021Vertical louver base422Short vertical louver223Long vertical louver224Switch box125Side panel226Side honeycomb pad227Side water distributor cover228Side water distributor229Side honeycomb pad holder430Swing motor131Swing motor wheel132Vertical louver drive133Base of fan motor frame234Fan motor frame435Fan blade assembly136Fan motor137Top cover138Water fill door139Four directions pipe140Back water distributor tube141Left/Right water distributor tube242Water fill door link243Back water distributor144Back water distributor cover145Left stand pillar146Back honeycomb pad holder247Back honeycomb pad148Back panel149Right stand pillar150Motor capacitor151Suction pipe152Water fill pipe153Float cap154Float holder155Float tube156Water level board157Vertical louver link158Water tank159Water pump160Water pump clip161Continuous water supply connection162Castor263Castor with brake264Water drainage plug165Silica gel ring1CONFIDENTIALWebsite: http://www.honeywellaircoolers.comDownloaded from www.Manualslib.com manuals search engineDocuments / ResourcesHoneywell CO60PM Evaporative Air Cooler [pdf] Instruction ManualCO60PM, Evaporative Air Cooler, CO60PM Evaporative Air Cooler, Air Cooler, CoolerReferencesUser ManualRelated PostsEvaporative Air Cooler With Humidifier SF-615H User ManualEvaporative Air Cooler With Humidifier SF-615H User Manual - Optimized PDF Evaporative Air Cooler With Humidifier SF-615H User…Honeywell TC10PM Series Portable Evaporative Air Cooler User ManualHoneywell TC10PM Series Portable Evaporative Air Cooler Portable Evaporative Air Cooler User Manual Read and save these instructions…kogan KAPMNCL4BA Mini Evaporative Air Cooler User Guidekogan KAPMNCL4BA Mini Evaporative Air Cooler SAFETY & WARNINGS Ensure to read this user guide prior to first…COOLER MASTER Hyper T200 CPU Air Cooler User ManualCOOLER MASTER Hyper T200 CPU Air Cooler IN THE BOX INTEL & AMD AMD AM4/AM3+/AM3/AM2+/AM2/FM2+/FM2/FM1 Intel - LGA1151/1150/1155/1156/1366/775…
NOTE:The speed control may be marked as High/Med/Low in certain units.Operation Instructions: Cooler Location:Place the cooler in front of an open door or window. Ensure that there is adequate cross–ventilation in the room by leaving a door or window open opposite the cooler. Following these guidelines will ensure your cooler will work as effectively as possible.Not an Air Conditioner:The evaporative air cooler is not an air conditioner as it does not use a compressor or refrigerant gas. It should not be expected to cool as efficiently as a refrigerated air conditioner. The recommended maximum relative humidity level is 60% or less, which allows a noticeable temperature decrease. The temperature decrease will be greater in drier climates because higher evaporation occurs when the humidity is low.The evaporative air cooler should not be used in enclosed spaces. It must be kept level and there must be water in the water tank. The room should have doors and windows opened to allow free airflow. The evaporative air cooler works best when placed near an open window so that outside air is drawn into the evaporative air cooler, the air circulates in the room, and then exits via the door. The maximum cooling effect is felt when a person is in the flow of air coming out of the evaporative air cooler.The evaporative air cooler can also be used to humidify dry air during cool weather. To be used for humidification the windows and doors should be closed to allow the humidified air to accumulate. The evaporative air cooler is not an air conditioner as it does not use a compressor or refrigerant gas. It should not be expected to cool as efficiently as a refrigerated air conditioner.NOTE: When the product is used for the first time the Honeycomb Cooling Media will have an odor that will dissipate in a week or so of initial use.FILL WATER:Water can be filled into the air cooler by:Water Inlet (Manually)Water / Ice can be put into the tank through the top opening. There is a hole for water to flow into the tank.Continuous water supply (Auto-Refill)Connect a garden hose to the continuous water supply inlet.Water Inlet (Manually)To refill the water tank, pull out the Water Fill Door located on the top of the unit and fill water to the Max, as indicated on the Water Level Indicator.Do not fill water above the Max water level mark.For maximum cooling performance, put ice cubes inside the Ice Loading Compartment located on the top of the Air Cooler.Filling With Water (Continuous Water Supply Connection)CAUTION Unplug from power source before fillingThis automated process eliminates the need to manually refill the water tank.Securely connect the continuous water supply connector (located on the lower left side panel) to the water supply.Turn on the water.The water tank will refill automatically.The water float valve will detect the water level and will automatically start or stop the water flow.Plug the unit into the power supply and turn the unit on.Installing Hose Adapter And Float ValveConnect the garden hose to the water supply connectorVerify that connections are secure and turn on the water.Control KnobsSpeed / On – OffConnect to the power supply and turn the Speed knob. The fan will start. Change the speed from 1 for Low to 2 for Medium to 3 for High. To switch OFF the unit turn the Speed knob to “0”.CoolTo begin cooling the desired area turn the “COOL” switch ON. The water pump will operate. You can feel the cooler air after the Honeycomb media is completely wet.SwingVertical LouversTurn the “SWING” switch ON. The louvers will begin to move from right to left automatically. Manually adjust the horizontal louvers to change vertical airflow.Horizontal LouversManually adjust the horizontal louvers to change vertical airflow.CLEANING & MAINTENANCEImportant – Please Read!The cooler is supplied with Honeycomb Cooling Media.The cleaning frequency for the Honeycomb media depends on local air and water conditions. In areas where the mineral content of water is high, mineral deposits may build up on the Honeycomb Cooling Media and restrict airflow. Draining the water reservoir and refilling it with fresh water at least once a week will help reduce mineral deposits. If mineral deposits remain on the Honeycomb media, the media should be removed and washed under fresh water. The media should be cleaned every two months or sooner, depending on your needs.Do not run the unit in COOL mode with stale water in the tank. Empty the tank and refill it with fresh water if the water has been standing in the tank for an extended period of time.For best results, allow the Honeycomb Cooling Media to dry after each use by turning off the cool function 15 minutes before turning the unit off.WARNINGBefore cleaning, turn the unit off and disconnect from the power source.Use a damp cloth to remove dirt and dust from the outside of the unit.Never use abrasive cleaners.When the unit is not in use, store it in a dry place, out of direct sunlight.Maximum water inlet pressure 0.5 MPa.Draining and Cleaning The Water TankTurn the power “off’ and disconnect the air cooler from the power supply.Move the unit to a location where it can be drained.Remove the drain plug and allow the tank to empty.Refill the water tank up to the maximum level with clean water and drain it completely.Fill the water tank and rinse at least 2-3 times before use.After cleaning ensure that the drain plug is back in place.Plug into the power supply and turn on the unit.Cleaning The Honeycomb Cooling MediaTurn off the unit, and unplug the power cord from the wall outlet.Rotate the unit facing the back panel, and locate the Grill Removal Screws. Remove the 4 screws with a screwdriver.Pull the rear grill panel, until it is completely removed.This cooler has Honeycomb cooling media on the right and left panels. The cleaning and removal procedure is the same as the rear panel.The Honeycomb cooling media can now be seen. Clean honeycomb with a clean cloth to remove all the dust & dirt particles.Once cleaning is finished, reassemble the unit.Plug into the power supply and turn on the unit.The air cooler is now ready to be used. This cleaning process should be repeated monthly to maintain the integrity of the unit and to remove particles filtered from the air.DISASSEMBLY INSTRUCTIONSWARNING – Before the following disassembly, POWER is set to OFF and disconnected the power cord.2.1 How To Change Honeycomb Cooling Media(3 sides)2.1.1 Back Panel.Use a screwdriver to remove 5 galvanized screws with plate head (ST4*12) on the back panel.Remove the back panel.2.1.2 Back Honeycomb Cooling Media.Use screwdriver to remove 4 galvanized screws with plate head(ST4*12) on the honeycomb holder.Remove the honeycomb holder.Remove the honeycomb cooling media from the back panel.2.1.3 Right Side Panel.Use a screwdriver to remove 4 galvanized screws with plate head (ST4*12) on the right-side panel.Remove the right side panel.2.1.4 Right Side Honeycomb Cooling Media.Use screwdriver to remove 4 galvanized screws with plate head(ST4*12) on the honeycomb holder.Remove the honeycomb holder.Remove the honeycomb cooling media from the right side panel.2.1.5 Left Side Panel.Use screwdriver to remove 4 galvanized screws with plate head (ST4*12) on the left side panel.Remove the left side panel.2.1.6 Left Side Honeycomb Cooling Media.Use a screwdriver to remove 4 galvanized screws with plate head(ST4*12) on the honeycomb holder.Remove the honeycomb holder.Remove the honeycomb cooling media from the left side panel.2.2 How To Change SwitchRemove the back panel and follow the procedure 2.1.1Remove the right-side panel and follow procedure 2.1.32.2.1. Switch BoxUse a screw driver to remove 4 galvanized screws with plate head(ST3*12) on the switch box.Remove switch box.2.2.2. Switch(cool/speed/swing)Use screw driver to remove 2 galvanized screws (ST3X10) on each switch of the control panel(cool/speed/swing).Cool switchSpeed switchSwing switch2.2.3. Wiring Color ConnectionWiring color connection refers to part 4.2 Wiring Color Description.2.3 How To Change Water PumpRemove the back panel and follow the procedure 2.1.1Remove the right-side panel and follow procedure 2.1.3Remove the switch box and follow the procedure 2.2.12.3.1 Water pump pipe and water pump clip.Remove the water pump pipe.Use a screw driver to remove 2 SS screws(ST4*12) on the water pump clip.2.3.2 Cool Switch And Wiring ConnectorUse a screwdriver to remove 2 galvanized screws (ST3X10) on the cool switch of the control panel.Remove the brown wire on the cool switch.Remove the wiring cap (below picture shown) to get the water pump.Note: connection is between the water pump and the N wire of the power cord.2.3.3 Water Pump Wiring ConnectionThe water pump wiring connection refers to part 4.2 Wiring Color Description.2.4 How To Change Fan MotorRemove the back panel and follow the procedure 2.1.1Remove the right-side panel and follow procedure 2.1.3Remove the switch box and follow the procedure 2.2.12.4.1 Speed Switch And Wiring Connector.Use a screwdriver to remove 2 galvanized screws (ST3X10) on the speed switch of the control panel.Remove the white/yellow/blue wire on the speed switch.Remove the wiring cap (below picture shown).Note: connection is between fan motor COM wire(black) and N wire of power cord.Remove the wiring cap (below picture shown).Note: connection is between motor and power cord earth wire.Remove the wiring cap (below picture shown).Note: connection is between the capacitor and the motor.Remove the wiring cap (below picture shown).Note: connection is between capacitor and the motor.2.4.2 Fan Blade And Fan MotorUse a screwdriver to remove 1galvanized screws (M6X14) on the fan blade.Remove the fan blade.Use a screw driver to remove 8 galvanized screws (M5X12) on fan motor to get the fanmotor.2.4.3 Main Motor Wiring ConnectionMain motor wiring connection refers to part 4.2 Wiring Color Description.2.5 How To Change Swing MotorRemove the back panel and follow the procedure 2.1.1Remove the right-side panel and follow procedure 2.1.3Remove the switch box and follow the procedure 2.2.12.5.1 Swing Switch And Wiring Connector.Use a screwdriver to remove 2 galvanized screws (ST3X10) on the swing switch of the control panel.Remove the pink wire on the swing switch.Remove the wiring cap (below picture shown).Note: connection is between swing motor and N wire of power cord.2.5.2 Swing Motor And Swing Motor Wheel.Use a screwdriver to remove 2 galvanized screws(ST4X12) on the swing motor.Remove the swing motor.Use screwdriver to remove 1 galvanized screw(ST3*8) on the swing motor wheel.Remove the swing motor wheel.Get the swing motor.2.5.3 Swing Motor Wiring ConnectionSwing motor wiring connection refers to part 4.2 Wiring Color Description.TROUBLESHOOTING GUIDE3.1 Outside DimensionsWidth: 700 mm (27.56’’)Depth: 466 mm (18.35’’)Height: 1017 mm (40.0’’)3.2 Cooling SystemHoneywell Evaporative Air Coolers are built to maximize energy efficiency and keep costs low. Warm air is drawn into the cooler through a dust and odor-reducing carbon filter and enters the Honeycomb Cooling Media. Water pumped from the tank pours over the honeycomb media. As the warm air passes through the media, the water absorbs the heat, naturally cooling and humidifying the air. A fan propels the cooled air out into the room. This no-compressor system cools naturally, efficiently and inexpensively.Troubleshooting GuideThe following troubleshooting guide is intended to address the most common symptoms and is by no means exhaustive. If symptoms persist, call a qualified service provider. Only a certified electrician should complete any electrical work. Unplug and disconnect the appliance from the power source before attempting to troubleshoot any of the following symptoms.ProblemPossible CauseSolutionNo discharge of airThe cord is not plugged in.Make sure the power cord is plugged in and the supply switch is on.The power is not on.Turn the unit ON.Humidity output minimal to noneWater is below the minimum water level in the tank.Turn off the unit.Follow the instructions to fill the water tank with clean water.The water pump is damaged.Replace the water pump according to procedure 2.3.Watercolor yellowish at initial useColor fasts from honeycomb filter.This is natural. After several uses, the watercolor will be clean.Abnormal noise inside the productThe noise of the water pump when water is not up-to-min water level. the product again.Turn off the product. Add water, and then turn onMotor or blade problem.Turn off and unplug the product or change the main motor according to procedure 2.4.Musty or unpleasant odorWhen the Cooler is new.When the unit is used for the first time, the Honeycomb Cooling Media will have an odor, which will dissipate within a few hours of initial use.Stale or stagnant water in the water tank.Drain, flush and clean the water tankMedia mildewed or clogged.Replace media according to the procedure 2.1.Not coolingPump is not turned on.Check the water level and turn on the pump.Low or no water.Damaged water pump.Replace the water pump according to procedure 2.3.SCHEMATIC DIAGRAM4.1 Wiring Diagram4.2 Wiring Color DescriptionPower Cord:(1) Brown(2) Blue(3) Green + YellowLiveNeutralEarth (Ground)to speed switch(4)motor COM(black)to motor earthMain Motor:(1) White(2) Yellow(3) Blue(4) Black(5) Red(6) Brown(7) Green + YellowHigh speedMedium speedLow speedNeutralEarth (Ground)to speed switch(1)to speed switch(2)to speed switch(3)to N wire of power cordto the capacitor by end-closed connectorto the capacitor by end-closed connectorto power cord earthWater Pump:(1) Brown(2) Blueto pump control switch(1)to N wire of power cordSwing Motor:(1) Pink(2) Pinkto swing control switch(1)to N wire of power cordEXPLODED VIEWREPLACEMENT PARTS LISTSrPART NAMEQUANTITY1Up/Down swing knob22Swing knob pressboard13Horizontal louver 124Horizontal louver 225Horizontal louver 326Horizontal louver 427Horizontal louver 528Horizontal louver middle link19Horizontal louver press board A210Horizontal louver link A211Horizontal louver press board B212Horizontal louver link B213Swing/Cool knob214Speed knob115Control plane116Swing/Cool switch217Speed switch118Air outlet panel119Front panel120Rubber washer2021Vertical louver base422Short vertical louver223Long vertical louver224Switch box125Side panel226Side honeycomb pad227Side water distributor cover228Side water distributor229Side honeycomb pad holder430Swing motor131Swing motor wheel132Vertical louver drive133Base of fan motor frame234Fan motor frame435Fan blade assembly136Fan motor137Top cover138Water fill door139Four directions pipe140Back water distributor tube141Left/Right water distributor tube242Water fill door link243Back water distributor144Back water distributor cover145Left stand pillar146Back honeycomb pad holder247Back honeycomb pad148Back panel149Right stand pillar150Motor capacitor151Suction pipe152Water fill pipe153Float cap154Float holder155Float tube156Water level board157Vertical louver link158Water tank159Water pump160Water pump clip161Continuous water supply connection162Castor263Castor with brake264Water drainage plug165Silica gel ring1CONFIDENTIALWebsite: http://www.honeywellaircoolers.comDownloaded from www.Manualslib.com manuals search engineDocuments / ResourcesHoneywell CO60PM Evaporative Air Cooler [pdf] Instruction ManualCO60PM, Evaporative Air Cooler, CO60PM Evaporative Air Cooler, Air Cooler, CoolerReferencesUser ManualRelated PostsEvaporative Air Cooler With Humidifier SF-615H User ManualEvaporative Air Cooler With Humidifier SF-615H User Manual - Optimized PDF Evaporative Air Cooler With Humidifier SF-615H User…Honeywell TC10PM Series Portable Evaporative Air Cooler User ManualHoneywell TC10PM Series Portable Evaporative Air Cooler Portable Evaporative Air Cooler User Manual Read and save these instructions…kogan KAPMNCL4BA Mini Evaporative Air Cooler User Guidekogan KAPMNCL4BA Mini Evaporative Air Cooler SAFETY & WARNINGS Ensure to read this user guide prior to first…COOLER MASTER Hyper T200 CPU Air Cooler User ManualCOOLER MASTER Hyper T200 CPU Air Cooler IN THE BOX INTEL & AMD AMD AM4/AM3+/AM3/AM2+/AM2/FM2+/FM2/FM1 Intel - LGA1151/1150/1155/1156/1366/775…
1.4 Warning & Safety RulesWARNING – This appliance is intended for use outdoors, in the home, or in office environments. Any other use is not recommended by the manufacturer and may cause fire, electrical shocks, or injury to a person or property.When using electrical appliances, basic safety precautions should always be followed:Your cooler should run on 120V Volt AC, 50 Hz current only.Check the household voltage to ensure it matches the appliance’s rate specification.Before operating the product remove it from its packaging and check it is in good condition.If the supply cord is damaged, it must be replaced by the manufacturer, its service agent or similarly qualified persons in order to avoid a hazard.DO NOT operate any product with a damaged cord or plug.DO NOT use an extension cord with this appliance.DO NOT run power cord under carpeting, or cover with rugs or runners. Arrange the cord away from areas where it may be tripped over.Unplug the appliance during filling and cleaning.Always unplug the appliance from the power source before servicing or removing the unit.Disconnect the power supply before servicing or cleaning operation.Remove the power cord from the electrical receptacle by grasping and pulling on the power cord plug-end only, never from the cord.DO NOT use the product in areas where gasoline, paint or other flammable goods and objects are stored.When using the ‘’COOL’’ setting, please check the water indicator level to ensure it is above the minimum water level. Operation of this unit on the ‘’COOL’’ setting on or below minimum water level could result in damage to the water pump.DO NOT attempt repair or adjustment to any electrical or mechanical functions of the cooler.Verify that the voltage power source matches the appliance’s electrical specifications. The improper voltage will burn out the blower/fan, oscillating, and/or pump motor windings and will void the warranty.DO NOT cover the air inlet or outlet on the appliance as this may cause motor damage.DO NOT insert or allow objects to enter any ventilation, exhaust opening, or water tank as this may damage the product and could cause an electrical shock or fire.DO NOT operate with media removed as this will overload and damage the motor.To reduce the risk of fire or electric shock, do not use this fan with any solid-state speed control device.DO NOT leave the appliance operating unattended for any extended period of time.This appliance is not intended for use by persons (including children or the elderly) with reduced physical, sensory or mental capabilities, or lack of experience and knowledge unless they have been given supervision or instruction concerning the use of the appliance by a person responsible for their safety.DO NOT let children play with any appliance packaging or plastic bags. Injury may resultfrom such practice.Children should be supervised to ensure that they do not play with the appliance.If the unit is damaged or it malfunctions, do not continue to operate it.Place the unit on the floor only.This product is not intended for use in wet or damp locations. Never locate the product where it may fall into a bathtub or other water container. DO NOT use in bathrooms. When it is not in use always store in a dry area.Don’t use indoor extension cords outside. Look for extension cords specifically marked for outdoor use. Look for extension cords that have a GFCI (Ground Fault Circuit Interrupter) built in.Make sure the amperage rating for the extension cord is higher than the amperage rating for the appliance. Check labels and owner’s manuals on the appliance and the extension cord for amperage ratings.Power cords have to be contained. If they must run along the ground, make sure every inch of them is secured so they will not be tripped over.The wiring and connections must be waterproof. Be sure the connections (to the air cooler) never get wet. Your unit is waterproof, but everything attached to it must be waterproof, too.Set up your unit so it cannot be tripped over or wobble loose. It must rest on solid support.NOTE: OPERATE THE UNIT WHEN THE WATER TANK IS FILLED WITH CLEAN WATER1.5 Parts Description1 Water Inlet and Ice2 Handle3 Left Honeycomb Panel4 Lever for Horizontal Louvers5 Water Tank6 Casters7 Horizontal Louvers8 Water Level Indicator9 Control Panel Loading Compartment10 Right Honeycomb Panel11 Continuous Water Supply Connection12 Drain Plug13 Backside Honeycomb Panel14 Power Cord & Plug15 Rear Grill Removal Screws16 Water Fill Door17 Honeycomb Cooling Media18 Water Inlet (Optional) for manual refill 1.6 OperationsControl Panel:NOTE:The speed control may be marked as High/Med/Low in certain units.Operation Instructions: Cooler Location:Place the cooler in front of an open door or window. Ensure that there is adequate cross–ventilation in the room by leaving a door or window open opposite the cooler. Following these guidelines will ensure your cooler will work as effectively as possible.Not an Air Conditioner:The evaporative air cooler is not an air conditioner as it does not use a compressor or refrigerant gas. It should not be expected to cool as efficiently as a refrigerated air conditioner. The recommended maximum relative humidity level is 60% or less, which allows a noticeable temperature decrease. The temperature decrease will be greater in drier climates because higher evaporation occurs when the humidity is low.The evaporative air cooler should not be used in enclosed spaces. It must be kept level and there must be water in the water tank. The room should have doors and windows opened to allow free airflow. The evaporative air cooler works best when placed near an open window so that outside air is drawn into the evaporative air cooler, the air circulates in the room, and then exits via the door. The maximum cooling effect is felt when a person is in the flow of air coming out of the evaporative air cooler.The evaporative air cooler can also be used to humidify dry air during cool weather. To be used for humidification the windows and doors should be closed to allow the humidified air to accumulate. The evaporative air cooler is not an air conditioner as it does not use a compressor or refrigerant gas. It should not be expected to cool as efficiently as a refrigerated air conditioner.NOTE: When the product is used for the first time the Honeycomb Cooling Media will have an odor that will dissipate in a week or so of initial use.FILL WATER:Water can be filled into the air cooler by:Water Inlet (Manually)Water / Ice can be put into the tank through the top opening. There is a hole for water to flow into the tank.Continuous water supply (Auto-Refill)Connect a garden hose to the continuous water supply inlet.Water Inlet (Manually)To refill the water tank, pull out the Water Fill Door located on the top of the unit and fill water to the Max, as indicated on the Water Level Indicator.Do not fill water above the Max water level mark.For maximum cooling performance, put ice cubes inside the Ice Loading Compartment located on the top of the Air Cooler.Filling With Water (Continuous Water Supply Connection)CAUTION Unplug from power source before fillingThis automated process eliminates the need to manually refill the water tank.Securely connect the continuous water supply connector (located on the lower left side panel) to the water supply.Turn on the water.The water tank will refill automatically.The water float valve will detect the water level and will automatically start or stop the water flow.Plug the unit into the power supply and turn the unit on.Installing Hose Adapter And Float ValveConnect the garden hose to the water supply connectorVerify that connections are secure and turn on the water.Control KnobsSpeed / On – OffConnect to the power supply and turn the Speed knob. The fan will start. Change the speed from 1 for Low to 2 for Medium to 3 for High. To switch OFF the unit turn the Speed knob to “0”.CoolTo begin cooling the desired area turn the “COOL” switch ON. The water pump will operate. You can feel the cooler air after the Honeycomb media is completely wet.SwingVertical LouversTurn the “SWING” switch ON. The louvers will begin to move from right to left automatically. Manually adjust the horizontal louvers to change vertical airflow.Horizontal LouversManually adjust the horizontal louvers to change vertical airflow.CLEANING & MAINTENANCEImportant – Please Read!The cooler is supplied with Honeycomb Cooling Media.The cleaning frequency for the Honeycomb media depends on local air and water conditions. In areas where the mineral content of water is high, mineral deposits may build up on the Honeycomb Cooling Media and restrict airflow. Draining the water reservoir and refilling it with fresh water at least once a week will help reduce mineral deposits. If mineral deposits remain on the Honeycomb media, the media should be removed and washed under fresh water. The media should be cleaned every two months or sooner, depending on your needs.Do not run the unit in COOL mode with stale water in the tank. Empty the tank and refill it with fresh water if the water has been standing in the tank for an extended period of time.For best results, allow the Honeycomb Cooling Media to dry after each use by turning off the cool function 15 minutes before turning the unit off.WARNINGBefore cleaning, turn the unit off and disconnect from the power source.Use a damp cloth to remove dirt and dust from the outside of the unit.Never use abrasive cleaners.When the unit is not in use, store it in a dry place, out of direct sunlight.Maximum water inlet pressure 0.5 MPa.Draining and Cleaning The Water TankTurn the power “off’ and disconnect the air cooler from the power supply.Move the unit to a location where it can be drained.Remove the drain plug and allow the tank to empty.Refill the water tank up to the maximum level with clean water and drain it completely.Fill the water tank and rinse at least 2-3 times before use.After cleaning ensure that the drain plug is back in place.Plug into the power supply and turn on the unit.Cleaning The Honeycomb Cooling MediaTurn off the unit, and unplug the power cord from the wall outlet.Rotate the unit facing the back panel, and locate the Grill Removal Screws. Remove the 4 screws with a screwdriver.Pull the rear grill panel, until it is completely removed.This cooler has Honeycomb cooling media on the right and left panels. The cleaning and removal procedure is the same as the rear panel.The Honeycomb cooling media can now be seen. Clean honeycomb with a clean cloth to remove all the dust & dirt particles.Once cleaning is finished, reassemble the unit.Plug into the power supply and turn on the unit.The air cooler is now ready to be used. This cleaning process should be repeated monthly to maintain the integrity of the unit and to remove particles filtered from the air.DISASSEMBLY INSTRUCTIONSWARNING – Before the following disassembly, POWER is set to OFF and disconnected the power cord.2.1 How To Change Honeycomb Cooling Media(3 sides)2.1.1 Back Panel.Use a screwdriver to remove 5 galvanized screws with plate head (ST4*12) on the back panel.Remove the back panel.2.1.2 Back Honeycomb Cooling Media.Use screwdriver to remove 4 galvanized screws with plate head(ST4*12) on the honeycomb holder.Remove the honeycomb holder.Remove the honeycomb cooling media from the back panel.2.1.3 Right Side Panel.Use a screwdriver to remove 4 galvanized screws with plate head (ST4*12) on the right-side panel.Remove the right side panel.2.1.4 Right Side Honeycomb Cooling Media.Use screwdriver to remove 4 galvanized screws with plate head(ST4*12) on the honeycomb holder.Remove the honeycomb holder.Remove the honeycomb cooling media from the right side panel.2.1.5 Left Side Panel.Use screwdriver to remove 4 galvanized screws with plate head (ST4*12) on the left side panel.Remove the left side panel.2.1.6 Left Side Honeycomb Cooling Media.Use a screwdriver to remove 4 galvanized screws with plate head(ST4*12) on the honeycomb holder.Remove the honeycomb holder.Remove the honeycomb cooling media from the left side panel.2.2 How To Change SwitchRemove the back panel and follow the procedure 2.1.1Remove the right-side panel and follow procedure 2.1.32.2.1. Switch BoxUse a screw driver to remove 4 galvanized screws with plate head(ST3*12) on the switch box.Remove switch box.2.2.2. Switch(cool/speed/swing)Use screw driver to remove 2 galvanized screws (ST3X10) on each switch of the control panel(cool/speed/swing).Cool switchSpeed switchSwing switch2.2.3. Wiring Color ConnectionWiring color connection refers to part 4.2 Wiring Color Description.2.3 How To Change Water PumpRemove the back panel and follow the procedure 2.1.1Remove the right-side panel and follow procedure 2.1.3Remove the switch box and follow the procedure 2.2.12.3.1 Water pump pipe and water pump clip.Remove the water pump pipe.Use a screw driver to remove 2 SS screws(ST4*12) on the water pump clip.2.3.2 Cool Switch And Wiring ConnectorUse a screwdriver to remove 2 galvanized screws (ST3X10) on the cool switch of the control panel.Remove the brown wire on the cool switch.Remove the wiring cap (below picture shown) to get the water pump.Note: connection is between the water pump and the N wire of the power cord.2.3.3 Water Pump Wiring ConnectionThe water pump wiring connection refers to part 4.2 Wiring Color Description.2.4 How To Change Fan MotorRemove the back panel and follow the procedure 2.1.1Remove the right-side panel and follow procedure 2.1.3Remove the switch box and follow the procedure 2.2.12.4.1 Speed Switch And Wiring Connector.Use a screwdriver to remove 2 galvanized screws (ST3X10) on the speed switch of the control panel.Remove the white/yellow/blue wire on the speed switch.Remove the wiring cap (below picture shown).Note: connection is between fan motor COM wire(black) and N wire of power cord.Remove the wiring cap (below picture shown).Note: connection is between motor and power cord earth wire.Remove the wiring cap (below picture shown).Note: connection is between the capacitor and the motor.Remove the wiring cap (below picture shown).Note: connection is between capacitor and the motor.2.4.2 Fan Blade And Fan MotorUse a screwdriver to remove 1galvanized screws (M6X14) on the fan blade.Remove the fan blade.Use a screw driver to remove 8 galvanized screws (M5X12) on fan motor to get the fanmotor.2.4.3 Main Motor Wiring ConnectionMain motor wiring connection refers to part 4.2 Wiring Color Description.2.5 How To Change Swing MotorRemove the back panel and follow the procedure 2.1.1Remove the right-side panel and follow procedure 2.1.3Remove the switch box and follow the procedure 2.2.12.5.1 Swing Switch And Wiring Connector.Use a screwdriver to remove 2 galvanized screws (ST3X10) on the swing switch of the control panel.Remove the pink wire on the swing switch.Remove the wiring cap (below picture shown).Note: connection is between swing motor and N wire of power cord.2.5.2 Swing Motor And Swing Motor Wheel.Use a screwdriver to remove 2 galvanized screws(ST4X12) on the swing motor.Remove the swing motor.Use screwdriver to remove 1 galvanized screw(ST3*8) on the swing motor wheel.Remove the swing motor wheel.Get the swing motor.2.5.3 Swing Motor Wiring ConnectionSwing motor wiring connection refers to part 4.2 Wiring Color Description.TROUBLESHOOTING GUIDE3.1 Outside DimensionsWidth: 700 mm (27.56’’)Depth: 466 mm (18.35’’)Height: 1017 mm (40.0’’)3.2 Cooling SystemHoneywell Evaporative Air Coolers are built to maximize energy efficiency and keep costs low. Warm air is drawn into the cooler through a dust and odor-reducing carbon filter and enters the Honeycomb Cooling Media. Water pumped from the tank pours over the honeycomb media. As the warm air passes through the media, the water absorbs the heat, naturally cooling and humidifying the air. A fan propels the cooled air out into the room. This no-compressor system cools naturally, efficiently and inexpensively.Troubleshooting GuideThe following troubleshooting guide is intended to address the most common symptoms and is by no means exhaustive. If symptoms persist, call a qualified service provider. Only a certified electrician should complete any electrical work. Unplug and disconnect the appliance from the power source before attempting to troubleshoot any of the following symptoms.ProblemPossible CauseSolutionNo discharge of airThe cord is not plugged in.Make sure the power cord is plugged in and the supply switch is on.The power is not on.Turn the unit ON.Humidity output minimal to noneWater is below the minimum water level in the tank.Turn off the unit.Follow the instructions to fill the water tank with clean water.The water pump is damaged.Replace the water pump according to procedure 2.3.Watercolor yellowish at initial useColor fasts from honeycomb filter.This is natural. After several uses, the watercolor will be clean.Abnormal noise inside the productThe noise of the water pump when water is not up-to-min water level. the product again.Turn off the product. Add water, and then turn onMotor or blade problem.Turn off and unplug the product or change the main motor according to procedure 2.4.Musty or unpleasant odorWhen the Cooler is new.When the unit is used for the first time, the Honeycomb Cooling Media will have an odor, which will dissipate within a few hours of initial use.Stale or stagnant water in the water tank.Drain, flush and clean the water tankMedia mildewed or clogged.Replace media according to the procedure 2.1.Not coolingPump is not turned on.Check the water level and turn on the pump.Low or no water.Damaged water pump.Replace the water pump according to procedure 2.3.SCHEMATIC DIAGRAM4.1 Wiring Diagram4.2 Wiring Color DescriptionPower Cord:(1) Brown(2) Blue(3) Green + YellowLiveNeutralEarth (Ground)to speed switch(4)motor COM(black)to motor earthMain Motor:(1) White(2) Yellow(3) Blue(4) Black(5) Red(6) Brown(7) Green + YellowHigh speedMedium speedLow speedNeutralEarth (Ground)to speed switch(1)to speed switch(2)to speed switch(3)to N wire of power cordto the capacitor by end-closed connectorto the capacitor by end-closed connectorto power cord earthWater Pump:(1) Brown(2) Blueto pump control switch(1)to N wire of power cordSwing Motor:(1) Pink(2) Pinkto swing control switch(1)to N wire of power cordEXPLODED VIEWREPLACEMENT PARTS LISTSrPART NAMEQUANTITY1Up/Down swing knob22Swing knob pressboard13Horizontal louver 124Horizontal louver 225Horizontal louver 326Horizontal louver 427Horizontal louver 528Horizontal louver middle link19Horizontal louver press board A210Horizontal louver link A211Horizontal louver press board B212Horizontal louver link B213Swing/Cool knob214Speed knob115Control plane116Swing/Cool switch217Speed switch118Air outlet panel119Front panel120Rubber washer2021Vertical louver base422Short vertical louver223Long vertical louver224Switch box125Side panel226Side honeycomb pad227Side water distributor cover228Side water distributor229Side honeycomb pad holder430Swing motor131Swing motor wheel132Vertical louver drive133Base of fan motor frame234Fan motor frame435Fan blade assembly136Fan motor137Top cover138Water fill door139Four directions pipe140Back water distributor tube141Left/Right water distributor tube242Water fill door link243Back water distributor144Back water distributor cover145Left stand pillar146Back honeycomb pad holder247Back honeycomb pad148Back panel149Right stand pillar150Motor capacitor151Suction pipe152Water fill pipe153Float cap154Float holder155Float tube156Water level board157Vertical louver link158Water tank159Water pump160Water pump clip161Continuous water supply connection162Castor263Castor with brake264Water drainage plug165Silica gel ring1CONFIDENTIALWebsite: http://www.honeywellaircoolers.comDownloaded from www.Manualslib.com manuals search engineDocuments / ResourcesHoneywell CO60PM Evaporative Air Cooler [pdf] Instruction ManualCO60PM, Evaporative Air Cooler, CO60PM Evaporative Air Cooler, Air Cooler, CoolerReferencesUser ManualRelated PostsEvaporative Air Cooler With Humidifier SF-615H User ManualEvaporative Air Cooler With Humidifier SF-615H User Manual - Optimized PDF Evaporative Air Cooler With Humidifier SF-615H User…Honeywell TC10PM Series Portable Evaporative Air Cooler User ManualHoneywell TC10PM Series Portable Evaporative Air Cooler Portable Evaporative Air Cooler User Manual Read and save these instructions…kogan KAPMNCL4BA Mini Evaporative Air Cooler User Guidekogan KAPMNCL4BA Mini Evaporative Air Cooler SAFETY & WARNINGS Ensure to read this user guide prior to first…COOLER MASTER Hyper T200 CPU Air Cooler User ManualCOOLER MASTER Hyper T200 CPU Air Cooler IN THE BOX INTEL & AMD AMD AM4/AM3+/AM3/AM2+/AM2/FM2+/FM2/FM1 Intel - LGA1151/1150/1155/1156/1366/775…
WARNING – Before the following disassembly, POWER is set to OFF and disconnected the power cord.2.1 How To Change Honeycomb Cooling Media(3 sides)2.1.1 Back Panel.Use a screwdriver to remove 5 galvanized screws with plate head (ST4*12) on the back panel.Remove the back panel.2.1.2 Back Honeycomb Cooling Media.Use screwdriver to remove 4 galvanized screws with plate head(ST4*12) on the honeycomb holder.Remove the honeycomb holder.Remove the honeycomb cooling media from the back panel.2.1.3 Right Side Panel.Use a screwdriver to remove 4 galvanized screws with plate head (ST4*12) on the right-side panel.Remove the right side panel.2.1.4 Right Side Honeycomb Cooling Media.Use screwdriver to remove 4 galvanized screws with plate head(ST4*12) on the honeycomb holder.Remove the honeycomb holder.Remove the honeycomb cooling media from the right side panel.2.1.5 Left Side Panel.Use screwdriver to remove 4 galvanized screws with plate head (ST4*12) on the left side panel.Remove the left side panel.2.1.6 Left Side Honeycomb Cooling Media.Use a screwdriver to remove 4 galvanized screws with plate head(ST4*12) on the honeycomb holder.Remove the honeycomb holder.Remove the honeycomb cooling media from the left side panel.2.2 How To Change SwitchRemove the back panel and follow the procedure 2.1.1Remove the right-side panel and follow procedure 2.1.32.2.1. Switch BoxUse a screw driver to remove 4 galvanized screws with plate head(ST3*12) on the switch box.Remove switch box.2.2.2. Switch(cool/speed/swing)Use screw driver to remove 2 galvanized screws (ST3X10) on each switch of the control panel(cool/speed/swing).Cool switchSpeed switchSwing switch2.2.3. Wiring Color ConnectionWiring color connection refers to part 4.2 Wiring Color Description.2.3 How To Change Water PumpRemove the back panel and follow the procedure 2.1.1Remove the right-side panel and follow procedure 2.1.3Remove the switch box and follow the procedure 2.2.12.3.1 Water pump pipe and water pump clip.Remove the water pump pipe.Use a screw driver to remove 2 SS screws(ST4*12) on the water pump clip.2.3.2 Cool Switch And Wiring ConnectorUse a screwdriver to remove 2 galvanized screws (ST3X10) on the cool switch of the control panel.Remove the brown wire on the cool switch.Remove the wiring cap (below picture shown) to get the water pump.Note: connection is between the water pump and the N wire of the power cord.2.3.3 Water Pump Wiring ConnectionThe water pump wiring connection refers to part 4.2 Wiring Color Description.2.4 How To Change Fan MotorRemove the back panel and follow the procedure 2.1.1Remove the right-side panel and follow procedure 2.1.3Remove the switch box and follow the procedure 2.2.12.4.1 Speed Switch And Wiring Connector.Use a screwdriver to remove 2 galvanized screws (ST3X10) on the speed switch of the control panel.Remove the white/yellow/blue wire on the speed switch.Remove the wiring cap (below picture shown).Note: connection is between fan motor COM wire(black) and N wire of power cord.Remove the wiring cap (below picture shown).Note: connection is between motor and power cord earth wire.Remove the wiring cap (below picture shown).Note: connection is between the capacitor and the motor.Remove the wiring cap (below picture shown).Note: connection is between capacitor and the motor.2.4.2 Fan Blade And Fan MotorUse a screwdriver to remove 1galvanized screws (M6X14) on the fan blade.Remove the fan blade.Use a screw driver to remove 8 galvanized screws (M5X12) on fan motor to get the fanmotor.2.4.3 Main Motor Wiring ConnectionMain motor wiring connection refers to part 4.2 Wiring Color Description.2.5 How To Change Swing MotorRemove the back panel and follow the procedure 2.1.1Remove the right-side panel and follow procedure 2.1.3Remove the switch box and follow the procedure 2.2.12.5.1 Swing Switch And Wiring Connector.Use a screwdriver to remove 2 galvanized screws (ST3X10) on the swing switch of the control panel.Remove the pink wire on the swing switch.Remove the wiring cap (below picture shown).Note: connection is between swing motor and N wire of power cord.2.5.2 Swing Motor And Swing Motor Wheel.Use a screwdriver to remove 2 galvanized screws(ST4X12) on the swing motor.Remove the swing motor.Use screwdriver to remove 1 galvanized screw(ST3*8) on the swing motor wheel.Remove the swing motor wheel.Get the swing motor.2.5.3 Swing Motor Wiring ConnectionSwing motor wiring connection refers to part 4.2 Wiring Color Description.TROUBLESHOOTING GUIDE3.1 Outside DimensionsWidth: 700 mm (27.56’’)Depth: 466 mm (18.35’’)Height: 1017 mm (40.0’’)3.2 Cooling SystemHoneywell Evaporative Air Coolers are built to maximize energy efficiency and keep costs low. Warm air is drawn into the cooler through a dust and odor-reducing carbon filter and enters the Honeycomb Cooling Media. Water pumped from the tank pours over the honeycomb media. As the warm air passes through the media, the water absorbs the heat, naturally cooling and humidifying the air. A fan propels the cooled air out into the room. This no-compressor system cools naturally, efficiently and inexpensively.Troubleshooting GuideThe following troubleshooting guide is intended to address the most common symptoms and is by no means exhaustive. If symptoms persist, call a qualified service provider. Only a certified electrician should complete any electrical work. Unplug and disconnect the appliance from the power source before attempting to troubleshoot any of the following symptoms.ProblemPossible CauseSolutionNo discharge of airThe cord is not plugged in.Make sure the power cord is plugged in and the supply switch is on.The power is not on.Turn the unit ON.Humidity output minimal to noneWater is below the minimum water level in the tank.Turn off the unit.Follow the instructions to fill the water tank with clean water.The water pump is damaged.Replace the water pump according to procedure 2.3.Watercolor yellowish at initial useColor fasts from honeycomb filter.This is natural. After several uses, the watercolor will be clean.Abnormal noise inside the productThe noise of the water pump when water is not up-to-min water level. the product again.Turn off the product. Add water, and then turn onMotor or blade problem.Turn off and unplug the product or change the main motor according to procedure 2.4.Musty or unpleasant odorWhen the Cooler is new.When the unit is used for the first time, the Honeycomb Cooling Media will have an odor, which will dissipate within a few hours of initial use.Stale or stagnant water in the water tank.Drain, flush and clean the water tankMedia mildewed or clogged.Replace media according to the procedure 2.1.Not coolingPump is not turned on.Check the water level and turn on the pump.Low or no water.Damaged water pump.Replace the water pump according to procedure 2.3.SCHEMATIC DIAGRAM4.1 Wiring Diagram4.2 Wiring Color DescriptionPower Cord:(1) Brown(2) Blue(3) Green + YellowLiveNeutralEarth (Ground)to speed switch(4)motor COM(black)to motor earthMain Motor:(1) White(2) Yellow(3) Blue(4) Black(5) Red(6) Brown(7) Green + YellowHigh speedMedium speedLow speedNeutralEarth (Ground)to speed switch(1)to speed switch(2)to speed switch(3)to N wire of power cordto the capacitor by end-closed connectorto the capacitor by end-closed connectorto power cord earthWater Pump:(1) Brown(2) Blueto pump control switch(1)to N wire of power cordSwing Motor:(1) Pink(2) Pinkto swing control switch(1)to N wire of power cordEXPLODED VIEWREPLACEMENT PARTS LISTSrPART NAMEQUANTITY1Up/Down swing knob22Swing knob pressboard13Horizontal louver 124Horizontal louver 225Horizontal louver 326Horizontal louver 427Horizontal louver 528Horizontal louver middle link19Horizontal louver press board A210Horizontal louver link A211Horizontal louver press board B212Horizontal louver link B213Swing/Cool knob214Speed knob115Control plane116Swing/Cool switch217Speed switch118Air outlet panel119Front panel120Rubber washer2021Vertical louver base422Short vertical louver223Long vertical louver224Switch box125Side panel226Side honeycomb pad227Side water distributor cover228Side water distributor229Side honeycomb pad holder430Swing motor131Swing motor wheel132Vertical louver drive133Base of fan motor frame234Fan motor frame435Fan blade assembly136Fan motor137Top cover138Water fill door139Four directions pipe140Back water distributor tube141Left/Right water distributor tube242Water fill door link243Back water distributor144Back water distributor cover145Left stand pillar146Back honeycomb pad holder247Back honeycomb pad148Back panel149Right stand pillar150Motor capacitor151Suction pipe152Water fill pipe153Float cap154Float holder155Float tube156Water level board157Vertical louver link158Water tank159Water pump160Water pump clip161Continuous water supply connection162Castor263Castor with brake264Water drainage plug165Silica gel ring1CONFIDENTIALWebsite: http://www.honeywellaircoolers.comDownloaded from www.Manualslib.com manuals search engineDocuments / ResourcesHoneywell CO60PM Evaporative Air Cooler [pdf] Instruction ManualCO60PM, Evaporative Air Cooler, CO60PM Evaporative Air Cooler, Air Cooler, CoolerReferencesUser ManualRelated PostsEvaporative Air Cooler With Humidifier SF-615H User ManualEvaporative Air Cooler With Humidifier SF-615H User Manual - Optimized PDF Evaporative Air Cooler With Humidifier SF-615H User…Honeywell TC10PM Series Portable Evaporative Air Cooler User ManualHoneywell TC10PM Series Portable Evaporative Air Cooler Portable Evaporative Air Cooler User Manual Read and save these instructions…kogan KAPMNCL4BA Mini Evaporative Air Cooler User Guidekogan KAPMNCL4BA Mini Evaporative Air Cooler SAFETY & WARNINGS Ensure to read this user guide prior to first…COOLER MASTER Hyper T200 CPU Air Cooler User ManualCOOLER MASTER Hyper T200 CPU Air Cooler IN THE BOX INTEL & AMD AMD AM4/AM3+/AM3/AM2+/AM2/FM2+/FM2/FM1 Intel - LGA1151/1150/1155/1156/1366/775…


 Neil
Neil 
 Neil
Neil